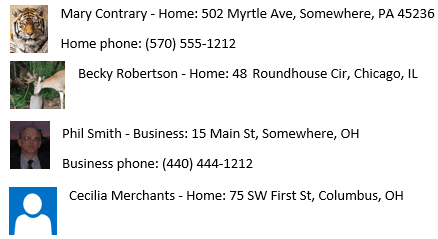
This code sample creates a Word document containing the selected contact's name, address, phone number and contact photo. This sample uses a new, blank Word document, however, you could use a Word template with either bookmarks or merge fields for the contact data.
In my code sample:
- If the contact has a home address or phone, that is used in the printout, else the business address or phone is used.
- If a photo is not assigned to the contact, it uses a placeholder image.
- The contact photos are scaled to 36 pixels high. If the image is more then 134 pixels wide after the height is scaled, the image is reduced to 100 pixels wide.
- The document is hidden until the macro finishes. If you want to watch the macro create the entries, put oWord.Visible = True right after oWord.Documents(1).Activate.
To use, paste the code into the VBA editor and create a folder under Documents called Logos. Rename an image placeholder.jpg, to use for contacts who don't have a photo and put it in the logos folder. Select the contacts you want to print (use Ctrl+A to select all) then run the macro.
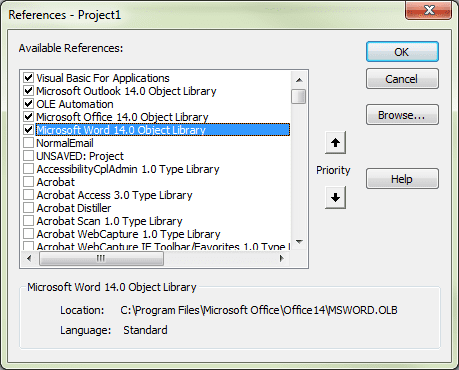
This is a Outlook macro. You need to set a reference to the Word object library in the VBA editor's Tools, References menu.
 Option Explicit

Public Sub MergeContactPhoto()
    Dim Session As Outlook.NameSpace
    Dim currentExplorer As Explorer
    Dim Selection As Selection
    Dim oContact As ContactItem
    Dim attach As Attachment
    Dim obj As Object
    Dim strFilename As String
    Dim filename As String
    Dim imagePath As String
    Dim oWord As Word.Application

    Dim strAddress As String
    Dim strNumber As String
    ' Uses current user's profile
    Dim enviro As String
    enviro = CStr(Environ("USERPROFILE"))
    ' Get Word
    On Error Resume Next
  Set oWord = GetObject(, "Word.Application")
        If oWord Is Nothing Then
           Set oWord = CreateObject("Word.Application")
       End If

' open a new word doc
oWord.Documents.Add
oWord.Documents(1).Activate

    Set currentExplorer = Application.ActiveExplorer
    Set Selection = currentExplorer.Selection

  If Not TypeOf Selection.Item(1) Is Outlook.ContactItem Then
  MsgBox "You need to select Contacts first!"
  Exit Sub
  End If

For Each obj In Selection

'Test for ContactGroups
 If TypeName(obj) = "ContactItem" Then
 Set oContact = obj

' Save the contact photo
strFilename = ""
For Each attach In oContact.Attachments
    strFilename = strFilename & ";" & attach.filename
Next

If InStr(strFilename, "ContactPicture.jpg") Then
   For Each attach In oContact.Attachments
        If attach.filename = "ContactPicture.jpg" Then
            filename = oContact.FirstName & oContact.LastName & ".jpg"
            imagePath = enviro & "\Documents\Logos\" & filename
            attach.SaveAsFile imagePath
            Exit For
        End If
    Next
Else
    imagePath = enviro & "\Documents\Logos\placeholder.png"
End If

If Not oContact.HomeAddress = "" Then
strAddress = " - Home: " & oContact.HomeAddressStreet & ", " & oContact.HomeAddressCity & ", " & oContact.HomeAddressState & vbCrLf
ElseIf Not oContact.BusinessAddress = "" Then
strAddress = " - Business: " & oContact.BusinessAddressStreet & ", " & oContact.BusinessAddressCity & ", " & oContact.BusinessAddressState & vbCrLf
Else
strAddress = vbCrLf
End If

If Not oContact.HomeTelephoneNumber = "" Then
strNumber = "Home phone: " & oContact.HomeTelephoneNumber
ElseIf Not oContact.BusinessTelephoneNumber = "" Then
strNumber = "Business Phone: " & oContact.BusinessTelephoneNumber
Else
strNumber = vbCrLf
End If


Dim shp As Word.Shapes
Dim logo As Word.Shape
Dim rng As Word.Range
Set rng = oWord.Selection.Range
oWord.Selection.TypeText Text:=oContact.FullName & strAddress
oWord.Selection.TypeText Text:=strNumber
oWord.Selection.TypeParagraph

Set shp = oWord.Documents(1).Shapes

' add the new logo
 Set logo = shp.AddPicture(filename:=imagePath, LinkToFile:=False, _
        SaveWithDocument:=True, Anchor:=rng, Left:=3, Top:=-3)

 ' use same wrap format as placeholder
 logo.WrapFormat.Type = wdWrapSquare

' height and width are in pixels
' 1 inch = 72 pixels

If logo.Height > 40 Then
 With logo
  .LockAspectRatio = True
  .Height = 36
  .Apply
End With
End If

If logo.Width > 134 Then
 With logo
  .LockAspectRatio = True
  .Width = 100
  .Apply
End With
End If

End If

    Next
   oWord.Visible = True

' oWord.Documents(1).PrintOut PrintToFile:=True

    Set oWord = Nothing
    Set obj = Nothing
    Set Selection = Nothing
    Set currentExplorer = Nothing
    Set Session = Nothing
End Sub
How to use the Macro
First: You will need macro security set to low during testing.
To check your macro security in Outlook 2010 and newer, go to File, Options, Trust Center and open Trust Center Settings, and change the Macro Settings. In Outlook 2007 and older, it’s at Tools, Macro Security. If Outlook tells you it needs to be restarted, close and reopen Outlook. Note: after you test the macro and see that it works, you can either leave macro security set to low or sign the macro.
Now open the VBA Editor by pressing Alt+F11 on your keyboard.
To put the code in a module:
- Right click on Project1 and choose Insert > Module
- Copy and paste the macro into the new module.
Set a reference to other Object Libraries
If you receive a "User-defined type not defined" error, you need to set a reference to another object library. For this macro, it would be Word's object library.
- Go to Tools, References menu.
- Locate the object library in the list and add a check mark to it.

More information as well as screenshots are at How to use the VBA Editor.
Steve Garbett says
HI there - could you tell me where i can find the word object model?
Many thanks
Diane Poremsky says
It's listed in Tool, References under Microsoft Word Object Library.
John Hendershot says
First time through running this and I get "Compile error: user-defined type not defined" for the line which reads, "Dim oWord As Word.Application". (I have been looking for this capability for years - so close, so far). I know practically nothing about macros; left off programming back at Fortran IV. Can fix
Diane Poremsky says
You need to add the Word object model in the VBA editor's Tools, References to avoid that error message.
John Hendershot says
Will try it - thanks,
Bills says
Dear Diane !!
I am getting same error "user-defined type not defined" in the line
"Dim Session As Outlook.NameSpace"
and I have already checked
"Outlook Addinlib"
"Outlook ChangeNotifierAddin 1.0 Type Library"
in "References" of Tool menu
Also, I have outlook already configured in my laptop with a working outlook email id.
Kindly guide the solution.
Diane Poremsky says
Are you using the macro in outlook or word? it's an outlook macro. Also, those two libraries you checked should be unchecked; one is the itunes sync addin, not sure about the other one, but they don't have any effect on this.
Bills says
And I am using Ms Word 2016
Diane Poremsky says
While the macro could be tweaked to work in word, its an outlook macro.