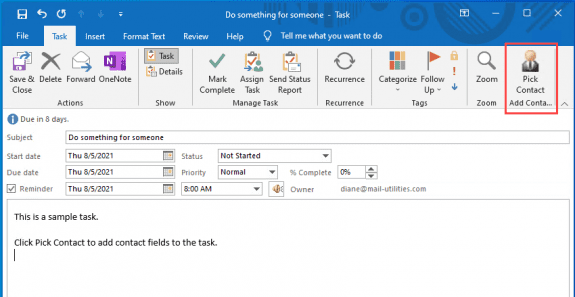
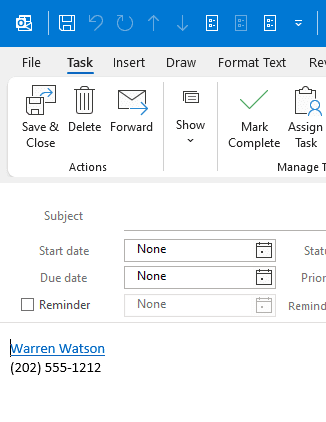
If you are creating a task and want to include contact information you have two options within Outlook:
Enable the Contact field on the task form or copy and paste the information from the contact.
If you frequently add the same contact information to your tasks, you can use a macro to get the contact fields you need and add a hyperlink back to the contact.
You can use these macros to add information from more than one contact to a task.
These macros would work with calendar items as well, just update the form type.
Use Address Book to pick the contact
With this macro, you pick a contact from the Address Book and the contact information is added to a task body. The macro is designed to work from an open task form or you can run the macro, select the contact and add it to a new task form.
This macro will work with multiple contact folders, provided the contact folders are enabled as Outlook address books. Note that if you have two contacts with the same email address it will return the first match it finds.
This will not work with shared contacts folders (use Select Contact from any Contact folder instead).
- Set up the macro and add a macro button to your ribbon or the Quick Access Toolbar, in both the main Outlook window and an open Tasks form as it will check to see if the current item is a task and add the contact information to it. If the current item is not a task, it will create a new task with the contact information.
- Click the button to run the macro.

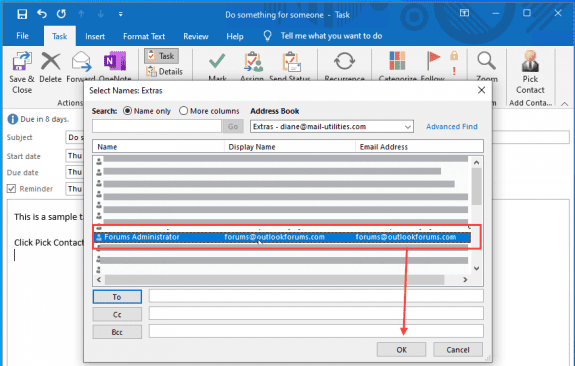
- Select the contact from your address book. Select the Contact then click OK; no need to click To first.

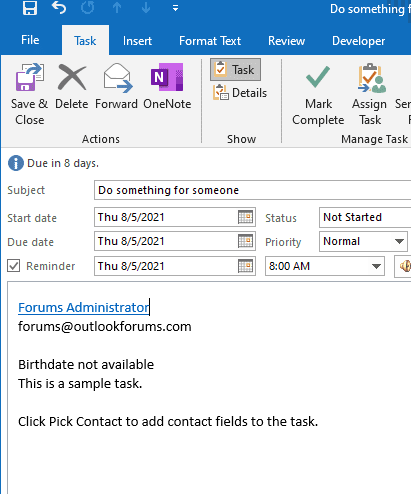
- The pre-defined contact fields are added at the top of the task body.

If you need to add another contact's information to the task, click the button again.
Sub AddContactsToTaskAB()
Dim Ns As Outlook.NameSpace
Dim olApp As Outlook.Application
Dim oDialog As SelectNamesDialog

Dim olRecip As Recipient
Dim olAddrEntry As AddressEntry
Dim objContact As ContactItem
Dim objTask As TaskItem

Dim objInsp As Inspector
Dim objDoc As Word.Document
Dim objSel As Word.Selection

Dim oEmail As String
Dim oFName As String
Dim oBizPhone As String
Dim oBday As String
Dim strLink, strLinkText As String

  Set Ns = Application.GetNamespace("MAPI")
  Set olApp = GetObject(, "Outlook.Application")

  Set oDialog = Ns.GetSelectNamesDialog

  With oDialog
    .AllowMultipleSelection = False
    .ShowOnlyInitialAddressList = False
    If .Display Then
      oEmail = oDialog.Recipients.Item(1).Address
      Debug.Print "oEmail: " & oEmail


    Set olRecip = Ns.CreateRecipient(oEmail)
    olRecip.Resolve
    Set olAddrEntry = olRecip.AddressEntry
    Set objContact = olAddrEntry.GetContact
      If Not (objContact Is Nothing) Then
        'this is a contact
        'olCont is ContactItem object
        Debug.Print objContact.FullName
      End If
    End If
  End With


 With objContact
    oFName = .FullName
    oBday = .Birthday
    oBizPhone = .BusinessTelephoneNumber
    strID = .EntryID
 End With

 If oBday = "1/1/4501" Then oBday = "Birthdate not available"

strLink = "outlook:" & strID

If olApp.ActiveInspector.CurrentItem.MessageClass = "IPM.Task" Then
' use already open task
Set objTask = olApp.ActiveInspector.CurrentItem
Else
' open new task
Set objTask = olApp.CreateItem(olTaskItem)
End If

Set objInsp = objTask.GetInspector
Set objDoc = objInsp.WordEditor
Set objSel = objDoc.Windows(1).Selection

With objTask
' to insert at insertion point, remove this line
   objDoc.Bookmarks("\StartOfDoc").Select

    objSel.Range.InsertParagraphBefore
' add link to contact
    objDoc.Hyperlinks.Add objSel.Range, strLink, "", "", oFName, ""
    objSel.Range.InsertBefore oEmail & vbCrLf & oBizPhone & vbCrLf & oBday
    objSel.Range.InsertParagraphBefore
' add a copy of the contact - link is better
    '.Attachments.Add objContact
    .Save
    .Display
End With

Set objTask = Nothing
Set objContact = Nothing
Set oDialog = Nothing
Set Ns = Nothing
Set olApp = Nothing
End Sub
Select Contact from any Contact folder
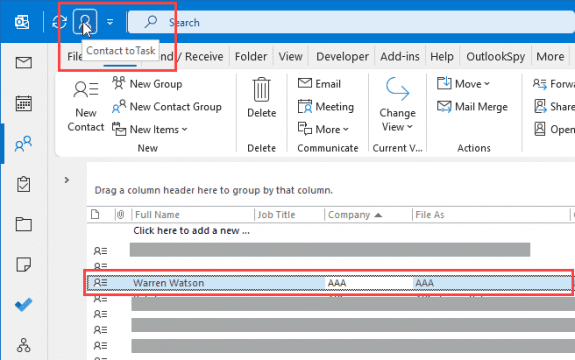
This version of the macro works with any contacts folder, even if it's not enabled as an Outlook Address Book. Add the macro to the Contact ribbon or Quick Access Toolbar. Select the contact from a contacts folder, run the macro to add a link to the contact to the task body.
As with the previous macro, it will work with an open task form or creates a new task if the last opened item is not a task. To add another contact to the same task, select another contact and run the macro.
' link contact to task
Sub AddContactLinkToTask()
Dim olApp As Outlook.Application
  Dim objTask As Outlook.TaskItem
  Dim objContact As Outlook.ContactItem
  Dim oEmail As String
  Dim oFName As String
  Dim oBizPhone As String

  Dim strID As String
  Dim strLink As String
  Dim objInsp As Inspector
  Dim objDoc As Word.Document
  Dim objSel As Word.Selection

Set olApp = GetObject(, "Outlook.Application")
Set objContact = Application.ActiveExplorer.Selection.Item(1)

With objContact
    oFName = .FullName
    oBizPhone = .BusinessTelephoneNumber
    strID = .EntryID
    strLink = "outlook:" & strID
End With

If olApp.ActiveInspector.CurrentItem.MessageClass = "IPM.Task" Then
' use already open task
Set objTask = olApp.ActiveInspector.CurrentItem
Else
' open new task
Set objTask = olApp.CreateItem(olTaskItem)
End If

Set objInsp = objTask.GetInspector
Set objDoc = objInsp.WordEditor
Set objSel = objDoc.Windows(1).Selection

With objTask
   objDoc.Bookmarks("\StartOfDoc").Select
   objSel.Range.InsertParagraphBefore
   objDoc.Hyperlinks.Add objSel.Range, strLink, "", "", oFName, ""
  objSel.Range.InsertAfter oEmail & vbCrLf & oBizPhone & vbCrLf

    '.Attachments.Add objContact
    .Save
    .Display
End With

    Set objTask = Nothing
    Set objContact = Nothing
End Sub
Add Contact information to Appointment
To convert the macro to work with appointments, you need to change task to appointment in the DIM statement and for the message class. You can leave the object name (objTask) but changing it to objAppt might be less confusing.
As with the task macro, run the macro and pick the contact entry from the Outlook Address Book.
Dim Ns As Outlook.NameSpace
Dim olApp As Outlook.Application
Dim oDialog As SelectNamesDialog

Dim olRecip As Recipient
Dim olAddrEntry As AddressEntry
Dim objContact As ContactItem
Dim objAppt As AppointmentItem

Dim objInsp As Inspector
Dim objDoc As Word.Document
Dim objSel As Word.Selection

Dim oEmail As String
Dim oFName As String
Dim oBizPhone As String
Dim oBday As String
Dim strLink, strLinkText As String

  Set Ns = Application.GetNamespace("MAPI")
  Set olApp = GetObject(, "Outlook.Application")

  Set oDialog = Ns.GetSelectNamesDialog

  With oDialog
    .AllowMultipleSelection = False
    .ShowOnlyInitialAddressList = False
    If .Display Then
      oEmail = oDialog.Recipients.Item(1).Address
      Debug.Print "oEmail: " & oEmail


    Set olRecip = Ns.CreateRecipient(oEmail)
    olRecip.Resolve
    Set olAddrEntry = olRecip.AddressEntry
    Set objContact = olAddrEntry.GetContact
      If Not (objContact Is Nothing) Then
        'this is a contact
        'olCont is ContactItem object
        Debug.Print objContact.FullName
      End If
    End If
  End With


 With objContact
    oFName = .FullName
    oBday = .Birthday
    oBizPhone = .BusinessTelephoneNumber
    strID = .EntryID
 End With

 If oBday = "1/1/4501" Then oBday = "Birthdate not available"

strLink = "outlook:" & strID

If olApp.ActiveInspector.CurrentItem.MessageClass = "IPM.Appointment" Then
' use already open task
Set objAppt = olApp.ActiveInspector.CurrentItem
Else
' open new task
Set objAppt = olApp.CreateItem(olAppointmentItem)
End If

Set objInsp = objAppt.GetInspector
Set objDoc = objInsp.WordEditor
Set objSel = objDoc.Windows(1).Selection

With objAppt
' remove this line to insert at cursor position
   objDoc.Bookmarks("\StartOfDoc").Select

    objSel.Range.InsertParagraphBefore
' add link to contact
    objDoc.Hyperlinks.Add objSel.Range, strLink, "", "", oFName, ""
    objSel.Range.InsertBefore oEmail & vbCrLf & oBizPhone & vbCrLf & oBday
    objSel.Range.InsertParagraphBefore
' add a copy of the contact - link is better
    '.Attachments.Add objContact
   ' .Save
    .Display
End With

Set objAppt = Nothing
Set objContact = Nothing
Set oDialog = Nothing
Set Ns = Nothing
Set olApp = Nothing
End Sub
Available Contact fields
| Contact Field Name | Equivalent Outlook object model property |
|---|---|
| Account | Account |
| Anniversary | Anniversary |
| Assistant's Name | AssistantName |
| Assistant's Phone | AssistantTelephoneNumber |
| Attachment | Attachments |
| Billing Information | BillingInformation |
| Birthday | Birthday |
| Business Address | BusinessAddress |
| Business Address City | BusinessAddressCity |
| Business Address Country | BusinessAddressCountry |
| Business Address PO Box | BusinessAddressPostOfficeBox |
| Business Address Postal Code | BusinessAddressPostalCode |
| Business Address State | BusinessAddressState |
| Business Address Street | BusinessAddressStreet |
| Business Fax | BusinessFaxNumber |
| Business Home Page | BusinessHomePage |
| Business Phone | BusinessTelephoneNumber |
| Business Phone 2 | Business2TelephoneNumber |
| Callback | CallbackTelephoneNumber |
| Car Phone | CarTelephoneNumber |
| Categories | Categories |
| Children | Children |
| City | HomeAddressCity |
| Company | CompanyName |
| Company Main Phone | CompanyMainTelephoneNumber |
| Computer Network Name | ComputerNetworkName |
| Country | HomeAddressCountry |
| Created | CreationTime |
| Customer ID | CustomerID |
| Department | Department |
| Email1Address | |
| Email 2 | Email2Address |
| Email 3 | Email3Address |
| File As | FileAs |
| First Name | FirstName |
| Flag Status | FlagStatus |
| Follow-up Flag | FlagRequest |
| FTP Site | FTPSite |
| Full Name | FullName |
| Gender | Gender |
| Government ID Number | GovernmentIDNumber |
| Hobbies | Hobby |
| Home Address | HomeAddress |
| Home Address City | HomeAddressCity |
| Home Address Country | HomeAddressCountry |
| Home Address PO Box | HomeAddressPostOfficeBox |
| Home Address Postal Code | HomeAddressPostalCode |
| Home Address State | HomeAddressState |
| Home Address Street | HomeAddressStreet |
| Home Fax | HomeFaxNumber |
| Home Phone | HomeTelephoneNumber |
| Home Phone 2 | Home2TelephoneNumber |
| In Folder | Parent |
| Initials | Initials |
| Internet Free Busy Address | InternetFreeBusyAddress |
| ISDN | ISDNNumber |
| Job Title | JobTitle |
| Language | Language |
| Last Name | LastName |
| Location | Location |
| Mailing Address | MailingAddress |
| Manager's Name | ManagerName |
| Message Class | MessageClass |
| Middle Name | MiddleName |
| Mileage | Mileage |
| Mobile Phone | MobileTelephoneNumber |
| Modified | LastModificationTime |
| Nickname | NickName |
| Notes | Body |
| Office Location | OfficeLocation |
| Organizational ID Number | OrganizationalIDNumber |
| Other Address | OtherAddress |
| Other Address City | OtherAddressCity |
| Other Address Country | OtherAddressCountry |
| Other Address PO Box | OtherAddressPostOfficeBox |
| Other Address Postal Code | OtherAddressPostalCode |
| Other Address State | OtherAddressState |
| Other Address Street | OtherAddressStreet |
| Other Fax | OtherFaxNumber |
| Other Phone | OtherTelephoneNumber |
| Outlook Internal Version | OutlookInternalVersion |
| Outlook Version | OutlookVersion |
| Pager | PagerNumber |
| Personal Home Page | PersonalHomePage |
| PO Box | HomeAddressPostOfficeBox |
| Primary Phone | PrimaryTelephoneNumber |
| Private | Sensitivity |
| Profession | Profession |
| Radio Phone | RadioTelephoneNumber |
| Read | UnRead |
| Referred By | ReferredBy |
| Reminder | ReminderSet |
| Reminder Time | ReminderTime |
| Sensitivity | Sensitivity |
| Size | Size |
| Spouse | Spouse |
| State | HomeAddressState |
| Street Address | HomeAddressStreet |
| Subject | Subject |
| Suffix | Suffix |
| Telex | TelexNumber |
| Title | Title |
| TTY/TDD Phone | TTYTDDTelephoneNumber |
| User Field 1 | User1 |
| User Field 2 | User2 |
| User Field 3 | User3 |
| User Field 4 | User4 |
| Web Page | WebPage |
| ZIP/Postal Code | HomeAddressPostalCode |
How to use the macros on this page
First: You need to have macro security set to the lowest setting, Enable all macros during testing. The macros will not work with the top two options that disable all macros or unsigned macros. You could choose the option Notification for all macros, then accept it each time you restart Outlook, however, because it's somewhat hard to sneak macros into Outlook (unlike in Word and Excel), allowing all macros is safe, especially during the testing phase. You can sign the macro when it is finished and change the macro security to notify.
To check your macro security in Outlook 2010 and newer, go to File, Options, Trust Center and open Trust Center Settings, and change the Macro Settings. In Outlook 2007 and older, look at Tools, Macro Security.
After you test the macro and see that it works, you can either leave macro security set to low or sign the macro.
Macros that run when Outlook starts or automatically need to be in ThisOutlookSession, all other macros should be put in a module, but most will also work if placed in ThisOutlookSession. (It's generally recommended to keep only the automatic macros in ThisOutlookSession and use modules for all other macros.) The instructions are below.
The macros on this page should be placed in a module.
Open the VBA Editor by pressing Alt+F11 on your keyboard.
To put the code in a module:
- Right click on Project1 and choose Insert > Module
- Copy and paste the macro into the new module.
Set a reference to other Object Libraries
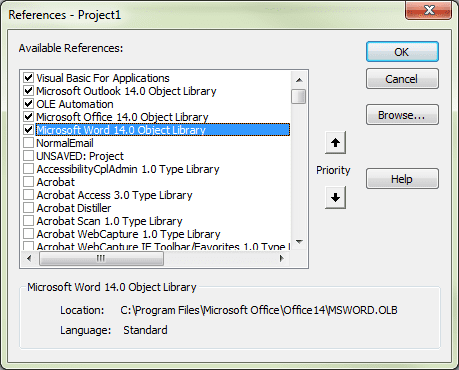
This macro requires a reference set to Microsoft Word Object Library. You will receive a "User-defined type not defined" error if the reference is not set.
- Go to Tools, References menu.
- Locate the object library in the list and add a check mark to it. (Word and Excel object libraries version numbers will match Outlook's version number.)

More information as well as screenshots are at How to use the VBA Editor
