• Outlook User
  • New Outlook app
  • Outlook.com
  • Outlook Mac
  • Outlook & iCloud
  • Developer
  • Microsoft 365 Admin
    • Common Problems
    • Microsoft 365
    • Outlook BCM
    • Utilities & Addins

Create an Organizational Forms Library

Slipstick Systems

› Exchange Server › Create an Organizational Forms Library

Last reviewed on May 1, 2019     No Comments

When you need to share custom forms with all users within your organization, you should use an Organizational Forms Library. When you publish a custom form in the Organizational Forms Library, you only have to maintain a single published form, regardless of how many folders are using the form.

Exchange 2010 Instructions | Exchange 2013 Instructions

Everyone can access these forms provided that they have the correct permissions to the library. Administrators and others with the correct permissions can publish custom forms to the Organizational Forms Library; by default, anyone can access the Organizational Forms Library.

Configuring an organizational forms library in Exchange 2007 or Exchange 2010 is very easy. Of course, in Exchange 2010 you need to have Public Folders enabled. These instructions assume that public folders are already enabled.

You can have multiple Organizational Forms Libraries, but with a big limitation: you can only have one Organizational Forms Library per language. If you are in a multi-language environment, you need to create a folder for each locale.

To completely configure the Organizational Forms Library, you need to have Exchange administrator permissions on your account or use an Exchange administrator account to configure the forms library.

You can create the Organizational Forms Library either through the public folder management console or using a cmdlet.

To use the Exchange Management Console to create the Organizational Forms Library

Use the following steps to create the Organizational Forms Library in either Exchange 2007 or Exchange 2010.

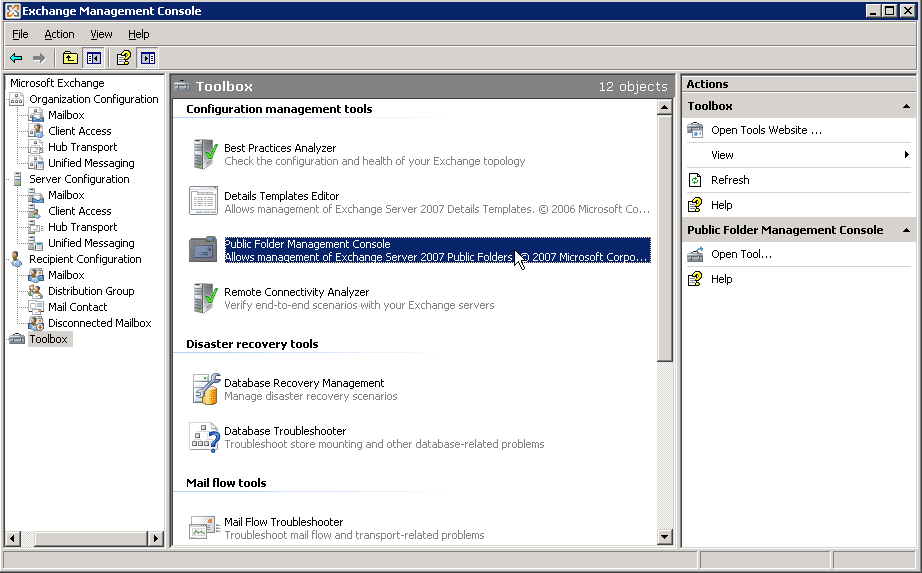
  1. Expand the Toolbox and double click on Public Folder Management Console.
    Open Public Folders toolbox
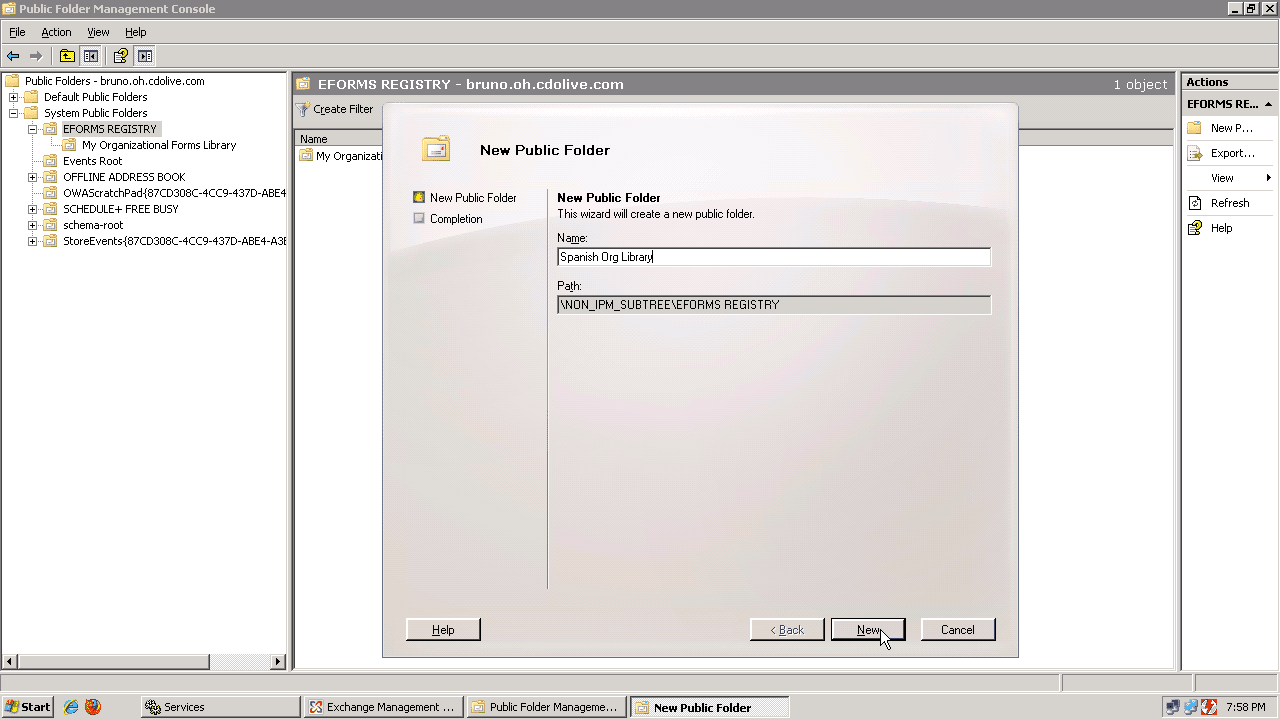
  2. Expand the Public Folder tree and System Public Folders, and then EFORMS REGISTRY.
  3. In the right pane, right-click and choose New Public Folder.
  4. Enter a name for your public folder. You can use "My Organizational Forms Library" or any name that you choose. If you're creating multi-language organizational form libraries, you may want to name each folder for the language that it's going to serve.
    Create the Org folder
  5. Click New to complete the wizard.

Now that you've created the Organizational Forms Library folder, you need to use MFCMAPI (on your desktop computer) to finish configuring it.

Note: you need to log in using a mailbox that has Exchange administrator permissions!

In MFCMAPI

  1. Double click on Public Folders, expand Public Root, NON-IPM-SUBTREE and finally, click on EFORMS REGISTRY.
  2. Select the Organizational Forms Library you need to configure then click on Property in the menu.
  3. Choose Additional Properties from the menu.
    Open the Properties menu
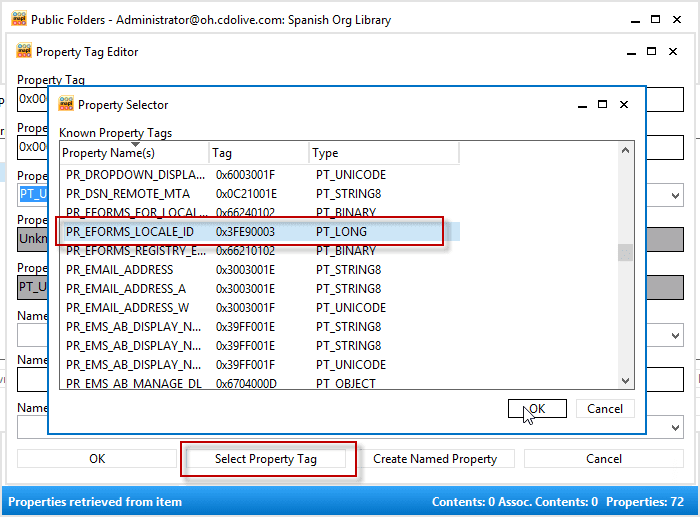
  4. Click the Add button and then click Select Property Tag button.
  5. Browse through the property tags to find PR_EFORMS_LOCALE_ID. Select it and click OK.
    Add the property tag
  6. Click OK twice more to close the dialog and return the Public Folder subtree in MFCMAPI.
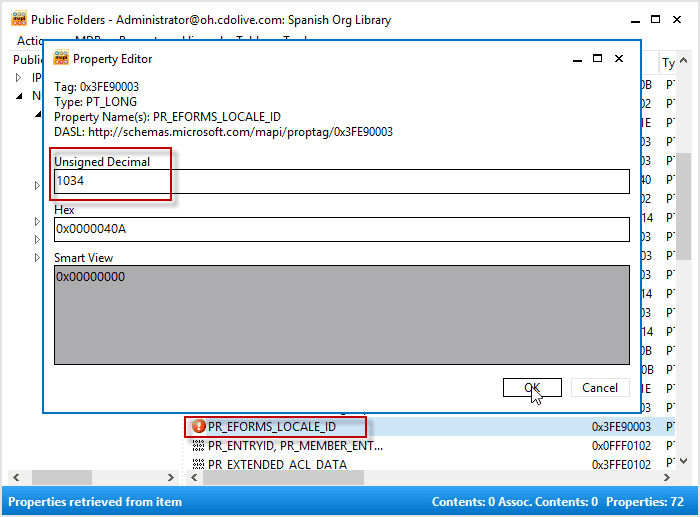
  7. In the property names list, locate PR_EFORMS_LOCALE_ID; it will have a red exclamation point icon.
  8. Double-click on PR_EFORMS_LOCALE_ID, and then type the four digit locale code in the Unsigned Decimal field.
    Change the Locale ID
  9. If using Exchange 2007, click OK and close the MFCMAPI dialog boxes.

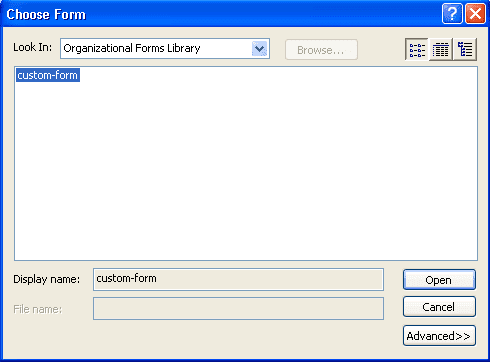
You are now ready to use the Organizational Forms Library in Exchange 2007. When users open the Choose Form dialog, the Organizational Forms Library should be listed by default.
Select Custom form

Additional Step for Exchange 2010

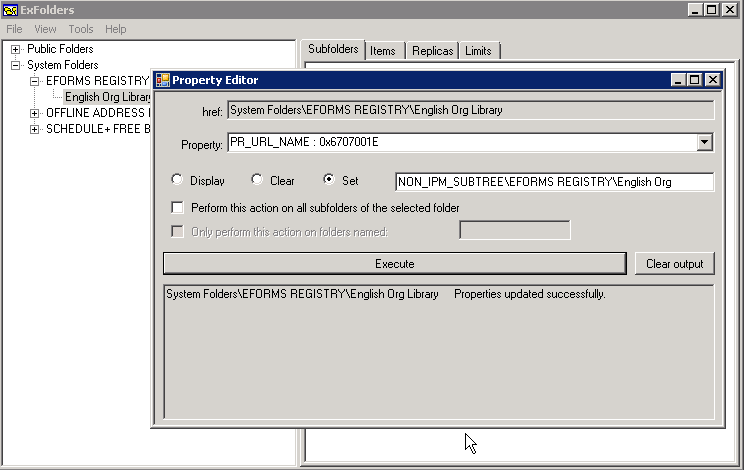
Exchange 2010 admins will need to set the PR_URL_NAME property. This can be set using MFCMAPI on the client or ExFolder on the Exchange server. In MFCMAPI, repeat the steps above, beginning with Step 3.

  1. Choose PR_URL_NAME from the list of Property tags, then click Ok to return to the Property listing.
  2. Right click on PR_URL_NAME and choose Edit Property. Enter your Organizational Forms Library path: \NON_IPM_SUBTREE\EFORMS REGISTRY\English Orgin the Ansi field.
    Add the Organizational Forms Library path to PR_URL_NAME property
  3. Click OK.

To use ExFolder on the Exchange Server 2010:

  1. Double click to ExFolder at C:\Program Files\Microsoft\Exchange Server\V14\Bin\ExFolder.exe.
  2. Click Connect and select the server. Click OK to connect to it.
  3. Expand the System Folder tree
  4. Right click on the Organizational Forms Library you created and choose Bulk Property Editor.
  5. Select PR_URL_NAMRE from the Property list.
  6. Select Set and type \NON_IPM_SUBTREE\EFORMS REGISTRY\English Org in the field.
    Use ExFolder to add the PR_URL_NAME property value
  7. Click Execute
  8. Close the dialog.

Configure user permissions for the Organizational Forms Library folder

By default, authenticated users can access the published forms. To give other users permission to publish forms, you need to set the permissions using the Exchange Management Shell. In Exchange 2010, you can also use ExFolder to set the permissions.

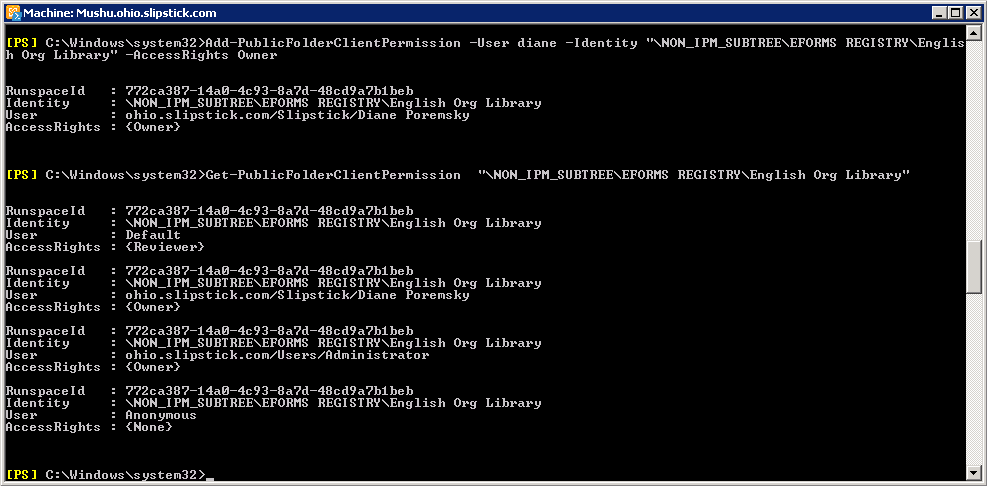
To use the Microsoft Exchange Management Shell in Exchange 2010, you'll use this cmdlet to set owner permission:

Add-PublicFolderClientPermission -Identity "/NON_IPM_SUBTREE/EFORMS REGISTRY/Organizational Forms Library" -User dianep -AccessRights Owner -Server "Servername"

In Exchange 2007, use

Add-PublicFolderAdministrativePermission -User dianep -Identity "\NON_IPM_SUBTREE\EFORMS REGISTRY\My Organizational Forms Library" -AccessRights AllExtendedRights

Use this cmdlet to check the permission settings:

Get-PublicFolderClientPermission -Identity "/NON_IPM_SUBTREE/EFORMS REGISTRY/Organizational Forms Library"

Use a cmdlet to set permissions

in Exchange 2010, you can use ExFolder.exe to change or set the permissions. It's located at

C:\Program Files\Microsoft\Exchange Server\V14\Bin\ExFolder.exe

More Information

Set-PublicFolder
Create an Organizational Forms Library
How to Create an Organizational Forms Library in Exchange 2007
Managing Public Folders
How to create an Organizational Forms Library in Exchange 2007

Create an Organizational Forms Library was last modified: May 1st, 2019 by Diane Poremsky

Related Posts:

  • Organizational Forms Library in Exchange 2010
  • Create an Organizational Forms Library in Exchange or Office 365
  • Publishing Custom Forms
  • Mail-Enable Exchange Public Folders

About Diane Poremsky

A Microsoft Outlook Most Valuable Professional (MVP) since 1999, Diane is the author of several books, including Outlook 2013 Absolute Beginners Book. She also created video training CDs and online training classes for Microsoft Outlook. You can find her helping people online in Outlook Forums as well as in the Microsoft Answers and TechNet forums.

Subscribe
Notify of
0 Comments
newest
oldest most voted
Inline Feedbacks
View all comments

Visit Slipstick Forums.
What's New at Slipstick.com

Latest EMO: Vol. 30 Issue 15

Subscribe to Exchange Messaging Outlook


Support Services

Do you need help setting up Outlook, moving your email to a new computer, migrating or configuring Office 365, or just need some one-on-one assistance?

Our Sponsors

CompanionLink
ReliefJet
  • Popular
  • Latest
  • Week Month All
  • Use Classic Outlook, not New Outlook
  • How to Remove the Primary Account from Outlook
  • Disable "Always ask before opening" Dialog
  • Adjusting Outlook's Zoom Setting in Email
  • This operation has been cancelled due to restrictions
  • Remove a password from an Outlook *.pst File
  • Reset the New Outlook Profile
  • Maximum number of Exchange accounts in an Outlook profile
  • Save Attachments to the Hard Drive
  • How to Hide or Delete Outlook's Default Folders
  • Google Workspace and Outlook with POP Mail
  • Import EML Files into New Outlook
  • Opening PST files in New Outlook
  • New Outlook: Show To, CC, BCC in Replies
  • Insert Word Document into Email using VBA
  • Delete Empty Folders using PowerShell
  • Warn Before Deleting a Contact
  • Classic Outlook is NOT Going Away in 2026
  • Use PowerShell to Delete Attachments
  • Remove RE:, FWD:, and Other Prefixes from Subject Line
Ajax spinner

Recent Bugs List

Microsoft keeps a running list of issues affecting recently released updates at Fixes or workarounds for recent issues in classic Outlook (Windows).

For new Outlook for Windows: Fixes or workarounds for recent issues in new Outlook for Windows .

Outlook for Mac Recent issues: Fixes or workarounds for recent issues in Outlook for Mac

Outlook.com Recent issues: Fixes or workarounds for recent issues on Outlook.com

Office Update History

Update history for supported Office versions is at Update history for Office

Outlook Suggestions and Feedback

Outlook Feedback covers Outlook as an email client, including Outlook Android, iOS, Mac, and Windows clients, as well as the browser extension (PWA) and Outlook on the web.

Outlook (new) Feedback. Use this for feedback and suggestions for Outlook (new).

Use Outlook.com Feedback for suggestions or feedback about Outlook.com accounts.

Other Microsoft 365 applications and services


New Outlook Articles

Google Workspace and Outlook with POP Mail

Import EML Files into New Outlook

Opening PST files in New Outlook

New Outlook: Show To, CC, BCC in Replies

Insert Word Document into Email using VBA

Delete Empty Folders using PowerShell

Warn Before Deleting a Contact

Classic Outlook is NOT Going Away in 2026

Use PowerShell to Delete Attachments

Remove RE:, FWD:, and Other Prefixes from Subject Line

Newest Code Samples

Insert Word Document into Email using VBA

Warn Before Deleting a Contact

Use PowerShell to Delete Attachments

Remove RE:, FWD:, and Other Prefixes from Subject Line

Change the Mailing Address Using PowerShell

Categorize @Mentioned Messages

Send an Email When You Open Outlook

Delete Old Calendar Events using VBA

Use PowerShell or VBA to get Outlook folder creation date

Rename Outlook Attachments

Repair PST

Convert an OST to PST

Repair damaged PST file

Repair large PST File

Remove password from PST

Merge Two Data Files

Sync & Share Outlook Data

  • Share Calendar & Contacts
  • Synchronize two computers
  • Sync Calendar and Contacts Using Outlook.com
  • Sync Outlook & Android Devices
  • Sync Google Calendar with Outlook
  • Access Folders in Other Users Mailboxes

Diane Poremsky [Outlook MVP]

Make a donation

Mail Tools

Sending and Retrieval Tools

Mass Mail Tools

Compose Tools

Duplicate Remover Tools

Mail Tools for Outlook

Online Services

Calendar Tools

Schedule Management

Calendar Printing Tools

Calendar Reminder Tools

Calendar Dates & Data

Time and Billing Tools

Meeting Productivity Tools

Duplicate Remover Tools

Productivity

Productivity Tools

Automatic Message Processing Tools

Special Function Automatic Processing Tools

Housekeeping and Message Management

Task Tools

Project and Business Management Tools

Choosing the Folder to Save a Sent Message In

Run Rules on messages after reading

Help & Suggestions

Submit Outlook Feature Requests

Slipstick Support Services

Buy Microsoft 365 Office Software and Services

Visit Slipstick Forums.

What's New at Slipstick.com

Home | Outlook User | Exchange Administrator | Office 365 | Outlook.com | Outlook Developer
Outlook for Mac | Common Problems | Utilities & Addins | Tutorials
Outlook & iCloud Issues | Outlook Apps
EMO Archives | About Slipstick | Slipstick Forums
Submit New or Updated Outlook and Exchange Server Utilities

Send comments using our Feedback page
Copyright © 2025 Slipstick Systems. All rights reserved.
Slipstick Systems is not affiliated with Microsoft Corporation.

wpDiscuz

Sign up for Exchange Messaging Outlook

Our weekly Outlook & Exchange newsletter (bi-weekly during the summer)


Please note: If you subscribed to Exchange Messaging Outlook before August 2019, please re-subscribe.

Never see this message again.

You are going to send email to

Move Comment