For other formatting macros, see Format Images in Outlook Email and Use Word Macro to Apply Formatting to Email
A user needed to resize images in incoming email.
A few days earlier another user posted a sample macro he needed help with; his macro resized images. I put bits of his macro together with my Format Selected Text macro to resize selected images in a message.
To use this macro, you need to open the message and enable Editing.
To test the macro, select a message containing large images and press Ctrl+C to copy the message then press Ctrl+V several times to make copies of the message, so you have plenty of messages to work with as you determine the best size for your needs.
- Open the message.
- On the opened message's ribbon or menus: Go to Actions, Edit Message (Actions is in the Move section of the ribbon)

- Select the images(s) or entire message.
- Run the macro.
This screenshot shows the original image size and the size after running the macro, with the picSize value set to 13:
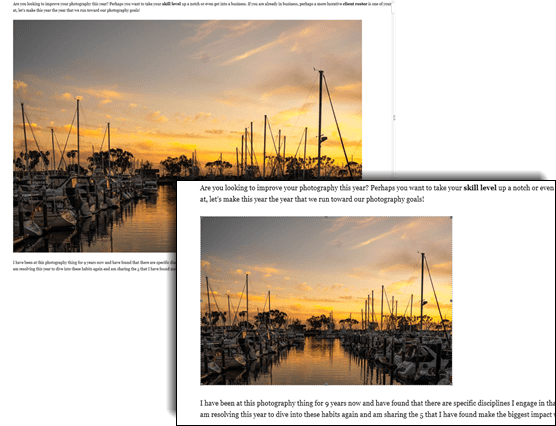
The picture size (in CM) is set in this line:
picSize = 13
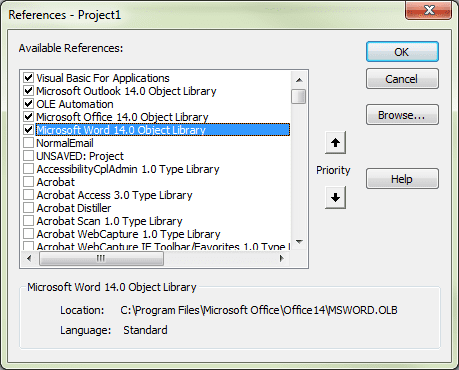
You'll need to set a reference to the Word Object Model in the VB Editor's Tools > References.
 Public Sub ResizeImagesReceivedMail()
    Dim objItem As Object
    Dim objInsp As Outlook.Inspector

    ' Add reference to Word library
    ' in VBA Editor, Tools, References
    Dim objWord As Word.Application
    Dim objDoc As Word.Document
    Dim objSel As Word.Selection
    On Error Resume Next

Dim targetHeight As Integer
Dim oShp As Shape
Dim oILShp As InlineShape
Dim picSize As Variant


' make all images (both inline and floating)
' 13 cm wide while preserving aspect ratio
picSize = 13

'Reference the current Outlook item
    Set objItem = Application.ActiveInspector.CurrentItem
    If Not objItem Is Nothing Then
        If objItem.Class = olMail Then
            Set objInsp = objItem.GetInspector
            If objInsp.EditorType = olEditorWord Then
                Set objDoc = objInsp.WordEditor
                Set objWord = objDoc.Application
                Set objSel = objWord.Selection

       With objSel
       ' Formatting code goes here

        For Each oShp In objSel.ShapeRange
        With oShp
        .LockAspectRatio = msoTrue
        .Height = AspectHt(.Width, .Height, CentimetersToPoints(picSize))
        .Width = CentimetersToPoints(picSize)
        End With
        Next
        For Each oILShp In objSel.InlineShapes
        With oILShp
        .LockAspectRatio = msoTrue
        .Height = AspectHt(.Width, .Height, CentimetersToPoints(picSize))
        .Width = CentimetersToPoints(picSize)
        End With
        Next

       End With

            End If
        End If
    End If

    Set objItem = Nothing
    Set objWord = Nothing
    Set objSel = Nothing
    Set objInsp = Nothing
End Sub


Private Function AspectHt(ByVal origWd As Long, ByVal origHt As Long, ByVal newWd As Long) As Long
If origWd <> 0 Then
AspectHt = (CSng(origHt) / CSng(origWd)) * newWd
Else
AspectHt = 0
End If
End Function
How to use the macros on this page
First: You need to have macro security set to the lowest setting, Enable all macros during testing. The macros will not work with the top two options that disable all macros or unsigned macros. You could choose the option Notification for all macros, then accept it each time you restart Outlook, however, because it's somewhat hard to sneak macros into Outlook (unlike in Word and Excel), allowing all macros is safe, especially during the testing phase. You can sign the macro when it is finished and change the macro security to notify.
To check your macro security in Outlook 2010 and newer, go to File, Options, Trust Center and open Trust Center Settings, and change the Macro Settings. In Outlook 2007 and older, look at Tools, Macro Security.
After you test the macro and see that it works, you can either leave macro security set to low or sign the macro.
The macros on this page should be placed in a module.
Open the VBA Editor by pressing Alt+F11 on your keyboard.
To put the code in a module:
- Right click on Project1 and choose Insert > Module
- Copy and paste the macro into the new module.
Set a reference to other Object Libraries
If you receive a "User-defined type not defined" error, you need to set a reference to another object library.
- Go to Tools, References menu.
- Locate the object library in the list and add a check mark to it. (Word and Excel object libraries version numbers will match Outlook's version number.)
More information as well as screenshots are at How to use the VBA Editor
More Information
resized images in Word sample posted in Answers forum by Word MVP Jay Freeman.
Jeff Borden says
I use screen clips a lot, and paste those into emails... the sizes are all over the place, and often way too big thanks to my 4K monitors...
Could this script be modified so that whenever I paste an image into an email, it automatically runs and resizes the image to a standardized specified width and/or scale?
Diane Poremsky says
It should work... but is noy automatic. I'll take a look and see if it can be automated.
Jeff Borden says
Thanks Diane,
It does work to resize the selected image (or multiples at once) after I've pasted... so that's certainly helpful.
Do you know if there is an event trigger that could run the macro on an image when I hit paste?
Diane Poremsky says
I need to check on the trigger to see if it can be automated.
James Martin says
This is the image compression macro I I created for Word. Not sure if it can easily be used in Outlook., The menus flicker a lot, as not directly codeable in VBA, and MSO, and SendKeys methods had to be used. I have a copy of this on the QAT in Word for 96ppi compression also. Took 10 months to get this to work! Easy when you see the code, so obvious, a bit frustrating that not all menus are directly codeable. List of MSO actions via dash&down chevron, above the Ribbon, via more commands, and All Commands...
Sub MacroC_28_06_2022()
'SOURCE: jam61mar@gmail.com
'150ppi
Word.Application.ScreenUpdating = False
If Word.Application.Documents.Count = 0 Then
Exit Sub
End If
Dim oIlS As inlineshape
If Word.ActiveDocument.Inlineshapes.Count > 0 Then
Word.ActiveDocument.Inlineshapes(1).Select
VBA.SendKeys "%W{ENTER}", True
Application.Commandbars.ExecuteMso ("PicturesCompress")
DoEvents '''28/06/2022 Add SendKeys for a 2nd time each time used to undo toggling off the NumLock
VBA.SendKeys "%W{ENTER}", True
Application.Commandbars.ExecuteMso ("PicturesCompress")
For i = 2 To Word.ActiveDocument.Inlineshapes.Count
If Word.ActiveDocument.Inlineshapes.Count > 1 Then
Word.ActiveDocument.Inlineshapes(i).Select
VBA.SendKeys "%W{ENTER}", True
Application.Commandbars.ExecuteMso ("PicturesCompress")
DoEvents '''2nd running to toggle numlock back on
VBA.SendKeys "%W{ENTER}", True
Application.Commandbars.ExecuteMso ("PicturesCompress")
End If
Next i
Word.Application.ScreenUpdating = True
End Sub
James Martin says
By accident I exploit a formatting quirk that could simplify this. I have been manually uploading 30 to 50 customer emails a day to a Council Account system for a few years. I have been researching automation such as Office 365 Flows and tested RegEx via Plumsail so with our IT Dept it should be possible to bounce back customer emails if they don't have the application number at the start of the Subject (and NI Number and date of birth in Email Body, and a match to the sender email). If sent correctly a text version of the email could be automatically added to the account with a bounce back acknowledgement with the queue number [original email kept for periodic customer reviews]. Anyway I am now creating a suite of Macos to simplify my job and to help others to do this, which is long winded - The Macos are with the help of this site: Save Outlook Item as text (with header and attachments list by default), docx with header (and attachments list), Rotate one image selected in docx, Rotate all images in docx [loads of customer emails have embedded images now from mobile uploads with no attachment list itemisation], save all attachments from the email (as these need to be uploaded), Additional macros to add attached jpegs in the docx produced [I select all and paste]; and doc, docx or rtf files [I insert page breaks and break links for Headers and Footers before pastes]; pdfs if collectly under 9 pages in total I manually rotate the pages landscape, full screen, copy and paste into the docx [I don't think this can be easily automated]; and then click on an image in the docx if needed to apply further image compression to 150ppi to all images [any smaller and images with text are not always readable - we have a 4MB upload limit to the customer website]. The formatting quirk is that I forward received customer emails and copy the full body of the forwarded email without sending it and paste this into docx, strangely this resizes the images even if the wrong orientation and in landscape so that the whole image is still viewable in docx. The archive macro here on other pages for pdf with header I have changed to save to docx as instructed, but the images are not justified - this is something I need to resolve. The minor issue with this forwarding manual technique is that the attachment list is not included in the E-mail header and maybe can be added via VBA if coding exactly as actioned and not using the one that is partially working from this site.
DIMGI says
Hello,
Could you please help me with code for formatting a picture frame to 1.5 pt + color = black?
And doing this while composing new e-mail.
Thanks in advance