When pictures in your email won't download, even though you have Outlook configured to download external content (or allow it on a per-message basis), the problem is usually a "full" temporary file folder. It can also be caused by a secure proxy server, an invalid Temp folder path, or a corrupt Temporary Internet File folder. If you do not see a red x but have a blank box shaped/sized like the graphic or photo, you have Show picture placeholders enabled.
There are two new causes for this problem, although I'm not sure how common these two causes are, especially in Outlook 2007 and 2010 because it's only a problem when the default setting is changed.
- Images are missing in online mode with Outlook 2013 / Exchange 2013
- Image is not embedded in the message (affects Outlook 2007, 2010, and 2013)
Corrupt Temporary Files Folder (TIF)
One cause of images not displaying in Outlook email is a corrupt Temporary Internet Files (TIF) folder (a second symptom is the TIF size is set to 0 in Internet Options). This is more common after IE is installed. The solution is simple: log out of your account and log in using another account that has administrator permissions, then delete the Temporary Internet Files folder. When you log back in using your own account, the folder will be recreated. If you don't want to make an administrator account, use Lewis's method (below) instead.
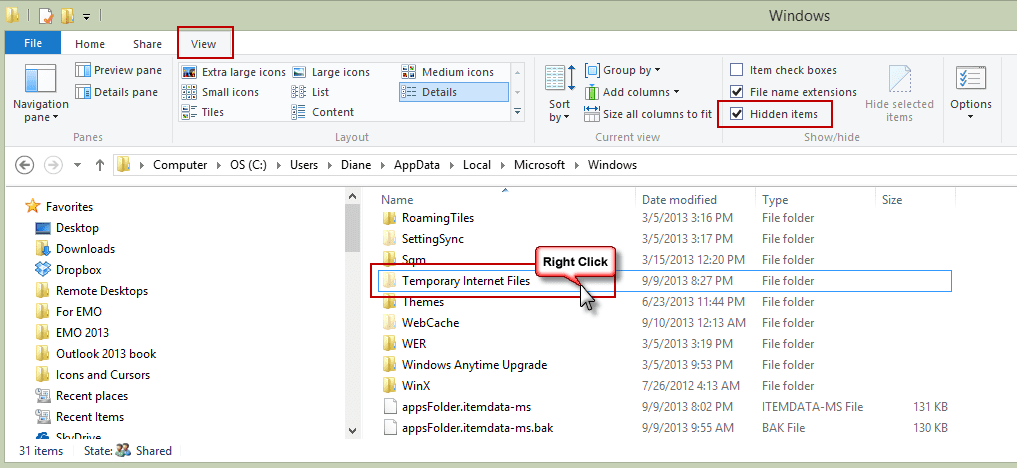
To locate the TIF, open Windows Explorer and type shell:cache in the address bar, and then press Enter.
Note the path, C:\Users\%username%\AppData\Local\Microsoft\Windows\INetCache (or C:\Users\%username%\AppData\Local\Microsoft\Windows\Temporary Internet Files if using Windows 7), then log out of your account and log in using an account with administrator permissions. Enable the Windows Explorer option to show hidden files and folders, then browse to the path used by your account. Right click on the Temporary Internet Files folder and choose Delete.
Lewis' Method
Lewis used the following method:
I went into Internet Explorer "Internet Options" and under "Browsing History, clicked "Settings". My "Disk Space To Use" was set at zero, and I couldn't change it, but I saw a button that said "Move Folder", so I thought "what the hell" and clicked it (then you have to reboot). Voila - I could increase the disk space, and my Outlook would let me download pictures and actually see them.
To open Internet Options, start typing Internet Options on the start menu or search box to bring it up. Or you can open it from the Control Panel.
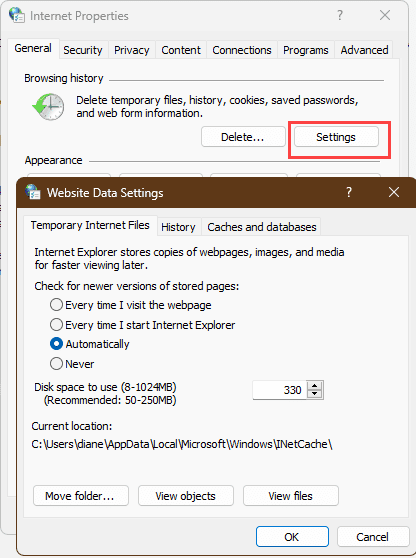
But before changing the path, click View Files to open Windows Explorer then copy the path from the address bar and save it. (This is a good use for Outlook's Sticky notes, or you can create a new message, paste the path in it then save it as a draft.) Close all open programs then select a new path. (I used C:\Users\username.)
After you log back into your account (you don't need to reboot, only log out then log back in), copy the old Temp Internet Files path from the draft email and paste into the address bar of Windows Explorer and press Enter. Select the folders and press Delete, skipping any that Windows says are in use. This deletes any old cache files created by other programs. The programs will use the new location.
Encrypted page setting
A few people mentioned that changing the setting for encrypted pages pages fixed the red x's, including kausikdatta:
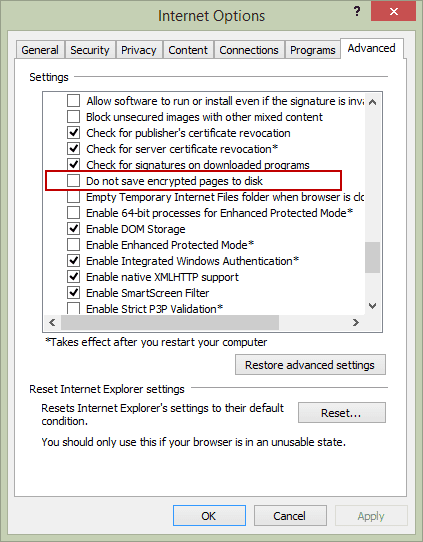
I finally hit upon the jackpot when I read somewhere that Outlook follows IE settings, even if IE is not the default browser (it's not for my machine). I opened IE settings, and in the Advanced tab, unchecked the "Do not save encrypted pages to disk" option. Et voilà! I now see images in emails in my Outlook 2013!
I'm not sure why a home user would have Do not save encrypted pages to disk option enabled, it's really not necessary. To check your settings, open Internet Options, Advanced tab. Do not save encrypted pages to disk is about 3/4 of the way down the list, near the bottom.
Images not embedded
In Outlook 2007 and 2010, inline images will display when using the default settings. In Outlook 2013 and up, inline images may display the Red X when using the default setting.
Outlook 2010
HKEY_CURRENT_USER\Software\Microsoft\Office\14.0\Outlook\Options\Mail
DWORD: Send Pictures With Document
Value: 0
Outlook 2007
HKEY_CURRENT_USER\Software\Microsoft\Office\12.0\Outlook\Options\Mail
DWORD: Send Pictures With Document
Value: 0
To fix the problem in either Outlook 2010 or 2007, you need to remove the Send Pictures With Document registry value or change the value of Send Pictures With Document to 1.
Outlook 2013:
HKEY_CURRENT_USER\Software\Microsoft\Office\15.0\Outlook\Options\Mail
DWORD: Send Pictures With Document
Value: 1
To fix, you need to add Send Pictures With Document with a value of 1, or change the existing Send Pictures With Document value to 1.
SecureTemp folder
When the secure temp folder is the cause, the picture will show only the red x; it won't include the text telling you to right click to download.

What exactly does "full" mean? The determination of Full is based on several factors, the most important is no more than 99 attachments of the same name in the folder (filename format of file(99).ext). The total number of attachments in the SecureTemp does not seem to be a factor (at least not under my personal record of nearly 9,000.) The amount of space allotted to the Temp Internet Folder is a factor but I haven't figured out the specifics.
Note: If you do not see a red x but have a blank box shaped/sized like the graphic or photo, you have Show picture placeholders enabled.
Check your SecureTemp folder
You need to locate the SecureTemp folder and delete the contents (or the entire folder) then restart Outlook. The images should display correctly once you do this.
Outlook 2007 and newer, on Windows 7 and newer:
* where 8A0VMD3A can be any random characters.
C:\Users\%username%\AppData\Local\Microsoft\Windows\Temporary Internet Files\Content.Outlook\8A0VMD3A
Outlook 2007 & Outlook 2010 on Windows XP:
* where 8A0VMD3A can be any random characters.
C:\Documents and Settings\%username%\Local Settings\Temporary Internet Files\Content.Outlook\8A0VMD3A
Outlook 2000 - 2003 on Windows 7/8 or Vista:
* The OLK directory will end in a series of numbers.
C:\Users\%username%\AppData\Local\Microsoft\Windows\Temporary Internet Files\OLK*
Outlook 2000 - 2003 on Windows XP:
* The OLK directory will end in a series of numbers.
C:\Documents and Settings\%username%\Local Settings\Temporary Internet Files\OLK*
To quickly jump to the Temporary Internet Folder (TIF) in Windows 7 or newer, type shell:cache in the Start menu's Search field and press Enter. This will open Windows Explorer to the TIF file. Outlook's SecureTemp folder should be visible (Content.Outlook or OLK*). If not, go to Windows Explorer's Organize, Folder and Search Options menu. On the View tab, enable the option to show Hidden Files and Folders.
See Outlook SecureTemp Files Folder to learn how it works and for the instructions to move the SecureTemp folder out of Temporary Internet Files.
The tools listed on this page make it easier to delete the orphaned attachments.
Verify the Temp path is correct in the registry
If the path in the path in the registry is not valid, you will have red x's for images. Open the registry editor and verify the value in OutlookSecureTempFolder is correct and exists.
If you aren't sure if the path is valid, right click on OutlookSecureTempFolder and Delete it, then restart Outlook. Outlook will recreate the value and a new SecureTemp folder.
The key in each version of Outlook is as follows:
Outlook 2016 and newer
HKEY_CURRENT_USER\Software\Microsoft\Office\16.0\Outlook\Security
Outlook 2013
HKEY_CURRENT_USER\Software\Microsoft\Office\15.0\Outlook\Security
Outlook 2010
HKEY_CURRENT_USER\Software\Microsoft\Office\14.0\Outlook\Security
Outlook 2007
HKEY_CURRENT_USER\Software\Microsoft\Office\12.0\Outlook\Security
Outlook 2003
HKEY_CURRENT_USER\Software\Microsoft\Office\11.0\Outlook\Security
Outlook 2002
HKEY_CURRENT_USER\Software\Microsoft\Office\10.0\Outlook\Security
Do it for me
Use the correct registry file for your version of Outlook to delete the OutlookSecureTempfolder key then restart Outlook.
Download the file, change the extension to .reg if your browser changed it to txt, then double click to run it and approve all of the prompts.
Outlook 2013Outlook 2010Outlook 20072003
Proxy Server Authentication
This issue affect users who access the Internet using a proxy server that is configured to use basic authentication.
When Outlook 2010 opens an HTML-formatted email message that contains an HTTP reference to an image that requires proxy authentication, Outlook won't bring up the password dialog and the image won't be displayed.
To address this, you need to set this registry key for Outlook 2010:
HKEY_CURRENT_USER\Software\Microsoft\Office\14.0\Common
DWORD: AllowImageProxyAuth
Data value: 2
If you use Outlook 2007, you need to add AllowImageProxyAuth to this key:
HKEY_CURRENT_USER\Software\Microsoft\Office\12.0\Common
When the value is set to 1, you're prompted for authentication once per Outlook session. If you cancel the authentication request, you are not prompted again during that Outlook session.
When the value is set to 2, you're prompted for authentication as needed. Typically, this is once per Outlook session. However, you may be prompted multiple times under certain circumstances. If you cancel the authentication request for one image, you'll be prompted for the next image that requires proxy authentication.
If the key is missing or set to 0, you will not be prompted for authentication, and the image might not be displayed.
Do It For Me
Ready to run registry files are available for Outlook 2010 and Outlook 2007. To use, download the correct registry file for your version of Outlook and double click on it to enter it into your registry.
AllowImageProxyAuth-2010 AllowImageProxyAuth-2007
More Information
Inline images may display as a Red X in Outlook
Outlook SecureTemp Files Folder
More Shell shortcuts: Easy Access to System Folders in Windows 7 and Vista
An image in an HTML-formatted email message is not displayed in Outlook 2010 when you use a proxy server that is configured to use basic authentication (MSKB)
SOLUTION: Red X in Outlook Where Pictures Ought To Be
Ken says
In my case, none of these solutions worked. What did the trick was resetting Internet Explorer settings (even though I've been using Edge not IE for years). In Internet Explorer, under Internet Options, go to the Advanced tab, at the bottom under Reset Internet Explorer Settings, click Reset. Worth a try if none of the other solutions worked. Unrelated, just backstory, I had some Event 36887, Schannel 70 and 80 fatal alerts that I was getting daily in Event Viewer. Apparently they're harmless but I changed a setting for TLS in IE in hopes of fixing it. Not only did that not work, but no doubt that created the new problem of images in emails not showing up in Outlook!
Mark Stepan says
Thank you Diane for your efforts (over the years, specifically today regarding this issue). Whenever I've seen your name associated with a post, etc, I always know I have something I can try and will get specific instructions, etc. You'da'bomb! In THIS case, I, like many others, had tried several things. In the end, deleting INetCache did the trick. Keep up the good work!!!
Touchbase says
I tried most of these solutions but still had the issue. In addition Internet Explorer wouldn't open. It also did not have a default location showng for TIF files.I could change the location for TIF by opening IE from the IE applet in Control Panel but it wouldn't save. I fixed both the problem of IE not opening, fixed default location for TIF files and images now showing in Outlook 2010 by
First un tick Hide protected operating system files (recommended) in "File Explorer Options" in Control Panel you'll need to do this for the WebCache step.
Then go here C:\Users\[username]\AppData\Local\Microsoft\Windows\INetCache\Temporary Internet Files - delete everything in this folder.
Then go here C:\Users\[username]\AppData\Local\Microsoft\Windows\WebCache - delete everything in this folder.
Reboot
I hope this helps some one because I spent hours going down rabbit holes. Most of the sites are copy and paste answers of the same thing. I think clearing the WebCache folder played a big part in this. Someone had posted that all you need to do is delete the WebCacheV01.dat file inside the folder and it would work. If this file is corrupted it can cause these issues. It didn't work for me. Completely deleting the contents did the job. This I worked out by myself after trying everything.
Bruno Leone says
IE Settings did the trick ! Tyvm =)
Norton says
Wow. I searched all over the internet for an answer to this problem. Lewis' solution seems to have solved the problem. Many thanks.
Judi R. says
I am confused about all this. Is there a "Wizard" I can use that will help me show the pictures in my emails instead of showing a box with the "red x' in the left corner?
I can't figure all this out. I own my laptop but I don't want to try something and cause it to wreck something else. Please help.
Diane Poremsky says
No, we don't have a wizard utility to check settings and fix it. Sorry.
Pat Junkins says
When trying to check the TIF I cannot open it. Says "Location not available" Also show that it is a shortcut and not a Folder.
Outlook 2007 and newer, on Windows 7 and newer:
* where 8A0VMD3A can be any random characters.
C:\Users\%username%\AppData\Local\Microsoft\Windows\Temporary Internet Files\Content.Outlook\8A0VMD3A
Neil Stewart says
This worked for me on Windows 10 and Outlook 2010, many thanks for the page posting.
I finally hit upon the jackpot when I read somewhere that Outlook follows IE settings, even if IE is not the default browser (it's not for my machine). I opened IE settings, and in the Advanced tab, unchecked the "Do not save encrypted pages to disk" option. Et voilà! I now see images in emails in my Outlook 2013!
Ron says
Lewis' Method worked for me on Outlook 2007/Windows 10! Seems like the problem is that since the cache folder Outlook 2007 wanted to use was renamed from Temporary Internet Files to InetCache in later versions of Windows, Outlook is looking for the old name of the file. My internet options (browser history) settings always read "0" bytes for that Inetcache folder and I couldn't change it.
In the new root directly I created, Outlook automatically created a sub folder called "Temporary Internet Files". It was obviously needing that file name to function.
Stewart says
I have the problem only with https addresses. I copy the mail to the desktop and open the .eml file with Notepad, I change all the https to http, and when I click on the file the e-mail opens and the images appea, whereas before I just had red crosses. So I how do I get my computer to load from https addresses.
Larry says
Thank you so much! I've been putting up with this issue for ages and always thought it was due to some security update that MS had installed for Outlook. It got so annoying at times I've been seriously thinking of switching to another email client. Now I'm happy again!
graham says
unchecked the "Do not save encrypted pages to disk" option
Worked for me. Thank you! SEEMS to have worked.
James says
This is incredibly frustrating. The Lewis method works... until th next time I log in to Windows and the images are missing again. I'm using Outlook 2106/W10. Any ideas?
Diane Poremsky says
Are you using an administrator account or a user account with lower permissions?
Bev Norris says
Thank you! Thank you! Thank you!! It was the "Do not save encrypted pages to disk" that worked for me. For a whole week I have searched for this answer, trying lots of things along the way on a new laptop using Win 10 and Outlook 2016 and this was it! I wish you a happy, healthy, fun-filled New Year for this post has made it so for me. I hope 2018 is all you wish it to be!!
bob says
unchecked the "Do not save encrypted pages to disk" option
Worked for me. Thank you!
Sharon says
Hello, I am running Win 10 and Outlook 2016. I have tried all the possible solutions listed and as many as I could find out on the web. I have also created a new Profile and de/reinstalled Outlook too. I am at my wits end and I've reached my limit. Is there something as a last ditch effort before I throw in the towel? I would be most grateful! I will even kiss someone's feet ;0) Sharon in Allentown, PA
Fabio Malfatti says
Really thank you,
The two step Lewis' Method and Encrypted page setting solve the problem.
I was dealing with the Xcross issue since years, and at the end I accepted it like a 'feature' of Outlook!
Eddie says
Thank you so very much. I've been plagued with this issue off and one for years. And only with my work computer. I always assumed that it was an IT issue but I tried "Lewis' Method" and it worked like a charm! Huzzah!
Thanks again to you both.
Mike Seale says
Thank you. After months of fustration my red x problem in Outlook 2007 is resolved. It took less than
5 min. I used regedit to get to HKEY_CURRENT_USERSoftwareMicrosoftOffice12.0OutlookSecurity.
I deleted the OutlookSecureTempFolder, restarted Outlook & I now get all the pix & images in email.
Jackk says
Thank you SO much, this is great! Not even my company's IT department could solve this!
Tony says
Just had this happen to me - no pictures, just red Xs - Outlook 2007
I don't use IE, I use Firefox.
Deleted the following directory:
C:usersusernameAppDataLocalMicrosoftWindowsTemporary Internet Files.
This is a hidden directory so you need to view hidden system files to find it.
When you try to delete it you are refused permission. If you view properties you see there is lots of content present but nothing is visible.
Download "Unlocker" from the internet and use it to delete the directory and all its content. Its a brilliant little utility.
When you restart Outlook you will get an error message, just ignore it. Close and restart Outlook. It will start ok and you will have all your pictures again.
Markxg says
Wow I have not used IE for years and only Chrome. Opened IE and disabled Do not save encrypted pages to disk, restarted Outlook 2013 and all the images were there and Red x Gone. Thank you!
Michael says
Many thanks for the solution!!! Corrupt TIF folder was the cause of my problem. Although in my case it was BLACK X (Outlook 2003).
Kathleen says
I ran AllowImageProxyAuth-2010.reg from this page and now my Outlook is in worse shape than before when it just wasn't showing images. How can I undo the .reg file I just ran???
Diane Poremsky says
You can either edit the registry and delete that value or open the reg file in notepad and replace dword:00000002 with a - sign. Save and run it again.
"AllowImageProxyAuth"=-
geoff says
Lewis u r a legend , un-ticking "do not save encrypted to disc" worked perfectly
You r a sensation
Russell says
In my case, repairing Office 2013 via Control Panel/Programs and Features fixed the problem.
pistof says
Same problem here. Outlook 2016, and after an update (?) wellat least it seems so, I have this red x and the message that appears. I tried all the solutions above , registrym internet temp, options etc... safe mode, nada, this is ridiculous.
David Hanson says
Lewis method worked for me. Thanks for the post
Finn Nielsen says
Occationally, pictures in mails (Outlook 2010) didn't show anything but the RED X . Changing the settings in Internet Explorer (disabled "Do not save encrypted pages to disk" ) changed the display of pictures. Thank you for the guidance from this site.
laf8 says
Email is already not fun. I'm hoping this issue fixes itself. Otherwise, I'm just going to switch to gmail.
James says
Windows 10 / Outlook 2016 - red Xs in only some emails - disabling "Do not save encrypted pages to disk" in Internet Explorer (option is not in Edge yet) did the trick and sanity prevails.
Thank you!!!
Guy Payeur says
In my case, after trying each and every steps, I opened IE settings, and in the Advanced tab, checked the “Allow software to run or install even if the signature is invalide” option worked for me.
Diane Poremsky says
That might not be the safest thing... viruses with an invalid signature could install software.
Mickey Segal says
I hadn't tried Lewis’ Method (in article) of moving Temporary Internet Files since my “Disk Space To Use” was not set at zero. But it worked. I was unsuccessful when I tried going back to the original location, but using C:\Users\[username]\AppData\Temporary Internet Files is working.
Mickey Segal says
This is a great compendium of tips I've found in a variety of locations, but none worked (with appropriate adjustments for keys for Office 16). My problem began with Installation of Office 2016 over Office 2013 using an Office 365 subscription. I have Windows 7 with all updates. I also updated a Windows 8.1 computer to Windows 10 and did Office 2013 to 2016 there, and all was fine.
When I look in the Temporary Internet Files I see a bunch of cookies but no \Content.Outlook folder with the alphanumeric name. When I use C:\Users\myUserName\Local Settings\Temporary Internet Files\Content.Outlook I see three folders, but one is empty, one has nothing past July and one has nothing past 2013. I found some command that I can't remember that suggested that the empty one is the one that is supposed to be in use.
Under HKEY_CURRENT_USER\Software\Microsoft\Office\16.0\Outlook\Options\Mail I see only Default (value not set) BlockExtContent (1) and Receipt Response (1). Is something missing?
If this happens to a lot of people with the Office 2016 rollout it will be a big problem.
DeeDee says
strange after upgrading from XP which never gave me this problem until using OS Vista Ultimate and now 7 Ultimate OS then I got the red x in my emails from selected Outlook 7 version email addresses. After searching and searching for correcting some upgrade issues with the way I like my computer, I came across this website and read the possible ways for resolving my problem. Thank you for I wouldn't have thought it was the 'do not save encrypted pages to disk' on the IE tools to make that change, but finally after un-checking it, (which XP never had a problem with it), whalla, I got rid of the red x in the emails. Thanks for posting this information for others to read for solutions.
Naz says
Do not store encrypted pages to the disk did it for us.
Thank you,
Naz
Chris says
We had the same problem in Outlook 2010! Unchecking "do not save encrypted pages to disk" fixed the issue.
jbraintree says
I wish there was a way to paste a picture in an Outlook Express email so that it continues to show in subsequent email exchanges.
Diane Poremsky says
It should be retained but often converts to an attachment, rather than embedded. Unfortunately, you can't avoid this due to have different systems handle headers - the content id (CID) remains in the html code but the information in the header that links the cid to the image is often lost.
Kelly Jackson says
It seems to only be some images. Embedded in the email.
Kelly Jackson says
Okay, Im stummped.
I Work as a IT Tech at my office.
I have spent hours on this issue. I have a user with this problem. Ive tried all these fixes, Ive reinstalled office, ive even completely recreated this users windows profile yet this problem still persists. Any reccommendations? Please!!
Diane Poremsky says
Are all images affected or just some? I worked with a guy earlier this week where the images were hit or miss - he was allowing all downloaded content but about 2/3 of the images were red x's. There were other issues that I fixed but I'm waiting to hear if the images were fixed by any of the changes I made.
spirit says
Since you reinstalled office - open explorer and reset in options. I know it's a new install, but this was the only thing that has lasted for me and now I have pics back (6 months now), unless I have not saved email as safe, then I can simply click download pictures or mark sender as safe. I tried everything else here too
Kelly Jackson says
Ive already did a restore defaults and a reset in IE as well. This is so strange. I dont even understand how its possible this issue followed to a completely different windows profile.
Diane Poremsky says
That is odd that it moved with a new profile - that seems to indicate that the problem could be outside of windows - like in a firewall or router.
Daniel says
We have had this issue at my office before, and short of rebuilding the PC I was never able to get the issue to go away. I recently had the issue with someone on IE 10, and decided to upgrade them to 11 and that fixed the issue. Then when I had the issue with another user, I uninstalled 11 and then installed 10 and it fixed it. Tried it again on another, and it worked. YMMV, obviously
Jane Bennett says
Thank you, thank you, thank you. That blasted thing has been bugging me for months, and I couldn't find an answer until today, with turning off that option in Internet Explorer about Do Not Save... Thank you!!
Ace Willcox says
If none of these work it may be that the IE10/IE11 settings are set to store 0 MB under Internet Options, General, Browsing >> Disk space to use (in mB) These cant be set by GPO from Windows 7/Windows 2008r2 and require your DC to be upgraded to Server 2012. Nightmare issue from Microsoft who seem to have gone past the stage of caring.
Joe K. says
Thank you, thank you, thank you...Lewis's method of moving the file location WORKED! After wasting hours trying to fix this, it fixed the problem in 2 minutes :)
amirbutt says
In my situation Outlook was published through XenApp 6. The published app did not show the image or allowed to download it. After trying all obvious steps it did not work. Eventually it was the IE advanced setting "Encrypted pages..." by unselecting I was able to see the images downloaded automatically.
spirit says
I LOVE YOU! Whew ... - this (resetting IE, since I don't use anyway) is the only thing that worked (I hope it continues - some things I've done only worked for a while). Thanks MoTown
MoTown says
Try simply resetting Internet Explorer to its default setting. Go to Tools - Internet Options - Advanced (tab) and you will find the reset button at bottom of page. After searching for hours for a solution and reading about so many different fixes from registry changes to cache files to add-in problems, I was relieved to find that this worked. I landed on this solution after reading some else's post where they said that Outlook relied upon IE for some of its settings even if IE wasn't the default browser. I hope this helps.
Dennis says
Thanks a lot, found your post and it worked.
Mapa says
MoTown, thank you so much! After trying everything, and I mean everything, resetting Internet Explorer to default setting worked. This simple but highly effective remedy should be at the TOP of these posts. I thank you again.
Steve Edwards says
Changing the encrypted page setting worked for my Outlook 2004, thanks Diane. One of those little mysteries why the setting would have suddenly changed (it's only just happened over the last few days and I don't use IE). Thanks again!
Diane Poremsky says
Well, you are in good company because I don't think anyone who fixed it by changing the encrypted page setting knows why it was changed. :) I'm assuming an update did it.
Miriam Evers says
Thanks so much for your post Diane. I finally fixed the problem by changing the "Encrypted Page Setting" (do not save encryped pages to disk) and now my Outlook emails are showing images again. Thank you so much!!
Faye Jeffrey says
THIS WAS A WASTE OF TIME. I HAVE NOTHING TO DO WITH OUTLOOK. I AM WITH TIME WARNER CABLE AND THEY ARE MY ISP AND E-MAIL TOO. SO HOW DO I REMOVE THE RED X NEXT TO THE PERSON I GET MAIL FROM. IT SAYS SENDER BLOCKED. I HAVE NOT BLOCKED THAT PERSON.
Diane Poremsky says
You see this red X when you read your email in a web browser? You'll need to call Time Warner support if those names are not on your blocked senders list. sorry.
Jeremy says
Just for the record, none of these more recent solutions work for me either.
kimmie says
Finally after days of trying reg edit, ie & outlook settings. On MS support page re: red x in html emails. (near the middle of the page) I ran the Mr Fix It (fix it for me) by downloading and running. And, it worked. Thank goodness. Here's the link: https://support.microsoft.com/kb/2638687
eric says
I had this problem after cloning a IDE hard drive to a SSD hard drive. The fix was to go to the manufacturer's site and download the latest AHCI driver. I then had to manually update the driver through device manager, rebooted and then outlook images and outlook searching (as well as windows search) worked fine once again.
GCFox says
Diane... thank you so much for doing what you do. I have used you site often, unfortunately the Red X in Outlook 2007 fixes listed here did not work for me. I tried each one of the ones you have and few others from other sites with no joy. I have worked on the issue (off & on) for about 3 weeks and was about to just switch to eM Client and just stop using Outlook. I realized that the trouble all started when I updated IE 9 to IE 11, I have Win 7 64 Ultimate with Office Pro 2007. Any way... as a last ditch effort, I decided to uninstall IE 11. When I did uninstall IE 11 system automatically reverted back to last version I had... IE 9. I rebooted, opened Outlook 2007, received error while it recreated temp file, closed Outlook 2007, reopened and boom! all my images were back in emails.
It seems this issue happens with IE 10 & IE 11, at least for me. I guess I will just keep IE 9 and use FireFox and Chrome to do my browsing. Thanks again for doing what you do and Happy Thanksgiving!
peter says
I finally hit upon the jackpot when I read somewhere that Outlook follows IE settings, even if IE is not the default browser (it’s not for my machine). I opened IE settings, and in the Advanced tab, unchecked the “Do not save encrypted pages to disk” option. Et voilà! I now see images in emails in my Outlook 2013!
Jeremy says
I have tried everything suggested on this page and it still doesn't work for me. All my help files from various different programs have exactly the same problem, no images. Amazing.
Diane Poremsky says
When help files are affected, it means it's something related to Internet Explorer - either the temp internet cache, the setting to not show images (would affect all web pages), or encrypted pages.
Bob Wilson says
Changing the encrypted page setting worked for me. Deleting Temporary Internet Files did not help. I am using Outlook 2007
Nick Hopkins says
Thanks for the post. I was getting a red x in all pictures...I went through each step on this post, until I got to the Secrue Temp Filder section. My Secure Temp Folder was full, I deleted the files and BAM! it works!
Dan says
THIS IS ALL UTTER BS. I just want to see my email pictures. Why does Microsoft force everyone to be a coder or friggin' IT support engineer just to do the most simple things? That's what I want to know. You'd think after 30 years they would have learned a thing or two from Apple.
Diane Poremsky says
For the vast majority of users, it works as expected. Unfortunately, updates or 3rd party software can cause problems. (Apples aren't trouble free either, but you don't hear about it much because there are many, many more Windows users.)
Jeremy says
Yes pictures are fine in IE. THe help files don't show pictures for every single help file on my PC. I have checked all of the IE settings and made all of the changes to the TIF folder as I documented above i.e. It is set to 256,000 decimal. I changed it to 512,000, it has no effect, the disk space for TIF still shows as zero in the Internet Options box. I deleted the TIF folder using Lewis' method from within IE. Outlook didn't recreate it when restarted. i have made a new TIF folder in a new location, and put that entry in the registry but still no pictures. Given IE will only allow zero space for the old and the new TIF folder I think that is roughly where the problem lies, but can't make any progress.
Keith says
After pulling my hair out since May 1st with this problem I solved it yesterday. I tried everything listed on this forumn and every other option found by googling this issue. I have a 2008 Toshiba laptop with Vista and Office 07, IE 9 and Webroot Virus software. Outlook started acting up right after Microsoft issued the latest big fix for the IE problem around the 1st of the month. And it actually corrected itself for two days inbetween then and now but only for a day each time? My problem was with Webroot. Somehow my settings within Webroot got changed to block Outlook! I believe this had something to do with all of the recent updates from Microsoft. Becuase I never go into my Webroot settings. I went into "active connections" and noticed that Outlook was being "Blocked" vs "Allow".This didn't block the emails from coming in just the images. I changed to "Allow" and all is well.
Diane Poremsky says
It's not unusual for updates to outlook.exe to be blocked by firewalls, if the firewall is blocking based on build #. If outlook is updated and the build # changes, the firewall blocks it.
Jeremy says
The other point to note is that I have exactly the same problem with images in all Microsoft help files - all images in the help files are replaced with a red x. So this isn't an Outlook specific problem. Not that Microsoft seem the least concerned by a broken operating system.
Diane Poremsky says
The help files indicate one of two things - corrupt TIF or, if the help files are for old programs on newer windows, it's an issue with the Help viewer. Or Security settings. Because Outlook is affected, I doubt it is the viewer. Pictures show ok when browsing in IE? It's probably not this, but check the Internet Explorer settings just to be sure. Go to Tools, Internet Options, click the Advanced tab, locate the “Show Pictures” option. Is it checked? On the General tab (still in IE options) click Settings. How much space is set for the TIF? Try moving it to a new location.
Ronald Dunbar says
Thanks Peter, but I already tried that aslo.
Ron
peter says
I got rid of this problem ,then it mysteriously returned ?? try this it worked for me "I finally hit upon the jackpot when I read somewhere that Outlook follows IE settings, even if IE is not the default browser (it’s not for my machine). I opened IE settings, and in the Advanced tab, unchecked the “Do not save encrypted pages to disk” option. Et voilà! I now see images in emails in my Outlook 2013! "
Ronald Dunbar says
I have tried everything on this page twice just to see if I missed something! I still cannot get rid of the red x's and start seeing the images again. I lastly restored an old PST from a year ago and that did not help either. Will it help to uninstall Outlook 2013 and re-install? I am using Windows 7 64 bit. Whatever happened only started maybe a month ago now. I'm frustrated!
Thank you in advance for any assistance,
Ronald w Dunbar
Diane Poremsky says
Generally speaking, uninstalling/ reinstalling does not fix problems like this but at this point, its probably worth a try.
Jeremy says
Well thank you Diane for putting so much effort into this, I do appreciate it. I suppose one last thought is, given I deleted the old TIF and moved it to a new location, what if it isn't the File/Folder itself that is corrupt, but the mechanism Windows uses to tell the programs where it is that is broken? I suppose this is the registry entry, and I manually entered it when I moved the folder, and the Shell:cache command does find it correctly, so that seems to be a dead end as well.
I don't suppose there is any way of actually getting Microsoft to take any responsibility for finding a solution to this is there?
Diane Poremsky says
anything is possible, whether it is very likely is another matter.
Jeremy says
I use Avast, have not had Mcafee on this machine as I find it too intrusive. I tried restarting in Safe mode, it made no difference to the red x's appearing in Outlook, or the way the settings for the TIF are not changeable in IE. ???!
Diane Poremsky says
I'm out of ideas - it sure sounds like the TIF is corrupt but the only ways i know how to fix it are the ones you've already tried.
Jeremy says
It is set to 256,000 decimal. I changed it to 512,000, it has no effect, the disk space for TIF still shows as zero in the Internet Options box. Gawd this is so frustrating, After 20 years tusselling with Windows issues I have honestly never come across a problem that couldn't be solved eventually. After 5 months of tinkering this is looking insoluble. And yet is appears to effect so many people?!
Diane Poremsky says
I'd say its a definitely problem with the cache file/folder. What antivirus do you use? Have your tried booting into Windows Safe mode to see if it works differently?
Jeremy says
One more piece of info. If I run Outlook in safe mode (Outlook /safe) then the images have the red cross and the message to tight click to view images. If i right click then the message goes and I am left with just the red cross and the title of the image, which is what I get when I run Outlook nirmally.
Diane Poremsky says
This is for an older version of windows - https://support.microsoft.com/kb/195163/ - but it suggests that not just TIF, but other folders could be corrupt too. This one - https://support.microsoft.com/kb/301897/ - blames mcafee.
Go to HKEY_CURRENT_USER\Software\Microsoft\Windows\CurrentVersion\Internet Settings\5.0\Cache\Content - what is the cachelimit value set to? If you change it there (decimal value, in KB) does it stick?
Jeremy says
Yes, as far as I can see I have done everything suggested on this page. I deleted the TIF folder using Lewis' method from within IE. Outlook didn't recreate it when restarted. i have made a new TIF folder in a new location, and put that entry in the registry. Given IE will only allow zero space for the old and the new TIF folder I think that is roughly where the problem lies, but can't make any progress.
Jeremy says
Diane
Thanks for your exhaustive thread on this surprisingly common problem, However I have tried every suggestion on this page - without success.
I have Win7 , Outlook 2007 and IE 11.
I do seem to have an issue with my TIF folder, I deleted the entry in the registry, and Outlook didn't recreate it. So I have manually entered a new location in the registry, but if I use shell:cache I can se it exists but it remains completely empty. Also before and after editing the Registry, it is impossible to change the size of the temporary Internet Folder in IE Internet options/browsing history/settings dialogue. It is always zero, if I try to change it it says I have to enter a value between 8 and 8, even if I put 8 in it reverts back to zero and the path is always blank. I have tried deleting the Cache and lowCache entries in the registry as suggested in another thread, they are then recreated when IE is next started but I still have the problem. I am sure this must be causing the issue with the red x's but can't fix it! Any ideas please?
Diane Poremsky says
Did you create a second windows logon account (that is an administrator) and delete the first account's TIF folder from the other account?
Clive says
Diane/Kausikdatta,
Pictures in emails from sources previously viewable had been replaced by a red cross on my home laptop
I installed various cleaners and tried the recommended registry changes to no avail.
And then found Kausikdatta's comment re the encrypted page setting. this was checked and after unchecking all was fine.
Many thanks
selvakumar says
I am using win 7 + ie11 and I am not able to see embed image in outlook and it just showing X mark instead of image. Kindly help. The image is from a https website.I am having only issue when the image comes from https website and images are showing fine when it comes from http websites. Also If I downgrade ie11 to ie 8 or ie 10 and it works fine.
Diane Poremsky says
Did you check the Encrypted page setting that several people said fixed their problem?
kausikdatta says
Diane, I tried - unsuccessfully - almost all the solutions posted in various internet fora for getting my Outlook 2013 to show the images in emails on my Windows 7 Enterprise x32 machine; Secure Outlook temp folder, new profile, folder size, registry edits to allow images, and so forth - none of them worked.
I finally hit upon the jackpot when I read somewhere that Outlook follows IE settings, even if IE is not the default browser (it's not for my machine). I opened IE settings, and in the Advanced tab, unchecked the "Do not save encrypted pages to disk" option. Et voilà! I now see images in emails in my Outlook 2013!
Hope this helps someone else.
RandyRay says
Thank you! Thank you! Thank you! After years of trying to correct the situation, I tried your 'fix' and "Et voilà! I now see images in emails in my Outlook" 365 app.
It's like Christmas except better! Thank you.
Lewis says
I finally fixed my problem with the red X. I went into Internet Explorer "Internet Options" and under "Browsing History, clicked "Settings". My "Disk Space To Use" was set at zero, and I couldn't change it, but I saw a button that said "Move Folder", so I thought "what the hell" and clicked it (then you have to reboot). Voila - I could increase the disk space, and my Outlook would let me download pictures and actually see them. The emails where I had already downloaded picture, but just got the red X, also displayed the pictures. An easy solution, but I had to find it myself.
Diane Poremsky says
That's easier for most people's than the "correct" way to fix it (log in to the computer using another account that has administrator rights and delete this account's Temp Internet Files folder).
Ellie Boross-Toby says
Thank you, Lewis! Your solution is brilliant in its simplicity, and it WORKED. Red X.s gone and images downloading, as they should. MS should employ YOU!!!
Regards,
Ellie Boross-Toby, Canada
Don Pham says
I used CCleaner v4.08 utility to delete temp files, and my problem fixed.
Alberto says
I cannot do it. I tried but now it tells me that the folder is inaccessible "access denied". Also, the folder has an arrow on it, like the ones for shortcuts.
Could you help me and tell me what is wrong please?
Alberto says
Sorry, obviously I re-installed MS Office 2007 onto the new SSD once I inserted it.
Alberto says
Thank you Diane,
This mornig I put in my old HD, unistalled MS Office 2007, re-cloned it onto my new SSD and the insterted my new SSD, but still I cannot see any images in Outlook.
I just tried logging in with another Administrator account but it won't let me delete the Temp INternet Files Folder for the main user (me). It tells me that this folder is in use and cannot be deleted.
What can I do?
Diane Poremsky says
Try logging off your regular account then log in with the new admin account, rather than switching users.
AlbertoDM says
I use Windows 7 Home Premium and use Outlook 2007 with my Gmail account.
It all happpended yesterday morning when I installed a new SSD which replaced my old and slow Hard Disk. The cloning process went perfectly and the support people at Apricorn believe it has nothing to do with it (or at least it never happened to them).
At this moment I think that this porblem can only have happened bacause of the cloning sinci I tried everything else.
For what conerns your links, I tried using them from Chrome so I guess that is why they did not work. I will try from IE and get back to you, even if I followed the manual procedure to the letter and nothing changed.
I also have another idea; what do you think if I re-install my old Hard Disk, then I unistall MS Office 2007, clone it again onto the new SSD and reinstall MSOffice 2007? Culd thius work?
Thank you Diane
Diane Poremsky says
I don't think all that effort will change a thing. The clone should have worked just fine. At the very most I would do two things: reinstall or repair office and log in to windows using an administrator account (create it under control panel, users) then delete the Temp Internet Files folder for your account. Switch back to your account and try again.
AlbertoDM says
Diane,
I also forgot to say, I could not make work your solutions "Do it for Me".
Are the links active?
Diane Poremsky says
The links are working. What happened when you tried? If you use Firefox or chrome, you need to save the file and change the extension to reg then double click to run.
AlbertoDM says
Dear Diane,
I followed closely your post and tried every option available that you described.
However my Outlook 2007 still does not download images form any email.
How could I fix this? I tried installing Outlook 2010 but still I could not see the images so I reverted back to Outlook 2007 to which I am more accustomed and happy with.
Still I could not fix the problem with the images in the body of incoming emails.
What could I do?
Please help because it is extremely important for my job that I can access images.
Regards,
Alberto
Diane Poremsky says
Is this with your gmail account or another account type? What version of windows do you use?
Crissinn says
Perdonen mi ingles pero soy de España y utilizo el traductor de google para poder expresar mi experiencia. Yo también tengo problemas con las imágenes vinculadas y he podido comprobar un par de cosas después de muchas pruebas.
1º caso “curioso”
Tengo una campaña publicitaria que si se recibe perfectamente, sin embargo si añado cualquier otra imagen a esa misma campaña y la vuelvo a enviar, ya no muestra ninguna de las imágenes que antes si se veían.
2º caso
Como he dicho, después de muchas pruebas y por supuesto seguir los pasos arriba indicados he comprobado que las imágenes se ven correctamente si utilizamos la opción de ver en en navegador y sin cerrar este volvemos a cargar el mensaje de correo, comprobaran que se ve perfectamente. He observado que al cargar en el navegador crea un archivo temporar en la carpeta secure, pero al cerrar este dicho archivo también desaparece y el correo vuelve a verse mal.
--------------- google traductor -------
Pardon my English but I'm from Spain and I use the google translator to express my experience. I also I have problems with linked images and I have seen a couple of things after many trials.
Case 1 "curious"
I have an advertising campaign if received perfectly, however if I add any other image that season and I resubmit, and does not show any pictures than before if they looked.
Case 2
As I said, after many trials and of course follow the above steps have verified that the images displayed correctly if you use the option to view in browser without closing this we reload mail message, ascertain that looks perfectly . I noticed that the load in the browser creates a file in the folder temporar secure, but also close the the file disappears and returns to dim email.
Caleb says
Page 2:
My situation is that my hard drive was slowly failing, and I bought and inserted a new WD hard drive and used their Acronis cloning software to clone the old information onto the new drive. For most programs, it worked great, but I am having all kinds of trouble with Outlook. I cannot see the graphics files in my emails, I cannot search email folders, indexing is permanently shut down, IE won't let me run any of the MS "Fixit" applets, can't run Windows updater, can't access windows help from within the programs.
That is why I am contemplating a clean install. I made rescue discs when I bought the computer, so I think a clean install would be a matter of inserting 3 discs in succession and letting it do its work. I would just overwrite every thing that's there, right? Then uninstall and re-install Office. The hardest part is keying in the registration code. --- OR???
Windows 7, Outlook 2010, IE10
Diane Poremsky says
Cloning shouldn't cause problem, things like Easy Transfer will, since its not a true clone. I would do two things before a clean install - repair office install and create a new profile. A new windows profile should fix it too, but sometimes that is as much work as a clean install.
Why won't IE run the fix its?
Do you have your office installation code? If not, you can get it from the registry using magical jelly beans (use the zip version) or similar.
Caleb says
Diane, I looked in the "HKEY_CURRENT_USER\Software\Microsoft\Office\x.0\Outlook\Options\Mail DWORD: Send Pictures With Document" and there IS NO "Send picture with document" key there. When I right-click inside the box, I get the following options:
Key
String Value
Binary Value
Dword (32-bit) Value
Qword (64-bit) Value
Multistring value
Expandable String Value
I am at a loss as to which one to choose.
Diane Poremsky says
If it doesn't exist, you need to create it - many keys are not created until and option is changed and some are only available if the user (or admin) creates them.
Caleb says
From July to October 2013, and there is NO DEFINITIVE ANSWER for this problem yet? You never answered the question about whether DWORD should be set to 1 or 0, or what to do if it is not present???
And concurrent with this issue, I am not bale to download any of the "FIX IT" applets or access the help thru my IE10 or search emails. It tells me that my indexing is off, even when I turned it ON. Office 2010, Windows 7, and IE 10.
At this point, should I re-install my windows 7?
Diane Poremsky says
Sorry, I get a lot of comments here - I try not to approve comments until I have time to answer them but occasionally I approve one without answering it.
Diane Poremsky says
I personally wouldn't reinstall windows, it's too much work. A clean install is a lot of hassle, but yes, it is likely to fix it. I'd try deleting the entire secure temp folder first - you need to log in as a user with admin rights then delete it from your profile.
The DWORD "Send Pictures With Document" value should be 1 if you are having problems.
maryh2 says
After many hours, this is what actually worked. Thank you.
Steve Tennis says
I set up a new profile for Windows and added sites back to my safe senders list. I am now seeing pictures from these sites. All e-mails are still not showing pictures initially but I have the choice to add to the safe senders list and not just open the pictures in a browser.
Steve Tennis says
Mine is set to 1. Is this the correct setting? I'm looking in the 14.0 folder but I also have an 8.0 folder. That folder only has an Outlook folder with Default and First_Run in it.
Diane Poremsky says
You guys with the problem need to check the value in HKEY_CURRENT_USER\Software\Microsoft\Office\x.0\Outlook\Options\Mail
DWORD: Send Pictures With Document - is it set to 0 or 1? (Or not present at all)
Steve Tennis says
I am one who needs to have it very specifically spelled out for me when it comes to this. I have done both the proxy server authorization and the registry edit things above. I assume the delete the value item you refer is done by the "do it for me" things above. I have gone to the advanced tab in IE10's internet options and unchecked the box in the multimedia section that reads show image download placeholders. I have emptied every "Temporary Internet Files" folder I found on my hard drive. I even went to control panel to uninstall IE10 and it wasn't even in the list of programs. Protected mode check box is empty on the security tab. Like I said, I have tried EVERYTHING on the internet on this site and others. There has got to be a fix ..... beyond annoyed and now frustrated.
Diane Poremsky says
I'm pretty sure it's IE10. Have you restarted Outlook or rebooted? I know many people say they needed to reboot. One possible fix for uninstalling is to use System Restore - that usually takes care of removing installed programs.
I'm the mean time, I'll see what i can find out.
Steve Tennis says
Outlook 2010, Windows 7 Home Premium, and IE10 is loaded but I use Firefox.
Diane Poremsky says
It's probably IE10 causing it. The two fixes I'm aware of are delete the value from the registry and let outlook recreate it and disable IE's protected mode. Someone said they had images turned off in IE's Internet Options settings - but this shouldn't affect 2007 and up. But it's worth checking.
Steve Tennis says
I have tried all of the above without success. Anything else???????? This is really annoying.
Diane Poremsky says
What version of Outlook, Windows and Internet Explorer are you using?
Cornan The Iowan says
There is at least one other cause for red "x"s without the explanatory text: If "something" makes Internet Explorer switch to "Offline" mode, the red "x"s will appear in Outlook.
I don't use Internet Explorer but opened it in response to another article (not on this site). As soon as I opened IE I saw that it was running in "Offline" mode, and as soon as I corrected this issue Outlook started showing me images again.
Paul Croston says
Diane
Many thanks
I had to access the Content.Outlook by entering shell:cache in the start menu search field. I deleted the files (approx 220Mb) and I was able to download email pictures again. I'd tried all the other fixes in other forums without success so was getting very frustrated after hours of trying to resolve this issue.
Paul
pete says
Diane you are a superstar ,worked immediately
many thanks this has been driving me mad for weeks
thanks again
Peter
pete says
my trust centre options are ok , i use firefox but IE 10 downloads automatically do you think that could be a problem even though i dont use it ?
Diane Poremsky says
I thought I posted this earlier but apparently write it but never finished it. :( Since you use FF, go to Internet Options in Control panel, and on the last tab, click Reset. Also, IE10's "Protected Mode" may be disabling hyperlinks -in IE, check Internet Options > Security... and deselect Protected Mode.
If that fails - use this reg key to clear the secure temp settings then restart Outlook.
Gil Henderson says
Hi Diane, same problem; solved by doing that IE reset, the basic one, not the personal. I also deleted the "OutlookSecureTempFolder" entry in the Security Key. Everything is working again, but the OSTF entry has not reappeared in the registry. The problem may have been IE going to offline mode as Cornan suggested, although I hadn't checked, being a FF user.
Thanks for all the information, and the time and effort you spend on these posts.
pete says
have tried all this , i dont have that temp folder you mention its not there??
my problem is only on e.mails linked to internet ,amazon,aldi etc ,im on windows 7 office 2010 ,firefox ,but when i bounce the e.mail to my works laptop i can see the images ok ? also running windows 7 and office 2010 ?? help please
Diane Poremsky says
That is blocked external content - Go to File, Options, Trust Center - check the settings on the Automatic Download page. If you are configured to allow external content, was IE10 installed right before you noticed the problem?
matt froman says
This can also happen when you install IE10 and then downgrade to IE9. I haven't located a fix for me, but that's how it started for me.
Diane Poremsky says
I suspected that with someone last week. I would start with deleting the OutlookSecureTempFolder value from the registry and let outlook rebuild it. Also check and see if Picture placeholders is enabled. One of the guys who mentioned it quit working after IE10 was installed came back and said it was the picture placeholders setting.
Karen Nyhus says
Do you have a spam filter? Could be the culprit.
Look at the message in Outlook preview pane. If the images are at the top of the message, the url for them should appear in preview mode (otherwise you may have to dig a little deeper to see the message source and check the image links). One possibility (happened to my client out of the blue, twice - spam filter companies adjust their algorithms periodically so this can appear/recur even if you've fixed it before!) is the spam filter is removing images and replacing them with something like "transparent.gif," including a url to the new image source (not your original url or web server). If this is the case, you will need to adjust your configuration settings at the spam filter (remove the 'spam beacon' and 'web bug' block). Here's a link for McAfee/(formerly MX Logic):
https://www.myicontrol.com/fusetalk/messageview.cfm?catid=28&threadid=793
I am not sure what triggered the block but for this client it only happened to emails sent through a third-party mass emailer. I am waiting to see if we can turn off the block only for them and leave it in effect for all other domains (it's a good thing). Hope this helps.
Richie says
Forwarding the message still doesnt show the image. As I mentioned, I dont think its corrupted since image is viewable (as attached image) via OWA and mobile devices. I am not sure of the original message format (HTML or RTF) but I will investigate that. On a different note, is it possible to receive email alerts when this thread is updated? If so, how?
Diane Poremsky says
I'll need to check on email updates - i thought it send them, but I may have it turned off.
Outlook has been known to have problems with messages that OWA or another client handles with ease. But forwarding fixed most of the problems.
Richie T. says
Any update to this issue? I am seeing the "red X" issue on multiple machines w/ Outlook 2010 connecting to our corp. Exchange 2010 server. Always seem to happen to messages with BMP images pasted inline and sent from outside mail servers. Have tried several things: cleaning secure temp folder, deleting and recreating temp folder, removing temp folder. this is even happening on a machine with a fresh OL2010 install and new profile in Online mode. Also attempted the MS Fixit here https://support.microsoft.com/kb/2638687 with no success whatsoever. I know images are there because they are viewable in mailbox via OWA or even IOS mobile devices.
Thanks.
Richie
Diane Poremsky says
No update yet, but thanks for the possible clue. I'll test it with BMP's inserted. Outlook converts BMP to web-safe images if using HTML format or embedded objects if using RTF. Try hitting Forward on the messages and see if the images show in the Forward. If so, the message is getting corrupted and outlook can't read the image - Forward re-writes the message which fixes the problem.
Bill says
Diane: I looked at a bunch of different web articles to try to figure this out and yours was by far the most comprehensive and understandable -- after trying stuff for an hour and getting more and more frustrated, I found your article and fixed it in about 5 minutes. Thank you!
Diane Poremsky says
Thanks!
Dawn says
So what did you actually delete? What was the name and location?
Diane Poremsky says
Should be the OutlookSecureTempFolder entry under
HKEY_CURRENT_USER\Software\Microsoft\Office\xx.0\Outlook\Security (where xx is your version)
Paul says
Hi, I too had this problem over the past week and followed every link, however, one link suggested the removal of the registry entry folder for the temporary files. As a last resort I just deleted this via 'regedit'. Rebooted and my pictures are now showing.
Hope this helps
Dawn says
C:\Users\Owner\AppData\Local\Microsoft\Windows\Temporary Internet Files\Content.Outlook\
This is what I have closed outlook and reopened and still red x
Diane Poremsky says
The problems started just this week? I'm thinking the bad update somehow affected it - we know for sure that it is causing other problems. Microsoft Security Bulletin MS13-036
Dawn says
When I look mine up the only users I have are owner & public.
Dawn
Roger says
Diane,
Thank you so much for this thread and your expertise/guidance.
I had thought I deleted the secure temp folder, but after reading your last two posts and looking at the registry I have multiple .....\office\xx.0 entries. eg, I have \office\8.0 AND office\11.0 AND office\12.0 etc. I am not sure what all of these are. I ended up going to each of them and deleting the file name only (OFH01PIF) eg ...\Content.Outlook\OFH01PIF...in all of them and left it so that all strings read: .........
C:\Users\Roger\AppData\Local\Microsoft\Windows\Temporary Internet Files\Content.Outlook\
I then re-launched outlook (with fingers crossed) and you could tell it was doing something as it took more time than usual. Obviously it was rebuilding the temp folders and it worked!
Many days of frustration gone!!!!
joe says
Do we delete the whole folder? Like 11.0, 12.0, 14.0?
Diane Poremsky says
The temp internet cache folder in Windows Explorer, yes, delete the entire folder. Windows will recreate it. Registry keys, no, you need to change the values, not delete them.
Tim says
Ok, did some digging. Yes, that does exist. It is empty. Still no images.
Diane Poremsky says
Did your problems start on Wednesday?
Tim says
Thanks Diane, but I really do not know how to check the path?
Dawn says
Diane on your 4/11/2013 comment at 6:23 pm what is the Value Data suppose to be? I am also having a problem and it has been about 10 days now. Everything you have in your comment matches up but when I look at my value data it is different.
Diane Poremsky says
Mine has C:\Users\Diane\AppData\Local\Microsoft\Windows\Temporary Internet Files\Content.Outlook\RMO1NFZY\
Diane Poremsky says
Is your Temp path valid? Check the path in the registry and confirm the path exists -
HKEY_CURRENT_USER\Software\Microsoft\Office\xx.0\Outlook\Security
Value: OutlookSecureTempFolder
Joyce says
HOW do you check the path in the registry? The search will not bring it up.
I, too, have followed all the directions, i.e emptying temp int files,etc, and the "Uncheck the box to Show picture placeholders" is unchecked...
I'm very frustrated...
Diane Poremsky says
Which version of outlook and windows?
Press windows key + R to open the Run command.
Type Regedit in the box and press Enter.
Browse to the registry location - HKEY_CURRENT_USER\Software\Microsoft\Office\xx.0\Outlook\Security
What path is listed?
Nelio says
I had the same issue and it was driving me nuts. Thankfully, it went away after I installed the latest Windows Updates and rebooted. Hope this helps everyone still having this problem. I'm running Outlook 2007 on Windows 7 64bit.
Tim says
I have been watching this thread because I too have this same problem and have tried everything. I do not run updates because of these kinds of issues. However, I did have to update to IE 10 because a site I use required the update. They also used the newest version of Apple Quicktime. It is since I made these updates about 10 days ago that I have been receiving the "red X' issue. I can close Outlook and when I re-open it the pictures show only to fade to "red X's" at a later time.
Stephen says
Tim, I have IE 10 installed and I have the exact same issue as you. When I first open emails with embedded pictures they will show, and then later when I come back to the email they disappear. Very annoying!
Roger says
I used the original office disk and did a "repair" function. No change. Unfortunately the mid-march windows updates did around 15 updates at the time and I haven't had the time to back them out one at a time. Interestingly, I have multiple email accounts set up in Outlook and one of them does not have this problem. I am therefore thinking this is more of an account setup/ISP issue however nothing has changed recently in either of these areas. Very Frustrating! ISP says its MS problem, MS says its ISP problem.
Diane Poremsky says
What type of email accounts are in your profile? They should all have the problem since it uses http functions to get the images.
Roger says
I have read this thread and there seems to be a problem that may have originated in a windows update done KB2687493 around mid March. That is around the same time that I started seeing it. I am running Win7 (32), Outlook 2007 and IE10. All suggestions I have found do not resolve this "new" issue. Hope someone can find out what is going on.
Diane Poremsky says
What have you tried? Did you try uninstalling it and repairing office?
Do you have any other problems with office since installing that update?
Potato says
I am having this same problem. I've tried everything suggested. I'm so annoyed with this Windows laptop that I'm considering going out and buying a Mac. I cannot delete any of the files in the Temporary Internet Files directory. I've also tried doing this in Safe Mode.
Diane Poremsky says
What happens when you try to delete the files?
Denis says
Hi Diane,
I am following this thread with interest as my Outlook 2010 running under W7 Ultimate is also doing exactly what others are reporting although it was not always the case. This seems to have started within the last week. I have no temp file or .OLK to clear, have followed the Fixit solutions for checking registry values but the solution is still alluding me. Do you have any further suggestions please?
Diane Poremsky says
At this point, no I don't have any other suggestions. I have seen an uptick in complaints and will see what i can find out.
Mark W says
Yes, I had tried the picture placeholder setting. I tried every checkbox suggestion I could gather from various forums. I tried running the Microsoft Office repair tool. Do I need to completely uninstall and reinstall Outlook 2007? I can't think of what's left to try. If I do uninstall, are there any utilities your recommend to completely clear out every last trace of the program?
Diane Poremsky says
Install/reinstall rarely fixes problems that are not fixed by a repair or a repair install. Did you try deleting the securetemp folder and letting outlook create a new one?
Mark W says
Thanks for your suggestion. I tried a system restore rollback to a few days ago when this issue wasn't happening. No luck. I also tried opening Outlook 2007 in safe mode. No luck.
This is all on a home computer, no proxy server. Does anything else come to mind that I should try?
Diane Poremsky says
Have you checked the picture placeholder setting? That shouldn't have the red x though- just a blank box.
While in a New message window
Click the Office icon
Click the Editor options button on the lower right of the dialog
Select Advanced from the left menu of the Editor options dialog
Scroll down to Display email contents section (near the bottom)
Uncheck the box to Show picture placeholders
Then click OK to apply and close
Mark W says
I appreciate this article to fix the red X issue, but I'm still at wits end. I followed the directions exactly to clear my SecureTemp folder, which only had a few files anyway. I've checked all my Trust Center settings and they're correct. I even set up a new administrator user account and set up Outlook on that account, and I still get the red X with no text next to it. I'm using Windows 7 and Outlook 2007, and this wasn't an issue as of a two days ago. Any registry tricks or other ideas?
Diane Poremsky says
Is this a home computer or work? Do you access the internet via a proxy server?
Did you try using System restore to roll back whatever changes may have been installed?
Mike M says
I have the red cross with no text beside it. But there is no "securetemp" folder in the "Temporary Internet Files" folder, and nothing with a cache of images.
I've wasted about 3 hours trying to resolve this. Microsoft are a real pain in the A$$ with "gotchas" like this.
Diane Poremsky says
What version of Outlook and windows do you use?
Pete Guzzetti says
This solution worked for me - THANK YOU!!!
Valerie says
First...important for you to know, I am in NO way, technical, so be gentle!
I have Outlook 2007, and sometimes I have a box that does not have the option to download images...just COPY. I read your info and found the temp file, but there were more than tmp files...is it safe to delete everything in that folder? I did delete the ones w/the .tmp extension, and when I returned, the images loaded in the e-mail right away! However, the other e-mails w/red x's that OFFER the choice to DOWNLOAD did not automatically load the image. Can you advise me what to do in this type situation? Thanks for any help
GreenJello says
And when all these fixes don't work, try this:
https://greenjelloland.blogspot.com/2011/11/soluti...
Clapton says
Hi Mr.
I tried these options, my outlook is set properly.
I have a message with a graphic embedded.
I tested the the arrived message by putting its source into an html file then opening it in Google Chrome. I could open it and have the image displayed without a problem.
Yet it's still not visible from within outlook 2010.
Robin Datta says
The Show picture placeholders box is already unchecked and images are downloaded fine with subscribed email ads, and the do not download automatically option is unchetced in the Trust Center but no luck with the pictures displaying in emails.
dporemsky says
Are the images attached or embedded? If attached, they need to be opened (or selected in Outlook 2010 - so they display in the reading pane). If embedded, they should display properly provided the securetemp folder is empty. However, it's also possible that the images are corrupt - can you view them if you save the attachments to the hard drive. (To save embedded images save the message as HTML then look in the folder of the same name in the save location.)
Many ads use linked images stored on a web server, not attached or embedded, so they display as long as download external content is enabled. (Some, especially spammers, use embedded images so they can't be blocked.)
Johnny King says
Okay, I searched for this problem before. I was experiencing it on a Windows 7 Ultimate, IE 10 , Outlook 2010 install. It started right after an update about 1 month ago, and I always kept my system updated! I lived with it until I downloaded Thunderbird for mail and Mozilla for browzing! MS wanted to charge me for extending my warrantee and tech support! Was not happy so I bought into their Windows 8 Pro and Office365 hype and did that instead. Just as cheap! Now I am getting clients having this same problem! Has it been fixed if so where are the links to the fix so I can start helping my clients?
Diane Poremsky says
There are several solutions - the one that seems to work best right now is deleting the Temp Internet Files folder. You need ot log into the computer as another account that has administrator permissions to delete it.