A user was looking for a way to insert scanned images into email, to make it easier for an elderly relative to scan and send images, using a one touch function to scan and send.

You can do this using the Windows Image Acquisition Library to call up the scanner then save the scan and insert it into a new message, all from VBA. You can set the scanner options (DPI and photo size) using VBA or bring up the scanner options dialog. Although the scanner dialog adds a second click, it easy to adjust the options for each scan,.
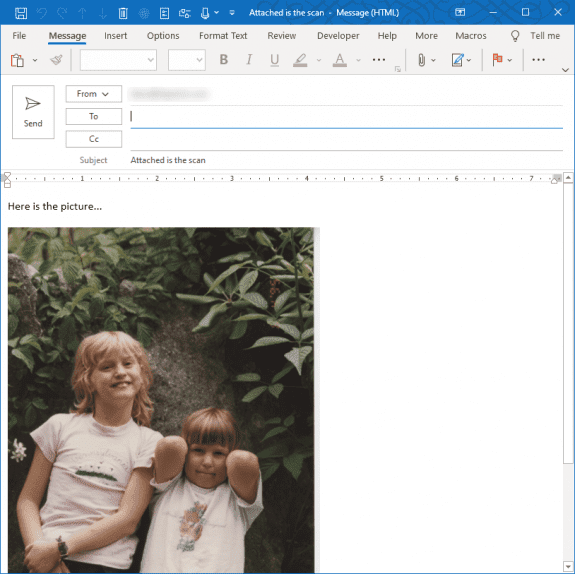
This code in the macro embeds the attachment in the message body.
 .Attachments.Add strFilePath, 1, 0
  .HTMLBody = "<html><p>Here is the picture...</p>" & _
    "<img src=""cid:" & strFilename & """width=400>"
    ' can set height also, if uniform. if not, set one value
If you want to attach the image but not embed it, change the code to this:
 .Attachments.Add strFilePath
  .HTMLBody = "<html><p>See the attachment...</p>"
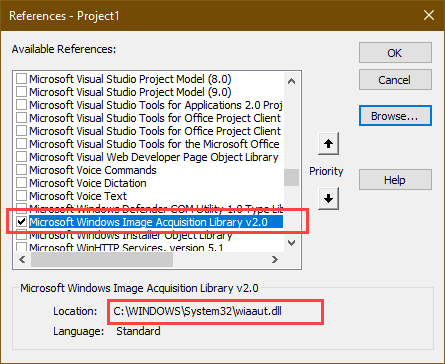
To use this macro, paste the code into a new module then open Tools > References to set a reference to the Microsoft Windows Image Acquisition Library v2.0 object library. If it's not listed in references, you'll need to click Browse and find it at C:\WINDOWS\System32\wiaaut.dll.
Sub ScanToEmail()

Dim wiaImg As New WIA.ImageFile
Dim wiaDialog As New WIA.CommonDialog
Dim wiaScanner As WIA.Device
Dim strFilePath As String
Dim strFilename As String

Set wiaScanner = wiaDialog.ShowSelectDevice

With wiaScanner.Items(1)
' Scammer Options you can set
 '   .Properties("6146").Value = 1 '4 is Black-white,gray is 2, color 1 (Color Intent)
'    .Properties("6147").Value = 100 'dots per inch/horizontal
'    .Properties("6148").Value = 100 'dots per inch/vertical
'    .Properties("6149").Value = 0 'x point where to start scan
'    .Properties("6150").Value = 0 'y-point where to start scan
'
' Paper sizes. This is a 4x6 photo.
    .Properties("6151").Value = 400 'horizontal DPI x inches wide
    .Properties("6152").Value = 600 'vertical DPI x inches tall

' Available formats
' wiaFormatBMP, wiaFormatPNG, wiaFormatGIF, wiaFormatJPEG, wiaFormatTIFF
' Change file file extension in strFilename to match format
Set wiaImg = wiaScanner.Items(1).Transfer(wiaFormatJPEG)

' Make sure its saved as correct format, not bmp
If wiaImg.FormatID <> wiaFormatJPEG Then
    Dim IP 'As New ImageProcess
    Set IP = CreateObject("Wia.ImageProcess")

    IP.Filters.Add IP.FilterInfos("Convert").FilterID
    IP.Filters(1).Properties("FormatID").Value = wiaFormatJPEG
    Set wiaImg = IP.Apply(wiaImg)
End If

End With

'Set the filename
strFilename = "Scan-" & Format(Now, "yyyymmddhhmm") & ".jpg"
' set the file path
strFilePath = Environ$("TEMP") & "\" & strFilename ' set temporary file

' Check if filename exists, if so, delete before saving new
    If Dir(strFilePath) <> "" Then Kill strFilePath
      wiaImg.SaveFile strFilePath 'save into temp file
    DoEvents

' Create the message and insert
Dim olMsg As MailItem
Set olMsg = Application.CreateItem(olMailItem)
With olMsg
  .Subject = "Attached is the scan"
' This is embedding the image
  .Attachments.Add strFilePath, 1, 0
  .HTMLBody = "<html><p>Here is the picture...</p>" & _
    "<img src=""cid:" & strFilename & """width=400>"
    ' can set height also, if uniform. if not, set one value
  .Display
End With

Set wiaImg = Nothing
Set wiaScanner = Nothing

End Sub
Show the Scanner Options dialog
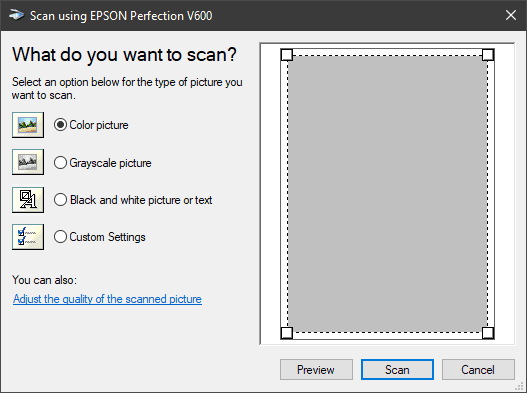
If you don't want or need a fully automated macro, or want a dialog so you can make adjustments, use the following code sample. It brings up a dialog with options for scan type, resizing and quality.

Tip: Use the resizing handles to adjust the scan size and drag the gray box to re-position the cropped area.
Sub Scan()
  Dim objCommonDialog As WIA.CommonDialog
  Dim objImage As WIA.ImageFile
  Dim strFilePath As String
  ' instantiate Scan WIA objects
  Set objCommonDialog = New WIA.CommonDialog
  Set objImage = objCommonDialog.ShowAcquireImage
  strFilePath = Environ$("TEMP") & "\Scan.bmp" ' set temporary file
  If Not objImage Is Nothing Then
    If Dir(strFilePath) <> "" Then Kill strFilePath
    objImage.SaveFile strFilePath 'save into temp file
    DoEvents

Dim olMsg As Outlook.MailItem

Set olMsg = Application.CreateItem(olMailItem)
With olMsg
.Subject = Now
    .Attachments.Add strFilePath
    .Display
End With

End If

End Sub
How to use the macros on this page
First: You need to have macro security set to the lowest setting, Enable all macros during testing. The macros will not work with the top two options that disable all macros or unsigned macros. You could choose the option Notification for all macros, then accept it each time you restart Outlook, however, because it's somewhat hard to sneak macros into Outlook (unlike in Word and Excel), allowing all macros is safe, especially during the testing phase. You can sign the macro when it is finished and change the macro security to notify.
To check your macro security in Outlook 2010 and newer, go to File, Options, Trust Center and open Trust Center Settings, and change the Macro Settings. In Outlook 2007 and older, look at Tools, Macro Security.
After you test the macro and see that it works, you can either leave macro security set to low or sign the macro.
The macros on this page should be placed in a module.
Open the VBA Editor by pressing Alt+F11 on your keyboard.
To put the code in a module:
- Right click on Project1 and choose Insert > Module
- Copy and paste the macro into the new module.
Set a reference to other Object Libraries
If you receive a "User-defined type not defined" error, you need to set a reference to another object library.
- Go to Tools, References menu.
- Locate the Microsoft Windows Image Acquisition Library v2.0 object library in the list and add a check mark to it. If it's not listed, you'll need to click Browse and find it at C:\WINDOWS\System32\wiaaut.dll.

More information as well as screenshots are at How to use the VBA Editor

This really helped me a lot today, thank you very much.
Where should the code snippit at the start be placed?
Before/after/......
"
Sub ScanToEmail()
Dim wiaImg As New WIA.ImageFile
Dim wiaDialog As Ne......
"
MMMMMM
The first code code snippet (to embed) is in the macro - if you want to attach the file not embed it, you need to replace that code in the macro with the second snippet.
Thanks Diane, I overlooked that.
One problem on my side however is that only a very small portion of the original is scanned (I guess about 1/4)...
Is it possible to make this "paper size" flexible or at least ask for a size before scanning starts. Sorry..... ;)
Yes. This part of the code controls the size and some scanning options.
Thanks again Diane!
I saw the piece of code, but hoped there would be some kind of "trick" to insert a user dialog, where the (approximate) measurements of the object to be scanned could be set. Also there are many scanners with an autodetect system, but I presume programming that would be far too complicated.
This code opens a dialog and i can use the resizing handles to adjust it.
Sub Scan()
Dim objCommonDialog As WIA.CommonDialog
Dim objImage As WIA.ImageFile
Dim strFilePath As String
' instantiate Scan WIA objects
Set objCommonDialog = New WIA.CommonDialog
Set objImage = objCommonDialog.ShowAcquireImage
strFilePath = Environ$("TEMP") & "\Scan.bmp" ' set temporary file
If Not objImage Is Nothing Then
If Dir(strFilePath) <> "" Then Kill strFilePath
objImage.SaveFile strFilePath 'save into temp file
DoEvents
Dim olMsg As Outlook.MailItem
Set olMsg = Application.CreateItem(olMailItem)
With olMsg
.Subject = Now
.Attachments.Add strFilePath
.Display
End With
End If
End Sub
Wonderful work, Diane. It works really fine. Thank you for all your trouble.
where to insert code fordialog with options for scan type, resizing and quality.
The example I posted in these comments is in the first macro in the article
Hi Diane
thanks for your Reply. Code works but I can not convert files to JPEG or PDF Formant.