The article How to Show Appointments as "Free" by Default shows how to change the default Free/Busy setting for appointments to Free. You can use the same method to change the default Free/Busy for All Day Events from Free to Busy. However, it's generally better to use a macro and set the Free/Busy state when the Event is opened or Saved to the Calendar because you have more control, but if you can't run a macro, you can use a custom form.
See the Tools section for a utility that sets the defaults for Free/Busy status and reminder time.
All New All Day Events are Busy
This macro sets the busy state when you open a new all day event. It checks for the creation date and does not change the busy state on existing events.
' Based on //www.vboffice.net/en/developers/newinspector-and-inspector-activate
Private WithEvents m_Inspectors As Outlook.Inspectors
Private WithEvents m_Inspector As Outlook.Inspector

Private Sub Application_Startup()
  Set m_Inspectors = Application.Inspectors
End Sub

Private Sub m_Inspectors_NewInspector(ByVal Inspector As Outlook.Inspector)
  Set m_Inspector = Inspector
End Sub

Private Sub m_Inspector_Activate()
If TypeName(m_Inspector.CurrentItem) = "AppointmentItem" And _
  m_Inspector.CurrentItem.AllDayEvent = True And _
  m_Inspector.CurrentItem.CreationTime > Now Then
    m_Inspector.CurrentItem.BusyStatus = olBusy
End If
  Set m_Inspector = Nothing
End Sub
Set Busy State When Added to Calendar
The macro below sets all events that are assigned the Personal category as Busy when they are added to the calendar. It will not set birthdays and anniversaries that Outlook creates or imported Holidays as Busy.
If you only need some all day events marked busy and either always assign a specific category before saving or use a specific word in the subject, such as "vacation", you can use a macro to set the event to busy as it's saved.
To check for keywords in the subject use:
If Appt.AllDayEvent = True And InStr(1, LCase(Appt.Subject), "vacation") = True Then
Private WithEvents Items As Outlook.Items

Private Sub Application_Startup()
  Dim Ns As Outlook.NameSpace

  Set Ns = Application.GetNamespace("MAPI")
  Set Items = Ns.GetDefaultFolder(olFolderCalendar).Items
End Sub


Private Sub Items_ItemAdd(ByVal Item As Object)
  On Error Resume Next
  Dim Appt As Outlook.AppointmentItem

  If TypeOf Item Is Outlook.AppointmentItem Then

    Set Appt = Item

'Checks to see if all day
  If Appt.AllDayEvent = True And Appt.Categories = "Personal" Then
     Appt.BusyStatus = olBusy
     Appt.Save
    End If
End If
End Sub
Change other fields
If you need to set other fields, edit the If line. You'll need to keep the Creationtime = Now line, otherwise the changes will apply to any appointment you open, including existing appointments.
This sample snippet will create meetings every time you open a new appointment form, either using the New Appointment button or double clicking in any of the calendar views.
Private Sub m_Inspector_Activate()
If TypeName(m_Inspector.CurrentItem) = "AppointmentItem" And _
  m_Inspector.CurrentItem.CreationTime > Now Then
    m_Inspector.CurrentItem.MeetingStatus = olMeeting
End If
Create a Custom Form that defaults to Busy
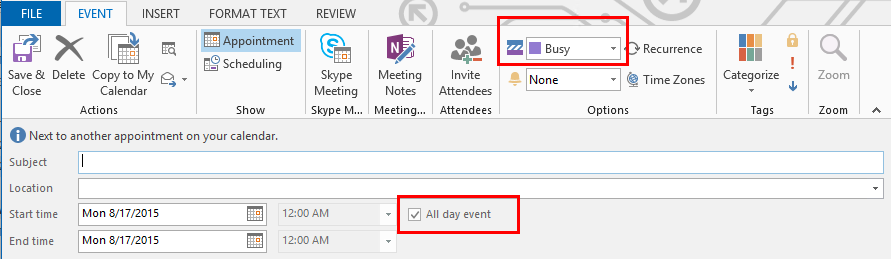
If you can't use a macro, you can customize a form and change the default for All Day events to Busy. There are a few more "gotchas" when you do this for All Day Events:
If you use the New Items > All Day Event menu or right-click and select All Day Event, you'll create an event with Free/Busy marked Free.
If you set the form as the default for the folder, new (timed) appointments may have the All day event checkbox checked. The new appointments will have the selected times correct even though the all day box remains checked but the reminder will default to 18 hours unless the All day event box is unchecked.
Imported events, including Holidays, along with Birthdays and Anniversaries that are created automatically by Outlook will use the built-in default form, where all day events are marked Free.
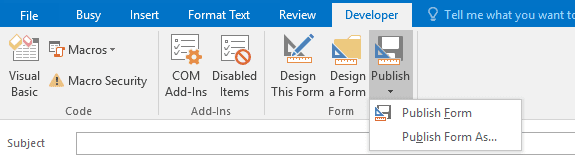
- First, go to File, Options, Customize Ribbon and add a check to Developer ribbon on the right.
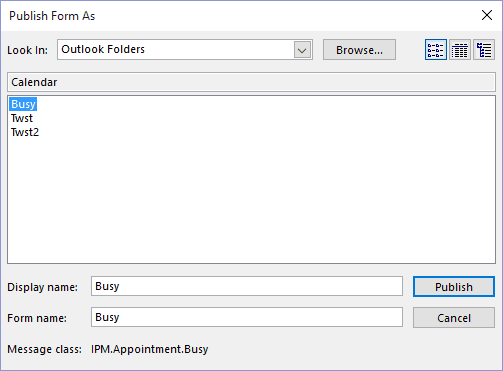
- Open the Calendar folder you want to publish the form in. This makes it easier to publish the form because it gets published to the folder you are "working" in.
- Open a new all day event by selecting a date in the month view then click the New button or double click on the date.
- Change the Show time as field to Busy.
- Publish the form using the Publish form command on the Developer ribbon

- If you are working in the Calendar folder, Outlook Folders is the calendar, so you just need to enter a name for your form.
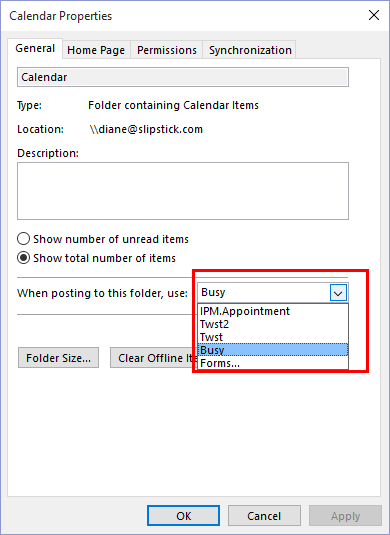
- Set the new form as default for new appointments by right-clicking on the calendar folder, choose Properties and select the form from the dropdown to set it as default.
To create an all day event using this form, select a date in the month view and click the New button or double click on the date. Don't use the New Items > All Day Event menu or right-click and select All Day Event. This command will create an event with Free/Busy marked Free.
If you set the form as the default for the folder, all new appointments will default to All Day Events. However, when you create a new appointment in the day or week view, timed appointments will be created in the selected time period, even though the all day box remains checked. The reminder will default to 18 hours unless the All Day box is unchecked.
Imported events, including Holidays, along with Birthdays and Anniversaries that are created automatically by Outlook will use the built-in default form, where all days events will be marked Free.
How to use macros
First: You will need macro security set to low during testing.
To check your macro security in Outlook 2010 or 2013, go to File, Options, Trust Center and open Trust Center Settings, and change the Macro Settings. In Outlook 2007 and older, it’s at Tools, Macro Security.
After you test the macro and see that it works, you can either leave macro security set to low or sign the macro.
Open the VBA Editor by pressing Alt+F11 on your keyboard.
To put the code in a module:
- Right click on Project1 and choose Insert > Module
- Copy and paste the macro into the new module.
More information as well as screenshots are at How to use the VBA Editor
Tools
ADEtuning allows users to set the default values for the All day event "Show as" status (Free/Tentative/Busy/Out of office) and the All day event reminder time. This COM Add-in is works with Microsoft Outlook 2010/2013/2016. |
Jennifer says
Hello Diane!
Is there a way to make all time that is not specified with any appts. as "Out Of Office"?
Diane Poremsky says
you'd need to create appointments to fill in the space, otherwise outlook will treat it as free.
John says
Hi Diane, can you tell me if there is a way when importing new events into outlook to have them show as Busy by default? Or if that's not possible then a way to convert them to busy once imported? Thanks!
Diane Poremsky says
if you are importing from csv, you can set it in the file before import. Or you can use the method here - https://www.slipstick.com/tutorial/how-to-easily-change-the-private-flag/ - add the modified time and show time as fields to the view, select all that have the current modified date and add a unique category. group by categories, then by show time as. change one imported item to busy, drag the rest to the busy group. Reset the view.