New for Office 365 Exchange in 2021: Send using Mailbox Alias Addresses
New users to Office 365's Exchange Online frequently ask how to send email from secondary addresses on their Exchange mailbox:
I have an Office 365 account and have set up two domains @a.com and @b.com. My user's primary email address is alias@a.com however there are times I want to SEND FROM alias@b.com from Outlook desktop application. How can I do this?
I have an Office 365 Exchange subscription for myself and have 3 different email addresses assigned to my mailbox. I receive email from all addresses in OWA, but I can only send email from one of the email addresses. How can I setup the other 2 email addresses to be able to send email from them, and display them as the sender address?
The answer to either question used to be "You can't". Now you can, if you have an Office 365 mailbox and the email administrator enabled SendFromAliasEnabled. If you are using Office 365 Exchange Online, see Send using Mailbox Alias Addresses for instructions to send from aliases.
If you don't have Office 365 Exchange Online, while you can add additional SMTP addresses to an Exchange mailbox, you can only send mail from the default email address assigned to the account. The additional accounts are receive-only addresses.
Depending on your needs, you (the email administrator) could create a shared mailbox for each address, which would save you the cost of additional mailboxes. If you need separate logins, you'll need to pay for mailboxes, but could use the lowest cost Exchange Online plan (currently $4US per month).
When you use separate accounts (mailboxes), you can send from any of the addresses. In OWA you'd need to open a in-private browser to send and receive mail from each account (unless they were setup as shared mailboxes with my main account having full Send As permission on the account). Outlook desktop supports multiple accounts in the profile, so you could have all mailboxes in a single Outlook profile and send with the correct From address.
Otherwise, there are two options: Create a send-only POP account or an IMAP account to send mail from that address or remove the address from your mailbox and create a single-member distribution group (distribution list), mail contact, or shared mailbox for the address then give your mailbox Send as permissions.
Generally speaking, using a distribution group is the easiest solution to configure. Office 365 administrators can do everything in the online interface.
If you receive a lot of mail to the second address, a shared mailbox keeps the mail separate from the mail sent to your mailbox. Replies to messages in the shared mailbox will use the shared mailbox address but you’ll need to select the shared mailbox’s address to send new messages using it.
A distribution group will receive the messages and distribute the messages to your mailbox, instead of the messages being delivered directly to your mailbox. The only difference is that the To field will list the group name, not your mailbox name. For both new messages and replies you’ll need to select the group address as the From address. Mail contacts work much the same way, except transport (mail flow) rules are used to redirect mail sent to a mail contact.
To create a distribution group or mail contact and give a user send as permission, you need to follow these steps:
Remove second address from mailbox
For a Distribution Group:
- Create a distribution group and assign the address to the group
- Make your user account the only member of the distribution group and give it send as permission
To create a Mail Contact:
When you want to send from the address, select the group or contact in the From field
Remove the address from mailbox
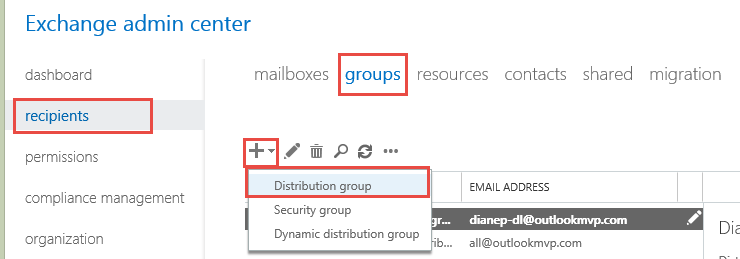
Log into the Exchange admin center and select recipients then mailboxes.
To remove second address from mailbox, select the mailbox name and click the Pencil icon (Edit), or double click on the mailbox name. Select email address from the list on the left, then select the email address you want to remove and click the minus icon. Click Save to save changes and close the dialog.

Using a distribution group
Step 1: Create the new distribution group
Next, you need to create a distribution group and assign the address to it. Still in the recipients section, select groups from the row above the mailboxes. Click on the plus sign and select Distribution group.
Create the new distribution group using the alias you removed earlier. Select the correct domain from the domain dropdown. Add group owners as members should be checked by default. If you are creating a group for other users, their name should be in the Owners list.
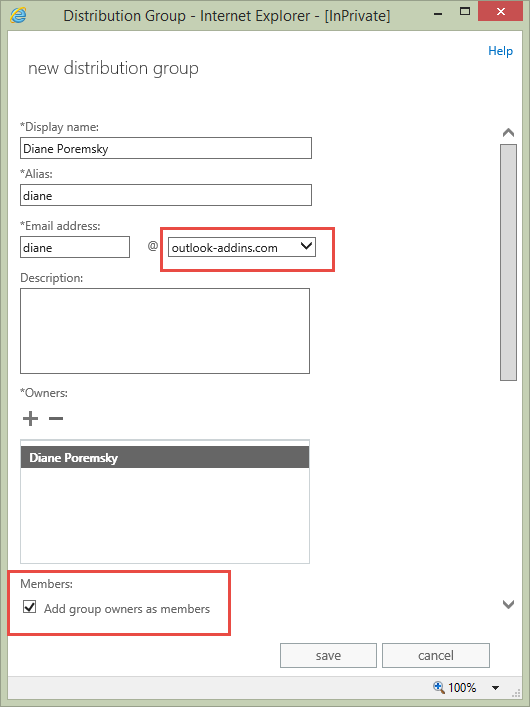
Wait a few minutes for the Active Directory to update and replicate then double click to open the newly-created group and continue with the next step.
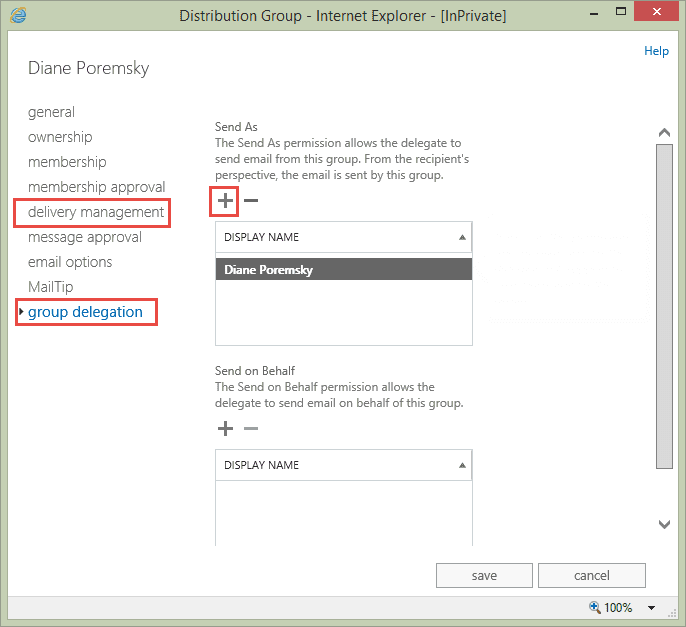
Step 2: Assign Send As permissions
Your user account is the only member of the group and it needs Send As permission. You will probably want to allow outsiders to send to the group address.
To make these changes, click the Pencil icon to open the group for editing. If you want to allow anyone on the internet to send mail to this address, select delivery management and choose Senders inside and outside of my organization.
Select group delegation. Add your account (or the group owner’s account) under Send As. Click Save to save the changes and close the dialog.
Using a Mail Contact
In older versions of exchange, many Exchange server administrators configured Mail Contacts and assigned Send As permission to other users in Active Directory Users and Computers and configured the contact to forward mail to a mailbox.
This is possible in Office 365 Exchange Online using the Add-RecipientPermission cmdlet and mail flow rules.
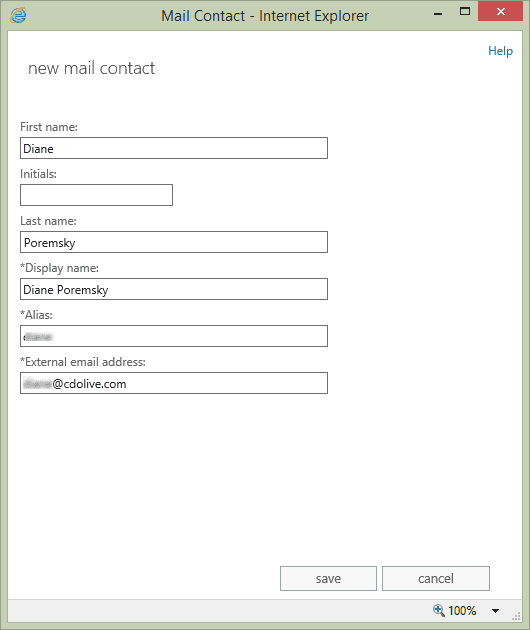
Step 1: Create the Contact
Log into the Exchange admin center and select recipients then contacts.
Create a new Mail Contact .
If you prefer using PowerShell, the cmdlet is
New-MailContact -Name "displayname" -ExternalEmailAddress alias@domain.com -FirstName fname -LastName lname
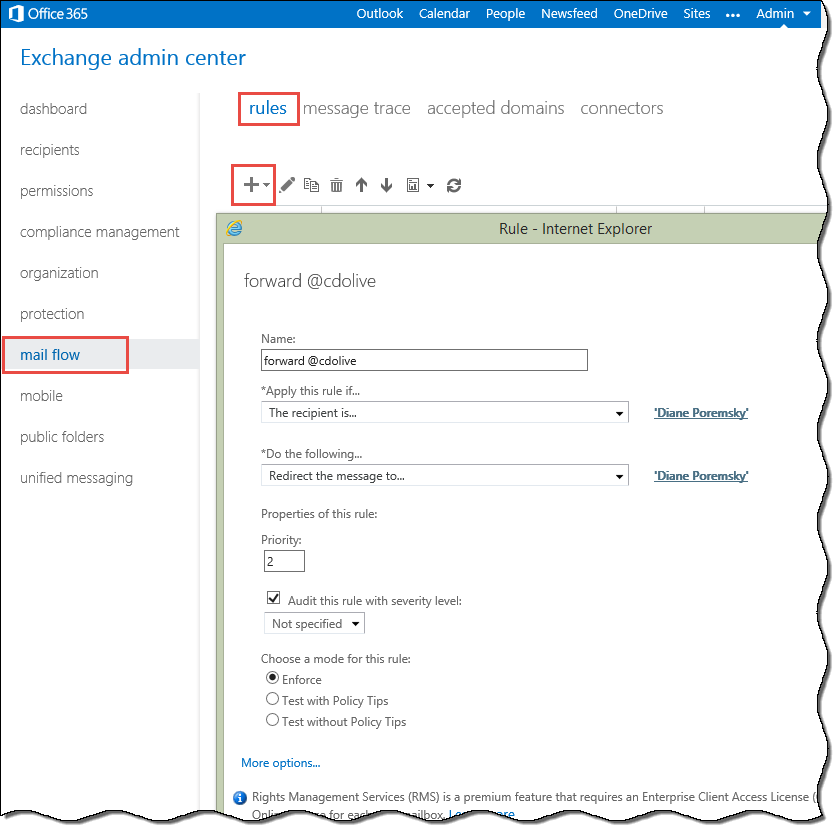
Step 2: Create a Mail Flow Rule
Click the Mail flow link then the plus sign, selecting Create a new rule.
- Enter a name for the rule.
- Select Apply this rule if and choose the recipient is... .
- If you used a unique display name for your contact, select it and click Add. If you used the same display name as a mailbox, type the contact's email address in the check names field then click the check names button. Click OK.
- In Do the following, select Redirect to.
- Once again, if the display name is unique, select it and click Add, otherwise type the address in the check names field and click check names. Click OK.
- Click Save to save the rule and close the dialog. (More Options has additional options such as stop processing more rules.)
Messages sent to the contact address are now being delivered to the user's mailbox. The mailbox user won't be able to reply using the contact address until they are given Send As permission.
If you prefer using PowerShell, the cmdlet is
New-TransportRule -Name "rule name" -SentTo email@address.com -RedirectMessageTo mailbox@address.com -Mode Enforce
More information on transport rules and conditions is available at Transport Rules
Step 3: Assign Send As Permission
You need to use PowerShell to assign send as permission to a contact. Log into Exchange using PowerShell and run the Add-RecipientPermission cmdlet, giving the mailbox user Send As permission on the contact. You can use the display name, alias, or email address in the contact and trustee fields. If the display names are not unique, use the email address.
Add-RecipientPermission "contact alias" -AccessRights SendAs -Trustee "mailbox alias"
To hide the contact in the address list so other users don't select it by mistake, use
Set-MailContact alias@domain.com -HiddenFromAddressListsEnabled $true
You can send as the contact by typing the email address (or display name, if unique) in the From field.
Using the address to send email
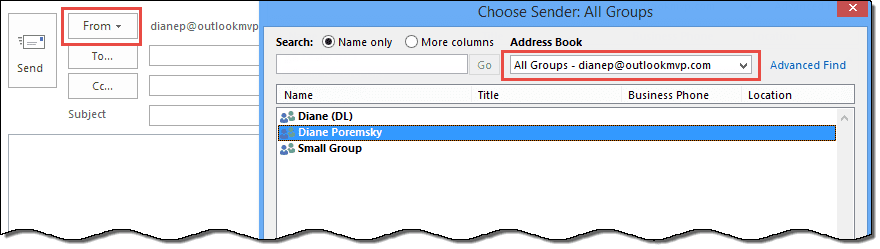
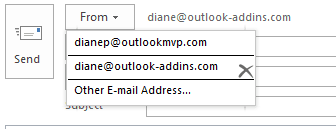
When you are using Outlook on the desktop and want to send from the address, select the distribution group name or contact in the From field. The first time you use it, you’ll need to select From < Another Email address and select your group or contact name. It can take up to 24 hours for the Offline address book to update, but it will be listed under All Groups or All Contacts immediately.
After the first use, the address will be listed under the From menu.
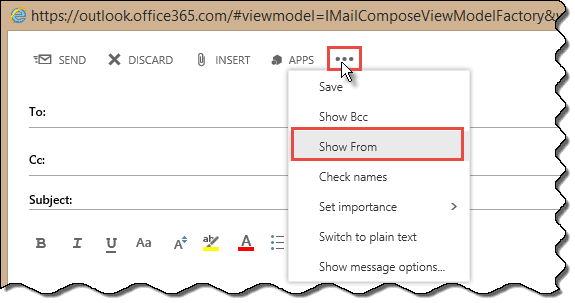
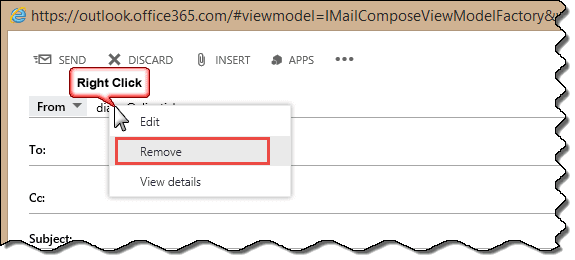
Outlook Web Access users can change the From address.
- First Show the From field by clicking on the 3 dots and choosing Show From.

- Right click on your address in the From field and choose Remove.
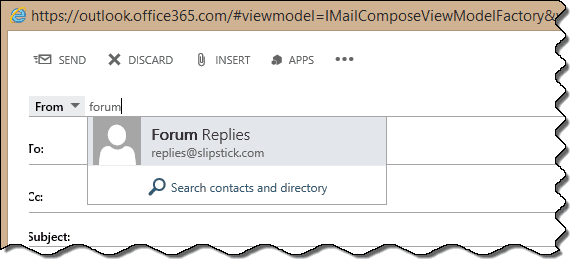
- Start typing in the address or display name of the Distribution Group, User Contact, or mailbox you have Send as rights on and select it when it comes up.
Tools
Office 365 mailbox may have multiple SMTP addresses and receive mail sent to any of the secondary addresses but Exchange Online always uses the primary SMTP address for sending messages. ChooseFrom 365 application allows Office 365 users to send a message with any of their own SMTP addresses as the From address. New feature: multiple display names associated with a single SMTP address. The application is a cloud service. | |
Exchange server mailboxes can have multiple SMTP addresses and receive mail sent to any of these addresses but Exchange will always use the primary SMTP address for sending messages. ChooseFrom allows users to send a message with any of their SMTP addresses as the From address. | |
Proxy Manager lets you send emails from Outlook using any alias (proxy) SMTP address with an arbitrary display name from your Exchange account, hosted or on-premises. There are no server components, everything is done on the client side - just install Proxy Manager, and you are ready to go! Select one of your proxy addresses and click Send. Outlook 2010, 2013, 2016 and 2019 are supported. | |
RightFrom automatically fills in the correct From address when the user is responding to a message in another user's Exchange mailbox. Also RightFrom utility can associate the signatures with the mailboxes. When John Doe navigates to Sales mailbox and clicks the "New message" button, the From: field will be populated automatically with "Sales" and the salesperson (non-default) signature will be added to the message automatically too. | |
SelectSender is a tool for Office 365 users who need to send mail from different addresses. This utility allows an Office 365 OWA user the ability to easily select the From address of the new, replied or forwarded message. SelectSender can be used only in cooperation with ChooseFrom 365 cloud service. | |
Outlook COM add-in for Exchange Server users who need to send mail from a second mailbox. The add-in ensures that messages sent with the second mailbox's From address or deleted from the second mailbox stay in the Sent Items or Deleted Items folder of the second mailbox. |
More Information
You can create single member distribution groups in any version of Exchange server, however the screenshots and exact steps will vary in each version.
James O'Sullivan says
The headline statement in this article is now wrong, I believe. It is now possible to send for alias addresses quite simply using O365 and Outlook.
1. Simply add the alias to your account in the usual way in O365 Admin.
2. In Outlook, open a new mail and from the "Options" ribbon ensure the 'From' button is pressed to reveal this field.
3. Click this drop down and select "other email address".
4. Under here you can manually type the email you want to send from
5. The next time you return to the from drop down, the address will be there to select with 1 click.
This is working for a number of our users, including my non-techy father!
Diane Poremsky says
That works with shared mailboxes (and other addresses, like DLs) that you have send as rights to but not with additional addresses on your own mailbox.
Outlook.com users with multiple aliases on their account can select them from the From dropdown - that hasn't made it to the business side yet. :(
Aaron says
This has been working perfectly for us for the last 18+ months, however as of yesterday the messages are "Undeliverable", "This message could not be sent. You do not have the permission to send the message on behalf of the specified user."
The distribution groups are all set as "Send as" and has never been set as "Send of behalf".
We are using Office 365 Exchange online with local installs of Outlook.
Any ideas to a solution would be greatly appreciated.
Thank you
Diane Poremsky says
sorry I missed this earlier. Is it still not working (after installing recent updates)? Based on the date, it sounds like the Jan 9 update broke it. They released at least 2 updates since then to fix problems caused by that update.
Bruce Redepenning says
Brilliant. Thanks for including every last step in the process.
Tasos says
Hi Diane,
This is an excellent work you have done here. I followed your guidelines and have successfully set up aliases that work with Office 365, Outlook and Outlook Web Access. I can receive and send emails using the aliases without any problem.
Now I face the next task which is to set up the mobile (android) clients to be able to use the aliases.
Any assistance will be greatly appreciated.
Thank you
Diane Poremsky says
You need to add them as IMAP (or POP) accounts - one account for each alias.
If the aliases are in outlook.com mailboxes, the outlook app should allow you to use the aliases without needing multiple accounts.
Ian says
I am trying to setup an Office 365 account so the user can "send as" using an external email address.
When I follow Step 3 (Assign Send As Permission) using the PowerShell command
Add-RecipientPermission "contact alias" -AccessRights SendAs -Trustee "mailbox alias"
I get the following error
You can't use the domain because it's not an accepted domain for your organization.
Any assistance greatly appreciated.
Diane Poremsky says
You cannot sendas using an outside address, only addresses in domains that are configured on the server. You would need to add the account to outlook and send using the correct smtp server.
Victor says
Diane is correct. If you wish to send as any address you have to use ChooseFrom 365 tool,
Ian says
Hi Diane, I am trying to setup an Office 365 account so the user can "send as" for a Hotmail account they use. I have added the Hotmail account as an external contact but assigning the send as permission in PowerShell fails with the error “You can't use the domain because it's not an accepted domain for your organization.”
Diane Poremsky says
Yeah, you can't send as an address that is not part of your tenant. You'll need to add the Hotmail account to your profile and select it when you send.
Diane Poremsky says
Sorry, that is not possible. Only addresses with accounts on the exchange server can be used to send as.
Karim says
Hello Diane, well i am having the issue as well but this time with Outlook 2016: Outlook doesn't list the address in the "From" menu after using it... did you manage to find a solution for this?
thanks!
Diane Poremsky says
No, not yet anyway.
Gaston says
Very informative.
I was to go with the distribution list until I noticed that it was not possible to gave a build a name with a "." in it. Very ofter we create FirstName.LastName@...., therefore it is not possible to use that trick to send "from" that email. Am I correct, or did I missed something ?
Thanks
Gaston
Diane Poremsky says
I'm not sure I understand the problem. You can use an alias with dots in it: my.group@domain.com and i was able to use the display name My.Group.
Gaston says
Sorry about the bad sentence.
When sending an email, my goal was to be in a position to select a secondary email address in the "from" field.
That email address is a secondary address like first.last@domain.com
As suggested, I did remove this secondary email address from the alias list, and tried to create a distribution group with the same name.
It was not possible because of the "." (dot) between First and Last.
Is it better explained ?
Thanks
Diane Poremsky says
It works here - i was able to create a dl using a dot in the alias. Did the error say it was because of the dot?
If the address was removed from the mailbox but the AD wasn't fully updated, it will fail because it thinks the address still exists.
Gaston says
Thanks Diane
In fact the message is: "You can use numbers, letters, underscores, and hyphens." when creating the email address for the distribution list.
The confusion could come from that last point. You were talking about "Distribution group" ("Generally speaking, using a distribution group is the easiest solution to configure. Office 365 administrators can do everything in the online interface").
I'm using the Admin Center Preview. When talking about "Distribution", the interface just refers to "Distribution list", and on my panel I cannot use the "." in the email address name ("You can use numbers, letters, underscores, and hyphens.")
For clarification,
Gaston
Diane Poremsky says
sorry I missed this earlier.
distribution list = distribution group. the main admin page calls it list, the Exchange admin section calls it group.
This is the DL i created when i tested it:

i think i did it from the exchange portal - but i just created on from the main admin panel - the banner on the right said numbers, letters, underscores, hyphens, but i typed a dot and it took it.
Owen says
This is a great workaround to achieving what I want to do, but do you know if something similar works if using the Exchange mail client on iPhone? IE, I'd like to be able to send-as (or send from) a different alias from a mobile device.
Thanks!
Diane Poremsky says
no, at least ont on the clients i checked - you need to be able to type in a from address and most device applications list the names you can use.
Fred says
FWIW - I have it on very good authority that MS are working on this now, as it is such an obvious requirement for moving SMB to exchange on-line.
Diane Poremsky says
They've been working on it for years but there is hope - you can send using aliases on outlook.com accounts (on the new server & using outlook 2016), which is progress. If they can do for outlook.com, they can do it for office 365.
I'm not sure why it would be an issue for SMB now, the same issue exists for in-house exchange / SBS servers and the workarounds work with Exchange online.
maritzapb says
Custom signatures per from address possible?
Diane Poremsky says
No automatic signatures - but you can manually change the signature.
Werner Pertl says
Windows 8.1 Pro update 1 (current patch level) and Office 365 Small Business Premium also with all updates installed.
Diane Poremsky says
It should work and I haven't been able to repro issues where it doesn't get created. Sorry.
Werner Pertl says
Hi Diane,
it only shows my actual accounts, after them one line and then "other email adress" (not a single address with a X beside, tested with several accounts and addresses - no luck).
I found the value 101f0483 in the registry and deleted it, but it doesn't bring any change (and the value doesn't get recreated).
Any other idea? This drives me mad :-)
Thanks again!
Werner
Diane Poremsky says
Hmmm. The value should be created the first time you click other email address and enter a name...
What version of Windows are you using?
Werner Pertl says
Hi Diane,
what can I do if Outlook (2013) doesn't list the address in the "From" menu after using it? I always have to select the address again with "From > Another Email address and select it from the list". Thats not very comfortable.
Thank you very much in advance!
Werner
Diane Poremsky says
I will look into it - it should work (and it used to work).
Werner Pertl says
Hi Diane, thx - I can´t get it to work - already did a Office repair, but that didn´t change anything.
If you have any idea that would be gr8 :-)
Werner
Diane Poremsky says
Does it show any MRUs?
Actual accounts are on top, addresses typed as ' other email address' are on the bottom, with the X beside them.

These addresses are stored in the profile in the registry, in the value 101f0483 - the actual key it's under can vary, here it is
HKEY_CURRENT_USER\Software\Microsoft\Office\15.0\Outlook\Profiles\Outlook\7d44826b1b21b94ab2a470e389a074a3
Search the reg keys in the profile for that value and delete it then restart Outlook and see if it sticks better.
Michael Connolly says
Diane:
I cannot thank you enough for this article! However, I'm at my wit's end trying to get my alias to show in the From field in Outlook 2013; I've configured them in Exchange Online as Mail Contacts, and set the forwarding rule in mail flow as described. It shows up just fine in OWA, but even updating the Global Address List on the local machine doesn't seem to get it into the list... what should I do? Am I stuck having to make them POP3 send-only accounts?
Thanks!
--Michael
Diane Poremsky says
It's not showing in the list of addresses in the From dropdown after it was selected once ?
Tech Ranker (@TechRanker) says
A bit unrelated but... can you create a rule in outlook based on the alias that is receiving the email?
Diane Poremsky says
If the alias is in the header, yes, you can use a words in the header rule (or words in recipients address).
Rahim Snow says
Hi Diane,
Thanks for these instructions. I created a distribution list. I can receive email to it from internal and external addresses just fine. But when I try to send email from it (yes, I have already setup the "send as" user), the web client at outlook.office.com (for Office 365 Business Premium) doesn't show me the distribution list email address as an item in the Show From drop down list. How do I get that email to even show up as a choice?
Thanks,
Rahim
Diane Poremsky says
you need to click Other email address and select the account the first time you use it, after that it will be at the bottom of the From field.
Rahim Snow says
Hi Diane,
I only followed the "Using a Distribution Group" steps above. In the Outlook web client for Office 365, when I create a new email message, click Show From, look at the drop down, there is nothing in there except for my primary email address. The option item for "Other email address" is not there at all.
Do I need to perform any extra steps using PowerShell? I didn't follow the "Using a Mail Contact" steps. Do I need to do that?
Diane Poremsky says
In OWA, right click on the address in the From field and click Remove (you can use Edit and delete the address) and type in the other address you have send as rights for.
eric says
great article! thanks
perhaps you should mention that with the distro group option the receipient will see send by XX on behalf of YY
with the Contact option the annoying on behalf of msg doesn't show up
Diane Poremsky says
It actually depends on your permissions - if you have send as permissions, you can send from dl's without the on behalf of tag. part.
Ruairidh says
Hi Diane,
Using O365, I have set a user to have 'Send As' permissions but it still shows as sent on behalf of. This is using Outlook 2016.
Any ideas?
Thank you!
Diane Poremsky says
Are they a delegate?
You could try removing the send on behalf of permissions, so they only have send as permissions.