Outlook has always supported categories and Outlook 2007 introduced Color Categories by merging the short-lived colored flags with categories. This page sums up a few things I've learned about Outlook categories and color categories, with suggestions for using and managing categories along with troubleshooting tips.
You can assign one or more categories to any Microsoft Outlook item and consistent use of categories makes it easier to locate specific items.
Outlook does not use the registry for a master category list; they are stored in the default message store (mailbox or pst). If you are setting up a new system and using your old pst the color categories will be available on the new system. If you imported from an old data file, right click on the root folder (Outlook Today), choose Properties and click the button to Upgrade to color categories. This will assign random colors to the categories assigned to items in your data file.
You can use Group policy to push Categories out to users, merging new categories with their existing categories. In the Group Policy Editor (with the Outlook 2007 or greater ADM files installed), look under Miscellaneous. You can also add the categories by adding a string value under the policy registry key. Add the categories in a comma or semicolon separated list. If you have more than one Email account in Outlook, categories added to the registry are available only to the default account or default data file. (nn = your version of Office.)
HKEY_CURRENT_USER\SOFTWARE\Policies\Microsoft\office\nn.0\outlook\preferences
String: newcategories
Value: New Category 1; New Category 2
The same path in the CURRENT_USER hive also works.
HKEY_CURRENT_USER\Software\Microsoft\Office\nn.0\Outlook\Preferences
String: newcategories
Value: New Category 1; New Category 2
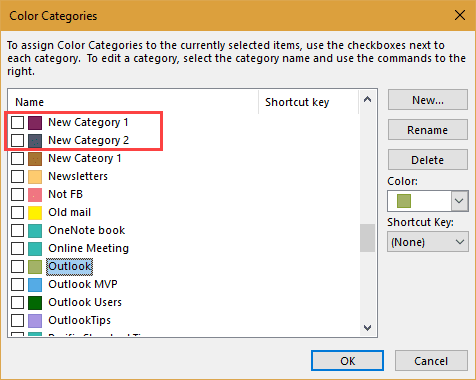
Note: if you remove a category name from the registry key (or edit the name in the registry), it remains available in the Category list (ex. misspelled Cateory 1 in my screenshot).
To print a list of the category names and their colors, we have a macro and instructions Print a list of Categories and their Colors.
How to Upgrade to Color Categories in Outlook (video tutorial)
Unlike with older versions, you cannot paste a comma separated list of categories into the master category dialog and add them all to the Outlook master list. With the exception of the All Fields page of an Outlook contact, the only way to add categories to items is using the Category picker menu or dialog. You can use the All fields page to bulk add categories to Outlook 2007 or Outlook 2010.
Assigning Categories to Sent Email | Categories in Shared FoldersManaging Categories | FAQ: Color Categories | Master Category ListKeeping Categories Consistent | How To | Category-based Mail MergeMore Fun with Categories | Things You Can't Do with CategoriesColor Names & RGB code | Tools | More Information
Color Categories and IMAP Accounts
Color categories are not available in IMAP accounts by default, since they are not supported on all IMAP servers. However, there is a way to add color categories to IMAP messages. See Outlook Categories, Flags, and IMAP Accounts for more information and the workaround.
Assigning Categories to Sent Email
By default, Outlook does not allow you to assign a category to mail before sending it. This change was made to prevent user data from "leaking". For example, if you use a category named "PITA Customer" you would not want it included on email sent to customers. (Yes, this type of scenario really happened, more than once.)
If you need to include the categories all the time, use the SendPersonalCategories registry entry. Exchange admins can configure Exchange to remove categories. If you use Exchange and it's configured to remove categories, adding the key to Outlook will not work, you'll need to speak to your admin.
This key works with Outlook 2003 and up, you'll need to use the correct path in the registry for your version. This can also be set using Group Policy; look for it in the Office adm files, under Outlook > Miscellaneous.
Create the key or path if it does not exist.
Outlook 2016
HKEY_CURRENT_USER\Software\Policies\Microsoft\Office\16.0\Outlook\Preferences
DWORD: SendPersonalCategories
Value Data: 1 to keep categories on sent mail, 0 to not include categories
Outlook 2013
HKEY_CURRENT_USER\Software\Policies\Microsoft\Office\15.0\Outlook\Preferences
DWORD: SendPersonalCategories
Value Data: 1 to keep categories on sent mail, 0 to not include categories
Outlook 2010
HKEY_CURRENT_USER\Software\Policies\Microsoft\Office\14.0\Outlook\Preferences
DWORD: SendPersonalCategories
Value Data: 1 to keep categories on sent mail, 0 to not include categories
Outlook 2007
HKEY_CURRENT_USER\Software\Policies\Microsoft\Office\12.0\Outlook\Preferences
DWORD: SendPersonalCategories
Value Data: 1 to keep categories on sent mail, 0 to not include categories
If you don't want to edit the registry yourself, download and run the registry file for your version of Outlook.
Outlook 2016 Outlook 2013 Outlook 2010
Outlook 2007 Outlook 2003
Remember: if you set this key, the categories will be included on the sent message and the recipient will be able to see the category (unless the recipient uses a rule to remove categories from messages they receive).
Categories in Shared Folders
Only category names are visible on items when you share folders on Exchange server; colors are per user. Other users will see your categories in a white color (unless it's already in their color category list).
When you open a shared mailbox, your permission level determines whether or not you can use and edit the category list
![]()
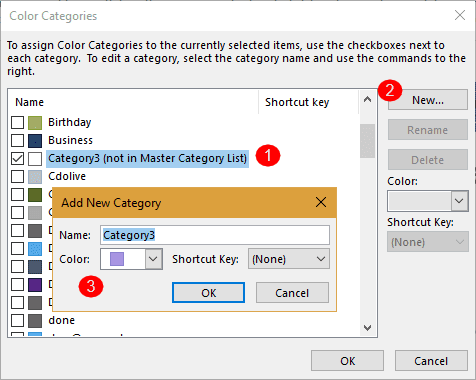
To add a category that is not in your master list, to your master list:
- Select it (so it's highlighted)

- Click the New button.
- Outlook will assign the next unused color; change the color and set a shortcut key, if desired, then click Save.
Shared Mailboxes
When you open a shared mailbox in your profile, your permission level determines whether or not you can use and edit the shared mailbox's category list.
Editor and above: You can use the category list.
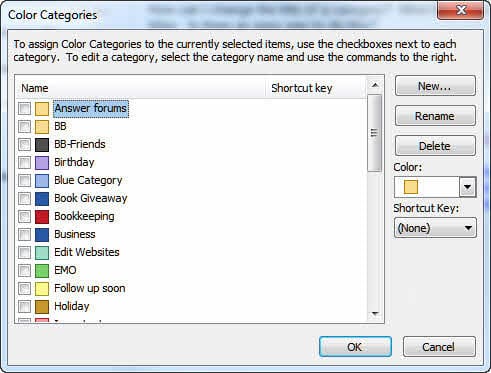
Managing Categories
To add, remove, rename, or assign shortcuts to categories, expand the category selector and choose All Categories from the end of the menu to open the Color Category dialog, shown below.
Select the category on the left then the appropriate button in the dialog to add, edit, delete categories, or assign colors or shortcuts to categories.
You cannot add categories in bulk using this dialog.
Bulk Add Categories in Outlook 2007 and up
While you can bulk add categories to any item in older versions of Outlook by typing in the category field; beginning with Outlook 2007, you need to use the category menu or dialog to select categories.
Also possible in older versions, you could type (or paste) a comma-delimited list in the master category dialog then add the list to your master list. While this is not possible to do from the master category list in newer versions of Outlook, it is possible to type a list of categories and add them to the master list.
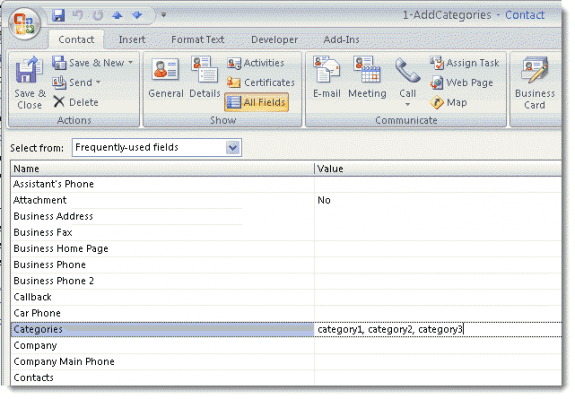
- Open a contact form and switch to the All Fields page.
- Select Frequently used fields from the Select from menu, then type (or paste) a comma-separated list of categories into the Category field.
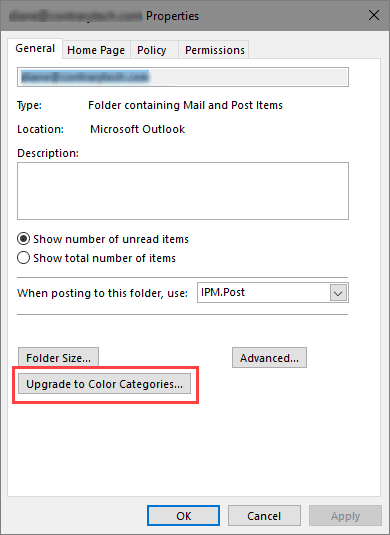
- Next, right click on the top level of your data file (where Outlook Today is) and choose Properties
- Click Upgrade to Color Categories button
FAQ: Color Categories
Q: How do I reset the categories?
A: In Outlook 2007 and newer, you can remove the categories you added and restore the defaults using the /cleancategories switch. Close Outlook and type or paste the following command in the Start Search field (Windows 7) or in the Run command (WinXP):
outlook.exe /cleancategories
This will remove all categories from the master category list and restore the default category placeholder names (Red Category, Blue Category etc). This will not remove the categories from individual items. To remove categories from Outlook items, create a search folder to find the items that have categories assigned then remove the categories using Select All, then right click and choose Clear All Categories.
If you decide you want to restore the categories to the master list (and haven't deleted them from the items yet), use Upgrade to color categories.
In Outlook 2003, go to Edit menu, Categories, Master Category List. Click Reset and close the dialog.
Q: How is the Category list organized?
A: When you expand the Categories button, the flyout is ordered by the most recently used categories. If you click All Categories to open the Color Categories dialog, the list should be alphabetical.
Master Category List
In current versions of Outlook, beginning with Outlook 2007, the master category list is stored in the Outlook data file. If you use a pst file and move the pst file to another computer, you'll keep your categories. If you use Exchange server, including Office 365 email or Outlook.com, your categories are stored in your mailbox.
In Outlook 2003 (and older) the master category list is stored in the Windows Registry. Each user has a different category list.
To back up the Master Category List in Outlook 2003:
- Run Regedit and go to HKEY_CURRENT_USER\Software\Microsoft\Office\11.0\Outlook and select the Categories key.
- Choose Registry | Export Registry File to make a copy of the Categories branch of the registry. Note that this list is in Unicode encoding and is not compatible with versions other than Outlook 2002.
To use any of these methods to move categories to another computer using a compatible version of Outlook, you'll need to change the version number in the key before importing.
You can use this exported branch to distribute a category list to other Outlook users. See the MSKB article How to Migrate Custom Categories to Other Users. CAUTION: Using a .reg file to propagate a category list does not update a user's own list; instead it completely replaces it. I personally do not recommend this method, because it eliminates much the utility of the Category feature for users. See the next section for what I think is a better method.
If you remove a category from the master list, any items marked with that category are not affected. In the Categories dialog box, that category is listed as "(not in master list)."
Keeping Categories Consistent
I'm convinced that many people worry too much about keeping the Master Category List consistent from user to user, when what they really want is to keep the categorization of the items themselves consistent. It is critical to remember that the category set on an individual item is totally independent of the user's Master Category List.
For example, you can set a category of Blue on an item, then delete Blue from your personal Master Category List. The item is still categorized as Blue. In the Categories dialog, you should now see its category as "Blue (not on master list)." Anyone who has never had Blue on the master list will see the same thing.
Yes, it would be nice if Microsoft had made this easier, but the real issue usually is making category assignment consistent. In a public folder, consider handling that with a custom form that forces users to pick from an "official" list of categories. I've put together a sample form at Required Categories Contact Form.
Another approach would be to use code behind the form to make category assignment automatic based on the value of other fields in the form.
One situation where the Master Categories list makes a difference is when you are working with a large folder and dragging a large number of items between categories. When a category is not in the Master List, you risk losing the original categories from items added to new categories. You can avoid problems by dragging fewer items at a time or select the items, right click and choose Categories.
How To ...
To filter a folder on multiple categories ...
On the More Choices tab in the Filter dialog, type the names of the categories separated by "AND" Do not use the Categories button.
For example, to display contacts who are in both the Personal category and the Business category, type in "Personal AND Business."
Use the Advanced tab to create the filter. Use Categories for the Field, select contains as the Condition and enter the category names, separated by AND in the Value field.
The QueryBuilder can be used to create the AND filter if you use Outlook 2002, 2003 or 2007. See Using QueryBuilder for more information.
Remove Categories From Messages
To remove categories from incoming messages, create a rule and choose the condition to "clear message categories".
If you use an older versions of Outlook, Rules Wizard doesn't have an option to remove categories from messages you send or receive, it can only add more categories. You'll need to use VBA to remove categories.
Private Sub Application_ItemSend(ByVal Item As Object, Cancel As Boolean)
      Item.Categories = ""
End Sub
Category-based Mail Merge
You can filter or group by category, select the contacts in the category and start the mail merge.
Some of the third-party mail merge tools also support merging by category.
More Fun with Categories
See Microsoft Exchange and Outlook Distribution Lists for details on how to use categories to create instant Personal Distribution Lists.
You can use categories in Rules Wizard rules, both as part of conditions and as actions, assigning one or more categories to an item. For example, I used to use an autoresponder to handle subscription requests for my Exchange Messaging Outlook newsletter and marked the incoming requests with a category of "Response sent."
If you create a new Outlook item from another item, the categories carry over. Back to the autoresponder example: I manage the mailing list in a Contacts folder that uses a custom form. New items are created by dragging the incoming message to the folder. When the new recipient is created, it has the category of "Response sent." This also works with replies and forwards; as long as you send in RTF format, the recipient will see any category you apply.
Helen Feddema's Code Sample 55 demonstrates how to use an Outlook form to display all contacts by category. It's up to you to take the next step of writing code to do something with all those contacts.
Also see:
Things You Can't Do with Categories
You can't create a view that shows both categories and subcategories. In other words, the Categories field can be used for grouping just once. What you might try is a set of categories that themselves include a subcategory: Friends - Good, Friends - Very Close, etc.
You can't search and replace a category directly without writing code. However, you can select a bunch of categories, then right-click, choose Categories from the pop-up menu and work with the Categories for the entire group of items.
Problems and Issues
We have a report that GoContactSync (an Outlook/Gmail sync utility) resets the master category list. Categories are not removed from the Outlook items, but the categories are shown as "not in master Category".
Color Names
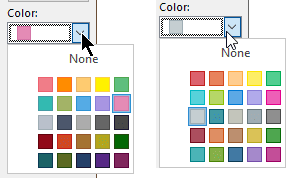
Microsoft updated the category colors beginning with Outlook 2019 / Outlook 365, in most cases the colors are lighter and brighter, as seen in the image on the right. The 25 color names are as follows.
| Category Color Names | ||||
|---|---|---|---|---|
| Red | Orange | Peach | Yellow | New: Light Green Old: Green |
| New: Light Teal Old: Teal | New: Lime Green Old: Olive | Blue | New: Lavender Old: Purple | New: Magenta Old: Maroon |
| New: Light Gray Old: Steel | New: Steel Old: Dark Steel | New: Warm Gray Old: Gray | New: Gray Old: Dark Gray | New: Dark Gray Old: Black |
| Dark Red | Dark Orange | New: Brown Old: Dark Peach | New: Gold Old: Dark Yellow | Dark Green |
| New: Teal Old: Dark Teal | New: Green Old: Dark Olive | New: Navy Blue Old: Dark Blue | Dark Purple | New: Dark Pink Old: Dark Maroon |
| White: No color assigned | ||||
Although knowing the names of the colors is less than useful for most users, they are in the Object model as OlCategoryColor[name], with the new category colors using the old name.
To print a list of the category names and their colors, see Print a list of Categories and their Colors.
These colors are in the order they appear on the category color picker in Outlook 2016. The color names are as listed in the color picker.
RedHEX : #F07D88 RGB : 240,125,136 HSB : 354,48,94 HSL : 354,79,72 | OrangeHEX : #FF8C00 RGB : 255,140,0 HSB : 33,100,100 HSL : 33,100,50 | PeachHEX : #FECB6F RGB : 254,203,111 HSB : 39,56,100 HSL : 39,99,72 | YellowHEX : #FFF100 RGB : 255,241,0 HSB : 57,100,100 HSL : 57,100,50 | GreenHEX : #5FBE7D RGB : 95,190,125 HSB : 139,50,75 HSL : 139,42,56 |
TealHEX : #33BAB1 RGB : 51,186,177 HSB : 176,73,73 HSL : 176,57,46 | OliveHEX : #A3B367 RGB : 163,179,103 HSB : 73,42,70 HSL : 73,33,55 | BlueHEX : #55ABE5 RGB : 85,171,229 HSB : 204,63,90 HSL : 204,73,62 | PurpleHEX : #A895E2 RGB : 168,149,226 HSB : 255,34,89 HSL : 255,57,74 | MaroonHEX : #E48BB5 RGB : 228,139,181 HSB : 332,39,89 HSL : 332,62,72 |
SteelHEX : #B9C0CB RGB : 185,192,203 HSB : 217,9,80 HSL : 217,15,76 | Dark SteelHEX : #4C596E RGB : 76,89,110 HSB : 217,31,43 HSL : 217,18,36 | GrayHEX : #ABABAB RGB : 171,171,171 HSB : 300,0,67 HSL : 300,0,67 | Dark GrayHEX : #666666 RGB : 102,102,102 HSB : 300,0,40 HSL : 300,0,40 | BlackHEX : #474747 RGB : 71,71,71 HSB : 300,0,28 HSL : 300,0,28 |
Dark RedHEX : #910A19 RGB : 145,10,25 HSB : 353,93,57 HSL : 353,87,30 | Dark OrangeHEX : #CE4B28 RGB : 206,75,40 HSB : 13,81,81 HSL : 13,67,48 | Dark PeachHEX : #A47332 RGB : 164,115,50 HSB : 34,70,64 HSL : 34,53,42 | Dark YellowHEX : #B0A923 RGB : 176,169,35 HSB : 57,80,69 HSL : 57,67,41 | Dark GreenHEX : #026802 RGB : 2,104,2 HSB : 120,98,41 HSL : 120,96,21 |
Dark TealHEX : #1C6367 RGB : 28,99,103 HSB : 183,73,40 HSL : 183,57,26 | Dark OliveHEX : #5C6A22 RGB : 92,106,34 HSB : 72,68,42 HSL : 72,51,27 | Dark BlueHEX : #254069 RGB : 37,64,105 HSB : 216,65,41 HSL : 216,48,28 | Dark PurpleHEX : #562685 RGB : 86,38,133 HSB : 270,71,52 HSL : 270,56,34 | Dark MaroonHEX : #80275D RGB : 128,39,93 HSB : 324,70,50 HSL : 324,53,33 |
Outlook 365 and Outlook 2019 have updated color category names and colors.
RedHEX : #DC626D RGB : 220,98,109 HSB : 355,55,86 HSL : 355,64,62 | OrangeHEX : #E8825D RGB : 232,130,93 HSB : 16,60,91 HSL : 16,75,64 | PeachHEX : #FFCD8F RGB : 255,205,143 HSB : 33,44,100 HSL : 33,100,78 | YellowHEX : #FDEE65 RGB : 253,238,101 HSB : 54,60,99 HSL : 54,97,69 | Light GreenHEX : #52CE90 RGB : 82,206,144 HSB : 150,60,81 HSL : 150,56,56 |
Light TealHEX : #57D2DA RGB : 87,210,218 HSB : 184,60,85 HSL : 184,64,60 | Lime GreenHEX : #B6D767 RGB : 182,215,103 HSB : 78,52,84 HSL : 78,58,62 | BlueHEX : #5CA9E5 RGB : 92,169,229 HSB : 206,60,90 HSL : 206,72,63 | LavenderHEX : #B1AAEB RGB : 177,170,235 HSB : 246,28,92 HSL : 246,62,79 | MagentaHEX : #EE5FB7 RGB : 238,95,183 HSB : 323,60,93 HSL : 323,81,65 |
Light GrayHEX : #C5CED1 RGB : 197,206,209 HSB : 195,6,82 HSL : 195,12,80 | SteelHEX : #4497A9 RGB : 68,151,169 HSB : 191,60,66 HSL : 191,43,46 | Warm GrayHEX : #C3C5BB RGB : 195,197,187 HSB : 72,5,77 HSL : 72,8,75 | GrayHEX : #9FADB1 RGB : 159,173,177 HSB : 193,10,69 HSL : 193,10,66 | Dark GrayHEX : #8F8F8F RGB : 143,143,143 HSB : 300,0,56 HSL : 300,0,56 |
Dark RedHEX : #AC4E5E RGB : 172,78,94 HSB : 350,55,67 HSL : 350,38,49 | Dark OrangeHEX : #DF8E64 RGB : 223,142,100 HSB : 20,55,87 HSL : 20,66,63 | BrownHEX : #BC8F6F RGB : 188,143,111 HSB : 25,41,74 HSL : 25,36,59 | GoldHEX : #DAC257 RGB : 218,194,87 HSB : 49,60,85 HSL : 49,64,60 | Dark GreenHEX : #4CA64C RGB : 76,166,76 HSB : 120,54,65 HSL : 120,37,47 |
TealHEX : #4BB4B7 RGB : 75,180,183 HSB : 182,59,72 HSL : 182,43,51 | GreenHEX : #85B44C RGB : 133,180,76 HSB : 87,58,71 HSL : 87,41,50 | Navy BlueHEX : #4179A3 RGB : 65,121,163 HSB : 206,60,64 HSL : 206,43,45 | Dark PurpleHEX : #A589CB RGB : 165,137,203 HSB : 265,33,80 HSL : 265,39,67 | Dark PinkHEX : #C34E98 RGB : 195,78,152 HSB : 322,60,76 HSL : 322,49,54 |
Tools in the Spotlight
Category Manager allows sharing of color categories; it adds a sidebar to the folder view as well as opened items, in which you can group your categories and assign them lightning fast; and it adds a reminder, which optionally prompts you if you forget to assign a category. Version 3 | |
ReliefJet Essentials is a set of 162 utilities for Outlook, Office 365 and Exchange Server. It can backup, import, export and convert data into different formats. Perform personalized mass mailings. Save, remove and optimize attachments. Find and remove duplicate messages, contacts, appointments, meetings, and other items. Retrieve statistics on email usage and get reports on Outlook data and settings. You can run the utilities directly from Outlook, automatically in rules, via standalone app, or from the command line. |


Tools
This first release displays all categories in one menu and contains all the basic functionality of the new Categorize button for Outlook 2013. | |
CodeTwo CatMan allows sharing of Outlook categories with other users on the local network. Centralized management using a shared configuration file. Version 3.0.1 | |
Exchange Category Manager is a plug-in for Exchange Server and Office 365. It enables you to manage the Outlook categories and colors that are available in Outlook. Define an unlimited number of groups with different users. Each group can have it's own set of categories and colors to choose from. You can add categories to the existing category list that a user has in Outlook or replace everything with the predefined list. As it integrates with Exchange server directly, the users do not have to do anything, their category list is automatically managed. No software has to be installed on the client pc's. | |
SimplyTag helps you categorize Outlook messages quickly and efficiently. It learns about your tagging patterns and enables you to assign the right tag to a message literally with a single click. Works on sent and received messages. Also support searching messages by categories. |
More Information
To set up subcategories
Categories vs. multiple Contacts folders
Backing Up Master Categories (Outlook Tips website)
The power of Outlook Categories (Michael Bauer)
How to Upgrade to Color Categories in Outlook (video tutorial)
Mail merge help:
Mail Merge
Printing Labels or Envelopes for Contacts
Start a Word letter from an Outlook contact
Victor says
Hi Diane, I started just now to be annoyed by the fact that when you arrange an address book by categories, each category is preceded by the completely useless "Categories: ". Wonder if that can be suppressed somehow.
Diane Poremsky says
If you edit the Field name. View > View Settings > Format Column - edit the display name for categories.
Diane Poremsky says
Screenshots
Alami says
still no hack to show more than the 15 most recent categories in the contextual menu?
Diane Poremsky says
No, not at this time. Sorry.
Carl says
Diane, thank you for this write up. I am wondering if you can help clarify something for me regarding color categories for calendar events.
Sarah creates a calendar and shares it with James, and gives him edit access. Sarah creates some events within this calendar and assigns them color categories, some blue, some purple, etc. James signs into OWA and sees all of the events categorized by color exactly how Sarah has set. But then James signs into his Outlook desktop client to view the calendar, and none of the events have the correct colors - they all just have one color - whatever James' local default is within the desktop client. How do we get James' Outlook desktop client to reflect the appropriate color categories as Sarah has set them?
It seems odd to me that they show up in James' OWA but not his desktop client.
Dan Thornburn says
Does anyone know of any MAC OS mail client that works with Outlook (or rather Office 365) categories?
I have been searching high and low. Have got really close with Outlook for Mac but even in that the categories don't filter accurately.
If Spark could add this feature I think it would be a game changer for me.
Is there anything else I am missing?
Thanks in advance.
Diane Poremsky says
I have not tried eM client on mac, but its a good replacement for Outlook on windows. (Am installing it on my MacBook now to check it.)
Brandon says
When I try to setup a "Categorize and Move" Quick Step in a shared Mailbox, the dialogue shows the categories setup under my personal mailbox rather than the shared mailbox categories. Any ideas?
Diane Poremsky says
The quick steps work with the account - you would need the shared mailbox open as an account to use it's color categories. Or add the categories to your mailbox too.
Nick Bracey says
How does one do this for Outlook for Mac? I don't see any options to be able to backup color categories on Outlook for Mac.
Diane Poremsky says
The mac version does not have an option to back up the category list. Sorry.
Dori Schmetterling says
Dear Diane
' By default, Outlook does not allow you to assign a category to mail before sending it. This change was made to prevent user data from "leaking". '
This is really helpful because I had been wondering about this inability to categorise a message in Outlook before dispatch for years.
It makes a lot of sense!
Thank you for mentioning it!
(User name@ londondas)
Julie says
Hello, when you create a shared calendar for a group, how do you remove the connection to your own categories? I would need the shared calendar to show as new blank Colors only - Category topics/names not yet created? Thanks.
Dean says
Hi
This comment is not correct.
"Q: How is the Category list organized?
A: When you expand the Categories button, the flyout is ordered by the most recently used categories.
I have been using these for years, but some old categories keep coming up in the flyout list that I have not used in years, but not the new ones I recently created. I think is is a "most used" list not a recent list. It has been driving me nuts for years and I can't fix it.
Luke says
I reset my view by accident - I categorize my emails and I want the categories to lock while I sort on subject or received date. So, if for example, I have 3 categories, "New", "Old", and "Archive", I want to expand one and click on the column header for "Subject" and have them sort without losing the categories. I have been doing this for years but can't seem to get it back - help!
Len says
Hi Diane, is there a limit to the number of categories that can be assigned? Should categories be setup without a short cut key to prevent overriding multiple categories that may be setup inadvertently with the same short cut key?
Ben says
I have a shared mailbox which has categories for each member of the team. Each email or conversation is manually updated with the relevant team member's category.
I have created a sub folder of this shared inbox for high priority items. I have setup a rule on the main shared inbox to copy emails that match the 'high priority email' criteria.
The problem I have is that the existing categories from the main shared inbox are not copied over to the new folder. If i update a category in either folder it will sync with the other but if another team member tries it doesnt sync.
Any suggestions would be appreciated.
kathleen mandelbaum says
I want to create a calendar file for paydays and make it GREEN. how do I do that? when I save as a .hol file it makes them all the color of holidays. how do I change to GREEN?
Nebulous says
This is a very thorough primer and much appreciated.
I use Outlook 2019. What I am trying to find is a way for my inbox to display collapsed categories at the top of the inbox followed by my uncategorized messages. This is because my categories are typically action-oriented, letting me know what I need to do with groups of messages or when I should return to them, if that makes sense. So I would like me inbox to display categorized messages at the top of the inbox followed by uncategorized messages. Is there a way to do this?
Am I correct in remembering that this was easy (just click a header) in previous versions of Outlook? Any assistance would be very much appreciated.
jb
Jesse says
Hey all,
TL;DR: Is there a way to programmatically assign a specific color to a category in Outlook?
I need to standardize the colors and names of categories in outlook in a company of ~70 users working both remotely and in office, across Outlook for Desktop, web, and mobile. The goal is to have multiple universal categories defined companywide, with matching names and colors.
I was able to push categories using information from this wonderful post
HKEY_CURRENT_USER\Software\Microsoft\Office\nn.0\Outlook\PreferencesString: newcategories
Value: New Category 1; New Category 2
where nn is the version of office you have ie. 16
I have found this method can successfully add categories locally,which do sync up to mobile/web etc. However they do not sync any other associated info, such as colors, which need to match. These added categories need to be upgraded from basic to Color Categories with the command "outlook.exe /remigratecategories" but are assigned random colors at this point.
I have tested other methods that involve exporting an item with categories assigned then importing it, but it still does not carry colors over.
Can anyone point me in a direction where I can push out predefined categories with colors to many users with little to no effort on the part of the end user?
Thank you!!
Shane says
I have been using categories extensively on emails & tasks within my Exchange 2003/Outlook 2007 environment for many years now. Just in the last couple of weeks Outlook is randomly adding multiple categories to existing tasks. I have on a couple of occasions spent hours going through and removing the extra categories from all of my tasks only to find additional categories added again a couple of days later. Has anyone else experienced this? Does anyone have a suggestion to fix?
I have already deleted the local *.ost and had it recreate. The extra categories started appearing again on tasks within a couple of days.
I am almost at my wits end with this.
Diane Poremsky says
Are you syncing with a smartphone or another computer? Are they categories in your master list ?
Shane says
Hi Dianne,
Yes they are categories in my master list.
I only have one active workstation operating at the moment using Outlook 2007 connected to exchange 2003.
I have 1 smartphone (iphone) connected to exchange
You may be on to something there as this issues started occurring probably around the time that iphone was updated to ios13
Diane Poremsky says
I'll test it on my iphone and see if i can repro.
Ruthie McGinn says
I have been having this same problem the last few weeks and it's making my task list impossible to use. Every day I clean up the categories (every task has as single category) and when I come back the next day my tasks have 2, 3, 4, 5 categories again instead of one. Is there anyone who can help fix this? It seems to be a syncing error - meaning if I change a category, somehow outlook is remembering all the categories the task ever had and putting them all there instead of just using the one I manually gave it. Thank you!
Diane Poremsky says
Are you syncing with a smartphone? If so, which os?
Shane says
Recently updated to ios 13.2.3 and after fixing all categories back to normal outlook added random categories to everything after a couple of hours.
Shane says
Upgraded iPhone to ios13.3
Still same problem occurring in Exchange 2003/Outlook 2007 environment.
Any luck with this Diane?
Shane says
Hi Ruth,
Did you ever manage to fix this issue? If so, how?
If not, what phone are you syncing with if any?
What add-ins are you running with your Outlook?
Shane
DEV says
I've exported Categories from Outlook 2016, and imported them into a new domain (Same version). None of the colors are preserved (tried this three times with different categories). What is going on here?
Diane Poremsky says
What method did you use to export them?
Shelley says
Hi I use multiple inboxes each have emails colour categorised to me, is there a way to get all of these emails to appear n my personnel inbox so instead of checking all inboxes any that are categorised to me in any of the inboxes will be in my personal inbox?
Diane Poremsky says
The only way would be if you downloaded the mail using POP3 - then you could deliver all of the mail to one inbox. The other option is using Instant search to show all new mail in all mailboxes.
See https://www.slipstick.com/how-to-outlook/how-to-create-a-unified-inbox/ for information.
Cheryl K says
I use each color to represent an approver for emails containing bills for my A/P system. Our company is growing rapidly, we are virtually paperless and I'm going to be out of colors very soon. Is there a way I can expand the list of color shades, like the huge one that Excel has? This system of assigning colors to approvers works so well, I have approvers all over the world and can easily keep track of who approves which invoice.
Diane Poremsky says
At this time, no. I believe it might be possible in Outlook 2019, but i don't know any specifics at this time (and haven't seen it in person.)
Until then, you'll need to reuse colors- use the same colors for similar category names.
Shravz says
Hi ,
is there any way to get a report for the employees who had been categorized the mails in the outlook
Diane Poremsky says
Possibly. What information do you need? We can get the count of categorized messages and what the category is.
Christine Couper says
Diane, is there a way to copy the categories used on one email to another? When I get a reply from someone, I want to categorize it in the same way as the original email, but have had to do this manually so far.
Diane Poremsky says
I thought replies picked up the category... maybe it was only if you set the category before the reply, but there is so much that can go wrong even if you do that.
Do you choose the category based on factors in the message or assign a specific category to the sender? I have a macro that picks the category from the person's contact and assigns it to all messages from that person.
https://www.slipstick.com/developer/categorize-messages-using-contact-category/
John P. Miles says
I recently lost all the items in my Master Category List on Outlook 2010 when I installed a Windows 10 update. I keep my contact on multiple devises and I went through the time consuming process off adding the categories one by one. Two Questions; is there a way to back up the master Category list, and if so, how? The next question is how do I reinstall? I did follow an instruction on copying them into a contact.....
Diane Poremsky says
Adding them to the contact keeps the names - then you can use upgrade to color categories to add to the master list and colorize (although not necessarily with the correct colors.) This is generally the easiest if you don't mind random colors. if you want specific colors, you can use a macro to backup the names and colors and restore it - https://www.slipstick.com/developer/get-color-categories-and-restore-them-using-vba/
The categories are stored in the default data file or pst, so you shouldn't have lost them, unless you reconfigured your outlook profile or created a new pst. Exchange accounts, outlook.com and office 365 mailboxes sync categories back to the server, so they shouldn't be lost if you create a new profile.
Hugh Hudson says
Diane - I'm wondering if you know of a way to keep categories on items that you want to archive but want to come back to later.
I am an instructor at a local college. I have categories created for each of my classes which I use for task and calendar items.
In the past I have simply removed the categories from my master list so the old categories don't clog up the list so my current class categories are always at the top (I put a zero as the first character to keep them at the top).
Now I have started keeping information in the calendar I will want to refer back to so I'm hesitant to remove the category since I won't be able to view all the calendar items for that class quickly with a "view".
I've run into tons of problems when I 'rename' categories so I'm nervous about the obvious simple solution.
Diane Poremsky says
removing the categories from the master list doesn't remove them from the individual items - they won't be colored (all will be 'white' or no color) but can be grouped by category or found using search.
John says
Hi Diane,
How do you sync Outlook contact categories to the iphone or other mobile devices? We have Microsoft Office 365/Exchange 2016. Are there any iphone apps or Microsoft Products/Upcoming releases that can do this?
We have heard of DejaOffice/CompanionLink, but were wondering if there were any more recent solutions/apps considering there must be a vast amount of users who want/need this functionality. We have done a lot of research on this and haven't been able to find anything else that will sync with Office 365. Thank you tremendously!
Diane Poremsky says
You can't at this time. Categories are not currently supported in the default mail apps or in outlook app... sorry. Deja and the Touchdown app support categories - not sure about others.
Liam Kelly says
Is there any way for only 1 person to be able to assign categories per team ? I would like to stop other people from assigning categories. Currently 13 people are able to assign items but I would like to make it so only 1 person can do this. Is there a way of changing the permissions per user ? This would be for a group inbox with multiple users.
Thanks
Diane Poremsky says
You can't restrict categories specifically, but it might work to remove some permissions (like edit permissions) - however they would likely lose the ability to do much more than view the messages, which may defeat the purpose of giving them access.
Ricky says
Thanks for this great article. I'm suddenly having difficulty assigning a category color when I make an appointment - the option for the category is grayed out. I never had this problem till just recently and nothing has changed so far as I am aware. Once the appointment is made, however, I can reopen the appointment and make category color assignment. I'm using Outlook for Mac version 15.30
Diane Poremsky says
What type of email account - imap, pop, or exchange/outlook.com ?
Chieri Thompson says
I was able to get this to work. I am having one issue. How do I get these Specific Categories to "Count" if an Email has more than one Category?
Public Sub TallyTags() 'Success
Dim Session As Outlook.NameSpace
Dim currentExplorer As Explorer
Dim Selection As Selection
Dim obj As Object
Dim objCat As Category
Dim cat1, cat2, cat3, cat4, cat5 As Integer
cat1 = 0
cat2 = 0
cat3 = 0
cat4 = 0
cat5 = 0
Set currentExplorer = Application.ActiveExplorer
Set Selection = currentExplorer.Selection
For Each obj In Selection
If obj.Categories = "KG" Then cat1 = cat1 + 1
If obj.Categories = "RR" Then cat2 = cat2 + 1
If obj.Categories = "MIRA" Then cat3 = cat3 + 1
If obj.Categories = "" Then cat4 = cat4 + 1
Next
Debug.Print cat1
MsgBox "Kay : " & cat1 & vbCr _
& "Rena : " & cat2 & vbCr _
& "Mira : " & cat3 & vbCr _
& "No Tag : " & cat4 & vbCr _
& "Multi-Tagged : " & Selection.count - (cat1 + cat2 + cat3 + cat4) & vbCr & vbCr _
& "Completed Total : " & vbCr _
& Selection.count & " Emails", , "LD Completed"
Set Session = Nothing
Set currentExplorer = Nothing
Set obj = Nothing
Set Selection = Nothing
End Sub
Note: Some Categories are not in Master List.
Diane Poremsky says
The = tells it to look just for that text and categories are a text list - "KG, RR" is seen as a string, not two separate categories. Use If Instr(1, obj.Categories, "KG") > 0 then cat1 = cat1 + 1 to look for the category name.
Steve says
In outlook 2010, when I assign multiple categories to an email, and I sort by any column (except "Categories"), I can see all the categories, in other words, if I assigned an email two categories, and sort on due date, I see both categories and their two different colors. But when sorting on "Categories" it only shows one category. That seems backwards - how can I see all the categories of an email when I sort on Categories?
Diane Poremsky says
You aren't sorting by categories, you are grouping. Categories is a keyword field, not Text. If it were a text field, which allows sorting, it would sort by the entire field, not as separate categories - a message with ABC, XYZ categories would not sort next to a message with XYZ, ABC categories.
Steve says
Thanks much.
Charlie B says
Diane,
First off, Thank you for this post!!! Second....I do not see any steps for Outlook 2013. When on a tech support call with Microsoft, they told me they would not support what I was doing but that the folders in the Registry that pertain to 2013 are all labeled as 15.0. this all makes perfect sense to me and testing worked fine except the pushing of colors. I am trying your method thru a contact and Frequently Use Fields with no luck, and I cannot find my master Category file to hack and push to everyone at work. any help would be appreciated.
Diane Poremsky says
As of Outlook 2007, the categories are not stored in the registry - they are stored in the data file.
If you want to push them out to everyone, use a group policy. You can use the group policy editor or push the categories out using a log on script.
These categories are stored in this key -
HKEY_CURRENT_USER\SOFTWARE\Policies\Microsoft\office\15.0\outlook\preferences
String: newcategories
Value: New Category 1; New Category 2
CHIERI THOMPSON says
Dear Diane,
How do you get a category count?
Dim oSelect as Outlook.Selection
Set oSelect as Application.ActiveExplorer.Selection
Msgbox "There are " & oSelect.count & " Emails Selected" & " and blah blah tagged MyTag"
Lets say I have 100 emails selected but i also want to get a count of a category named "MyTag" (for demonstration purposes)
I assume the category would need to be a string "MyTag." But I'm not familiar with categories. The Need for this is due to "shared accounts." Several of us work on account. We work emails by categorizing (aka tagging an Email) with our initials. But we have to manually count how many emails are completed by us by counting our tags. It would be nice to have a total to run at the end of the day.
MyTag = 20
Co-Tag = 10
Co-Tag2 = 45
Out of 100 emails selected.
Diane Poremsky says
you'll need to go through each message and check the category, using something like
if obj.categories = "me" then strMe =strMe + 1
if obj.categories = "co1" then strCo1 =strCo1 + 1
if obj.categories = "co2" then strCo2 =strCo2 + 1
A code sample to loop though messages is here - https://www.slipstick.com/developer/code-samples/working-items-folder-selected-items/
CHIERI THOMPSON says
Okay, I'm stuck! I feel I'm on the right track. But... I'm clearly missing something.
Sub TallyTest()
Dim oItem As Object
Dim oSelection As Outlook.Selection
Dim cat1 As Integer
cat1 = 0
Set oSelection = Application.ActiveExplorer.Selection
Dim i As Integer
For i = 1 To oSelection.count
Select Case oItem.Categories
Case Is = "CT": cat1 = cat1 + 1
End Select
Next i
MsgBox "CT " & cat1 & vbCr
End Sub
What am I doing wrong?
I have my selection. Now I'm trying to get a count for the Category named "CT" and display it in a msgbox.
So, I'm looping through my messages. But I'm still learning.
Chieri Thompson says
So, I finally got this to work! Took me since October I know... Here is the code for anyone needing the same. Question Below...
=========================================
Dim Session As Outlook.NameSpace
Dim currentExplorer As Explorer
Dim Selection As Selection
Dim obj As Object
Dim cat1, cat2, cat3, cat4 As Integer
cat1 = 0
cat2 = 0
cat3 = 0
cat4 = 0
Set currentExplorer = Application.ActiveExplorer
Set Selection = currentExplorer.Selection
For Each obj In Selection
If obj.Categories = "KG" Then cat1 = cat1 + 1
If obj.Categories = "RR" Then cat2 = cat2 + 1
If obj.Categories = "MIRA" Then cat3 = cat3 + 1
If obj.Categories = "mw" Then cat4 = cat4 + 1
Next
Debug.Print cat1
MsgBox "KG = " & cat1 & vbCr & "RR = " & cat2 & vbCr & "MIRA = " & cat3 & vbCr & "mw = " & cat4
Set Session = Nothing
Set currentExplorer = Nothing
Set obj = Nothing
Set Selection = Nothing
=========================================
Now I have another Issue... This works well with Categories from the "Master Category List" but There are some tags that arent from the Master Category list that also need to be counted (Basically tagged from another account and moved over. So Dear Diane, Can you help? :) Let me know if that does not makes sense!?
Diane Poremsky says
sorry, I am way behind in answering questions and I'm trying desperately to catch up.
It *should* work for any category assigned to the item provided the category name is one of the 4 in the If statements (and you use If Instr(1, obj.Categories, "KG") > 0 then cat1 = cat1 + 1 to capture a category when more than one is assigned).
Bob Nelson says
I have upgraded to the Office 365 on my HP computer. Last month I opened my Outlook and noticed that the category assignments I use for Contacts have all disappeared. I went to the Outlook web site and opened my account there and couldn't even see how to apply categories to my "Outlook People" there.
Has this happened to others?
On my laptop I was able to go in and start reassigning categories to contacts. But it would be nice to be able to recover the old assignments rather than do everything over.
Diane Poremsky says
this is your outlook.com account? Was your account moved to the new server? log into the account at outlook.com and if the url is outlook.live.com/owa, it is on the new server. if it's NOT on the new server, you can only add categories at outlook.com, by adding contacts to groups. Do not edit contacts in outlook.
emily says
Category colors do not show up in search view...any suggestions?
Diane Poremsky says
Are you searching in contacts? Did you try change the view on the search results?
Bettsee says
I just upgrade my Mac laptop and in the process upgraded from Outlook 2011 to Outlook 2016 (for Mac). I use Exchange. When I go to Organize > Categories, it shows a very short list of categories. If I try to add one of the categories I've been using in my Exchange account, it says that category is already being used. However, it doesn't show this category in the Categories window, and I can't choose it when assigning a category to an appointment or contact. Any ideas?
Diane Poremsky says
I have not been able to repro this behavior so i'm not sure what is going on. Sorry.
Arbr says
Did you sort this I'm having the exact same issue?!
Janelle says
Dear Diane,
Sorry to disturb you.I see you quite expert in using Outlook, and hope you can lend your hand to me!
I feel the color categories to categorize my email is quite useful, but recently I change another desktop to use it. The problem is, for example, after I clear red color category on that specific email. But when I do searching on red colour category, the specific email (that I already remove red colour category) will turn up again. So, is it any good way to let it DON't turn up since it is being remove as red color category?
Diane Poremsky says
What type of email account do you use? It definitely shouldn't be on the message or in the search index after you remove it.
JITEN says
Is there any option to pull out the date and time when the category was assigned?
or please let me know what is the alternate option to see the date and time if we want to assign any mail to someone.
Diane Poremsky says
The only date you'd have is last modified time and that changes with each modification, so it might not be accurate (and I'm not sure category changes the modified time).
what exactly are you trying to do? You might be able to use a macro to set a custom date field when the category was added or whatever you do to assign it. (You can do that using a macro... the might part refers to meeting your needs.)
Richard McLean says
Great help Dianne thank you. I have weird problem. I have Outlook 2016 for mac, and have just started new job in company that uses exchange.
I created 5 categories relevant to my new job. The new categories are listed nicely when I assign categories to emails and tasks, but for Calendar items the categorize function gives me a long list of categories I have used in past jobs, decades even, but none of the new categories I recently made.
Any ideas how I can get rid of the old categories, please?
Many thanks. Richard
Diane Poremsky says
Sorry for missing this. Are there old calendar items assigned to those categories? It should be the same list you see in email... do you have more than one email account in your profile?
Click Organize tab then Categories - you can delete categories using the dialog.
Gert Degnemark says
Hi Diane. - I have from Outlook 2007 Enterprise make a pst file, copy this to a second Outlook 2007 Enterprise, and see the problem that the main category list is not displayed or updated, so not all categories suffer in the window. How can I solve this problem? Best regards, Gert
Diane Poremsky says
Categories are stored in the default data file - if the pst is not set as default you won't see the categories that are on the master list.
Goer says
Hi Diane - I have found this post to be very useful. What I seem to miss is whether there a maximum number of categories. Is I fair to assume that if there are 25 colours, that the maximum number of categories is 25 ?
Diane Poremsky says
No, that's is not a safe assumption. :) The limit is up around 1000 - but you need to share the colors between some categories. Of course, trying to manage that many categories is difficult - my practical limit is around 100 or so.
elayne says
how can i edit this list? i just want to delete some that are no longer in use. how? how? please! i am not a code writer or an engineer.
Diane Poremsky says
You can go through the list manually and delete them or use a macro to create a list of categories on the list then edit it and run a macr to delete all and add the list back. The macros to do this are at https://www.slipstick.com/developer/get-color-categories-and-restore-them-using-vba/ (along with instructions).
Chris says
When using a group policy to add new categories, what is the correct format to specify a color for the new category?
Diane Poremsky says
Colors are set automatically - you can't control it. Outlook uses the next color in the list, so it's possible that many people will have the same color. If you need to set colors, you'll need to use one of the category utilities.
Marko says
i know there are many add-ins that can easily based upon a rule, add or remove categories nicely. BUT i am looking for such an add-in that can do the same with but unto CUSTOM FIELDS, and so far i have only been able to find the ReliefJets Essentials "Set Field Value" action which can then be saved to a macro and from then triggered by a rule via then selecting custom action using a script.
but this seems way too cumbersome and time-consuming to do for many many rules.
so do you know maybe of an add-in, that can set or remove values in custom fields based on rules?
i cannot seem to find one, but i am considering to just make a table in the body of the email dedicated to fields, and then just use the many global search and replace and/or auto-fill / responding template add-ins to accomplish essentially the same thing.
but still looking for an add-in that can rule-based populate custom fields.
thanks for any tips you might know.
Diane Poremsky says
I'm not aware of any addins that can do this but a macro would be easy - provided the field list isn't huge.
Katherine says
Diane, I use a Macbook Pro, and just upgraded from Office 2011 to 2016. In the old Outlook, messages assigned to categories in the preview pane had all the print in the assigned color. Now there is only a small colored flag to the right of the message. Is there a way to make the entire preview print be colored like it used it used to be? Also when I go to Outlook Preferences and click on Categories, Outlook has an error and shuts down. Do you have any thoughts on these issues? I use a POP3 email account.
Thank you, Kathy
Diane Poremsky says
Yean, now they use the Outlook for windows method of the little bar. Unfortunately, you can't change it. Sorry.
I haven't heard anything about a problem with the dialog. does it return an error message or just shut down?
Luuke says
If I use a category on a mail in my Inbox, then move it to my Online Archive (Outlook 2013/Exchange 2013), the category is not kept, I have to recreate it so it is in the Online Archive Master Category List.
Following the solution you provide in "Categories in Shared Folders" is a workaround.
Diane Poremsky says
The category color is lost or the category is actually removed from the message? Colors will disappear if the category is not on the master list, but they shouldn't be removed from the message completely.
Sven Blomme says
In my organization we work with shared mailboxes on an Exchange server (these are not accounts to which you can physically log on, they're just shared data files). When I create a new category, it is visible for all users of this mailbox, and the category is listed in the category list that resides in teh shared data file. However, when my colleagues create a new category, it's visible for me on the item it's assigned to (eg email) but it's white, and more importantly, I do not find the category in the list of categories that resides in the shared data file. In addition, upgrading to color categories does not change this situation (neither a color is assigned nor it is visible in the category list). As all users of a particular shared mailbox have the same permissions, do you know what the cause of this problem may be? Thanks a lot for your help.
Diane Poremsky says
What permissions do they have one the folder? They need to have owner permissions to add to the categories list.
Olivier R. says
Adding registry keys was not enough to make categories sent Inside my organisation.
There is another filter at Server level you have to disable using command : Set-transportconfig -clearcategories $false
Than the problem was solved
Diane Poremsky says
Yeah, if you use exchange server, the admin also needs to check the server settings.
maryann pearson says
I HAVE a small business MS 365 account. i just downloaded office 2016 for MAC on macbook....i want to delete ALL the assigned categories. How can i do this please?? thanks, maryann
Karen McMicken says
I have created a custom form for contact entry and can't figure out how to get the colored strip to appear on the form when you assign a category like it used to.
Paul Holland says
I cannot create categories using Outlook 2016 has this feature disappeared when using an IMAP/SMP account. Is there a way round this problem
Diane Poremsky says
Correct, it is a limitation of IMAP accounts. See https://www.slipstick.com/outlook/outlook-categories-flags-and-imap-accounts/ for workarounds for categories and flags.
If you haven't heard the warnings about imap data files set as default, see https://www.slipstick.com/outlook/2013/imap-accounts-outlook-2013/
Marcy says
I have a shared calendar in Outlook 2010. I have gone to everyone's computer and coded the color categories....however, when they restart Outlook or their computer, the colored categories disappear. Mine however do not. I created the calendar. Others are owners/reviewers. Please help.
Diane Poremsky says
Just the colors disappear? Are they caching the shared calendar?
Alana says
I am having this same issue. 4 of us use the different computers for 4 different shared calendars. We have used this for almost 2 years daily. Now the colors only work on one of the calendars for 3 of us. But one of the computers it works fine and there aren't any color issues. When I try to go into permissions it says we all are "owners". When I look in the color categories to change/add/rename it is all grey and it won't allow me to edit the colors. Any advice?
Diane Poremsky says
How is the account added to outlook? If there aren't a lot of categories, the person who has them accessible could try resetting to the default (use the /cleancategories switch) to see if the others can access them, then adding them back.
MarkS says
Diane, I've been using categories extensively for a few years with a lot of success. However, recently my IT provider (GoDaddy) swapped me to Office365, and while I'm still using the Outlook 2013 client, my "fly out" list of categories brings up categories that I haven't used in years, instead of the ones I use frequently and recently. I removed the MRU3 registry file thinking this would reset my Category fly out list when I open the drop down menu, but it didn't. Any thoughts or suggestions?
Thanks.
Mark
Diane Poremsky says
Did you run the 'upgrade to color categories' command? If that doesn't bring the categories back (it might be what brought the old categories back), were you using a pst before the switch to office 365? Set the pst as default and add all of the categories to one contact then switch the default back to the office 365 data file as default, move the contact to the office 365 contacts folder and run upgrade to color categories.
Or, if you want to keep the same colors, use a macro to make a list of colors (with the pst as default data file) then restore the list with the office 365 data file as default. Macro is here https://www.slipstick.com/developer/get-color-categories-and-restore-them-using-vba/
Mike Stevens says
One last piece of info that may be helpful... In Outlook 2010 (PC) there is still "categories" on old appointments but they are not color coded... they are "white".
Is there anyway to search out all of these "white" categories and mass clear the deleted categories? There is no categories in the category list.
Diane Poremsky says
Use a group by category view, then select all, right click and choose Categories > Clear all.
Mike Stevens says
Diane, I originally used Outlook 2010 as a POP account, then switched to a Zimbra account and created categories. Most recently I purchased Outlook Mac 2016 and synced my Outlook 2010 (PC) to a hosted exchange on Outlook 2016 for Mac.
The import worked great except now I have a lot of my "old" categories from Outlook 2010 that I deleted a long time ago? I am not sure where it is storing that cached info from, but in Outlook 2016 I have categories that I cannot delete or edit?
Please help because no one seems to know the answer.
Warm regards
Mike
Wendy says
is there anyway to search a color category? rather than just right click and sort?
Diane Poremsky says
You can use category in instant search -
category:="category name" subject:something
Cecilia Kelly says
Hi Diane,
I hope you can help me, and I apologize if this has already been addressed.
My boss has a Mac, I have a PC, I'm his delegate and we both use Outlook. He can color code his Outlook meetings from his Mac, I do not currently have the ability to use the category feature to color code his calendar like I do with other Outlook/PC calendars I'm the delegate for. I don't want use the conditional formatting in view settings if possible. Is there a work around for this Outlook, Mac vs. PC issue
Diane Poremsky says
At this time no, there is not a workaround. Mac uses a different protocol and not all features are supported. Sorry.
Stephen Taylor says
One of my users are having an issue in making a category stick. She has permissions to a second mailbox but seems unable to assign a category to new mail item and make it stick. Certainly she can right-click the item and give it a category and the mail even moves itself alongside the other like-categorized mails. But after about 3 seconds, it drops its new category and shoots back to the list of general (uncategorized) mail.
She is using Office 2010 on a Windows SBS server.
Diane Poremsky says
It sounds like she is caching the mailbox and the server thinks the mailbox copy is the updated copy and overwrites her changes.
Debbie Tennent says
I have Outlook 2007, whilst categorizing diaries for my Team, Outlook "froze" and I then realised that everything in my calendar and inbox had been assigned the blue category I had been using to colour code when freezing.
My IT dept have said it can't be fixed other than removing the category from each item but I've now noticed that new emails received while I'm not logged in are still being categorized, but not when I'm logged in!
Is there a reason for this? I've had a look online for help and have been through most of the drop down menus but can't see any Rules or settings that would explain this.
Any help would be greatly appreciated!
Diane Poremsky says
Yeah, you can't undo changes like this - but you can use a list view, select all and then remove the blue category from everything at once.
I'm not sure why the mail is being categorized - a rule would be the most likely culprit but messages will also automatically categorize if you use conversation view and the conversation is being categorized.
Jessica says
Hi, Thanks for all the helpful information.
Sometimes an email comes in and the category color doesn't get assigned to it. I thought that perhaps that happens when I open the email on my iPhone for the first time. But it also sometimes happens anyway. ??
Jessica
Diane Poremsky says
It's possible that it's because the message was previously opened, or it could be because too many messages are coming in at once and Outlook can't process them fast enough so it skips a few.
Zachary Pack says
I created shared calendar and also renamed the categories, when I shared it the person who is now sharing doesn't see the categories as I renamed them but as the defaults. Is there a way to rename them and when I share the calendar everyone sees them as I created them?
Diane Poremsky says
When you share a folder, they will see the category names but they will only have colors if the person has the categories on their category list.
Asfa Shah says
Hi Diane,
I receive a big number of emails being service desk manager on shared \ additional mailbox and i want to know following:
1. any recent \ useful method to equaly share emails (outlook 2010) among my team to make it ease
2. how to count number emails received with or without categories assigning to each analyst \ different groups. (other than manually counting each email)
please suggest & thanks in advance
Diane Poremsky says
1. you can use a macro to assign messages.
2. If you can filter, you can get the value using search folders or use group by views and collapse the groups (not all groups include the count). Depending on how you are assigning values, copying to excel may also work.
Shelley says
Outlook 2010: View Tab, Current View - View Settings, Filter, More Choices Tab, Categories... Drop-down menu -- how does one clear out the drop-down menu so that old choices are no longer there?
Diane Poremsky says
That is in the registry in the Finder MRU at HKCU\Software\Microsoft\Office\15.0\Outlook\Office Finder\MRU 3 (If not using Outlook 2013, change the 15 to the correct version). See https://www.slipstick.com/outlook/clearing-outlooks-most-recently-used-mru-lists/#mru for more details and reg files that will clear the list for you.
mrsadmin says
Hi Dianne,
I have a series of appointments in Outlook 2010, they repeat every week for the year. I want to however change a couple of individual appointments to have a specific category assigned to it (Compulsory, Offbase etc). However I get a notification that Outlook can't change a category without the series being affected.
Is there a way, other than going back & deleting appointments & re-adding singular ones, around this? Even VBA will be ok.
I need to visually see at a glance a compulsory appointment when scheduling other events.
Thanks in advance. :)
Diane Poremsky says
You would need to use individual appointments if they needed to have a different category. If only a few occurrences in the series need to be changed, select one of the dates that gets changed and copy, then paste it in place (ctrl+c,v) The copy should be a single event - assign the category to it. You can delete the occurrence for that date or leave it, if two appointments aren't a problem. Repeat for each date that needs changed.
If you wanted individual appointments, I do have a macro that can break up a series, or you can export to CSV/Excel then import. But for just a couple of dates, I'd go the copy and paste route.
mrsadmin says
A macro would be great, thank you :) I'm always interested in stretching my wings.
Too bad that Outlook doesn't allow the individual items to be changed. Oh well.
I'll run the macro, else I'll just copy & delete as you suggested.
Many thanks :)
Diane Poremsky says
Use the macro at https://www.slipstick.com/developer/copy-recurring-appointments-meetings-series/ - using a list view, select the recurring appointment and run the macro. It will make a copy of all appointments in the series for the next 30 days (can be changed, but needs to be some value, otherwise the macro will create appointments through the year 4500 if the appointment doesn't include an end date). My notes say the it only uses the 30 days if there is no end date, but I don't see it picking with the end date from the appointment and I haven't rerun it to refresh my memory.
Diane Poremsky says
Now that I've looked at the macro and refreshed my memory, it goes from the start (if selected in list view) to 30 days from now because it was originally intended to use with recurring events that were ending early, to preserve exceptions. I added a code snippet that checks the end date and uses that date or sets a limit on no end date appointments.
Jade Webber says
Thank you so much Diane! Your advice is always excellent!
Jade Webber says
Hi,
Is trying to obtain a consistent Master List for multiple PC's using 2013 Outlook still relevant in the "Keeping Categories Consistent" and " Category Importer" link? Or is there an updated method to going about it?
Diane Poremsky says
No, they are not relevant for Outlook 2013 (thanks for reminding me that I need to update the page). One of the utilities or a macro - the utilities are more automatic. Oh, and you can also use GPO to add categories (but not colors) to user's Outlook.
Brett Burningham says
When click on the box to assign a color category, my email message disappears from my inbox. I can't find it, where does it go? I've looked through the settings and can't find out how to stop this. It's happening with every new message I try to click and assign a color category. HELP
Diane Poremsky says
It sounds like you are using a view that hides items marked with that category. Try resetting the view - in Outlook 2010/2013, there is a reset button on the View tab or the ribbon. In older versions, right click on the field names above the message list and choose Customize, then Reset.
Tara says
Can you print a calendar of events of only certain categories?
Diane Poremsky says
Yes, created a filtered view that shows only appointments in those categories before going to File, Print.
Yinnie says
A department is using a calendar to organize their group work on that group calendar which is located in Public Calendar Folder. Of course, it would be marvellous if we would categorize per person and visually have a color for that individu ... according to IT, it is not personal when calendar is on Public Calendar, and is only possible in personal mailbox (and shared the mailbox) .... but the purpose here is to have a common departmental calendar where tasks are assigned on that calendar ... can you help me out?
Max says
Hello Diane, I just upgraded from Outlook 2007 to 2010. It appears the Category option that I used to select on the message in my Inbox is no longer there. Did this get removed? Is it an option that can be turned back on either by me or our Administrator? To be clear, it used to sit next to the Flag in the message header.
Diane Poremsky says
Sounds like the account is an IMAP account - they don't support categories fully so Microsoft removed the button. See https://www.slipstick.com/outlook/outlook-categories-flags-and-imap-accounts/ for details and some workarounds.
Sonja Spörhase says
Hello Diane, we have a huge problem in our office with categories and I did not found a solution yet. We tag all our contacts in the outlook database with categories like name of the street, nature of the business, member or non-member etc. We work a lot with filtering categories and using them for different purpose. Since several months we watch, that our contacts are loosing their categories. Only one is left mostly. But we don't know, when and why! I try to fix it now by setting new categories for every contact. But I fear, that they will get lost again. Do you know this problem? Is it common? What are we doing wrong??? Please help. Thanks a lot in advance, Sonja Spörhase Bremen/Germany.
Miriam says
Hello Diane,
Thank you. It worked like a charm. It will make my job a lot easier.
Miriam says
Hello Diane,
I have Outlook 2010 and share a contact list. I would like to create envelopes and select one of the two categories listed for each individual on that list. How can I do that?
Diane Poremsky says
The contacts are in a shared folder? Use instant search: category:=("category1" OR "Category2"), select all, and use Mail merge on the Home tab.
Larry says
How can I have dual calendars using 2 different color categories for appointments? My personal calendar has color categories that I've assigned. Someone sent me a shared calendar, that has the information for our whole department on it. The colors that were assigned/used on that calendar, don't show up on my screen when I look at the two calendars side by side, but others in my department have both calendars on their outlook show up with different color categories. My Outlook version is 2010.
Diane Poremsky says
Categories are per user/folder and you'll need to add the categories to your mastr category list and set a color. if there are only a few categories, open an item, open All Categories and select the category that is marked (not in master list) then click Add. If you have a lot to add, use upgrade to color categories (I think it works on share folders too).
Jeff Taylor says
Thanks for thinking about this. If my preferred changes aren't possible, perhaps I can do something else that would at least be a step in that direction.
1) Can I increase the number of categories that appear in the list shown when hovering over the "Categorize" menu option?
2) Can you tell me what criteria are used to determine which categories are shown in that list? For example, is the selection based on how often a category is used, how many messages have been placed in that category, etc.?
3) Can I change the criteria that are used to make that determination?
Diane Poremsky says
1. No. It's hardcoded.
2. It's supposed to be an MRU list, in alphabetical order. It should list the last 15 categories you used.
3. No, sorry, that can't be changed.
Jeff Taylor says
This is a very long thread. Although I read most of it pretty thoroughly, I apologize if I've missed a reply that you posted previously.
I'm interested in making a change to one aspect of the default Category behavior in Outlook 2010. When I right-click on a message shown in the Inbox message list, the Context Menu options that appear include "Categorize." Hovering the cursor over that option displays a sub-menu with a list of categories. However, that list changes in seemingly random ways.
I'd like to tweak that behavior to be able to produce either of these two results.
1) Display the alphabetical list of all my categories, of which there are far more than appear in the default list.
2) Select the categories that appear in the initial list, so that the contents of the list does not change.
Is there any way to do this?
Diane Poremsky says
Neither of those is possible. Category Manager and some of the other tools will display a list of the categories or, if there are only a few you want to see, you can create macro buttons. I wouldn't use macro buttons for more than a handful - too many will be unmanageable.
Nathan says
When using a shared email box is it possible to flag sent emails with a specific category? For Example all of Jack's emails get flagged blue when moved to the sent items folder, and all of Jill's items are flagged orange.
I found this registry key (see website) that will automatically move the sent items to the proper sent item folder, but I need something to auto categorize based on sender. Is this possible?
Diane Poremsky says
It might be possible using a macro, I'll have to look into it. In the mean time, try adding the Changed By field to the view - or create a custom view that uses conditional formatting based on the name in that field. I'll update https://www.slipstick.com/exchange/sending-email-from-a-secondary-exchange-mailbox/ with instructions.
Peter says
Hi Diane. Thx for the reply.
If only I could contact them. The product is great, but I've only 8 day of trail left :(
What I liked so much about this solution is the category grouping and the auto-categorizing. I've tried 'Categorize Plus', but the are not working with 'real' categories.
I'll give the VBOffice.net cat mgr a try.
Peter says
Hi, I've downloaded and like the software on the top of the tools list: Aladdins Categoriez.
I'd like to buy and register the program, but every link seems te be broken on the https://www.software-solutions.co.nz/ website and I don't find any referenc or contact info. Does anyone have an idea how to contact them (or register the software) or know an equivalent solution?
Thx
Diane Poremsky says
Hmm. You need to create an account but once in the account, the purchase system is broken. (I removed it from the list until I find out if they are still in business or are just having issues with the site.)
Have you tried Category Manager from VBOffice.net?
Michelle says
I want to have a legend or key of all my categories show on my calendar page so they can be seen easily and interpreted (I use my calendar kind of like a task organizer - along with several other methods to keep organized as I need all the help I can get in that category) Haha...I said Category! Anyone know how to do that?
Diane Poremsky says
This is in outlook or on a printed page? It's not possible in Outlook (although some of the category utilities might add a sidebar you could leave open). It's also not possible in a printed page, but you could do something with the footer to add it (or use the Calendar template for word and add a legend).
Carol Bernett says
My work place uses Outlook to organize incoming emails that contain setup requests and all the department data updates. The emails are sorted to folders depending on what the request is for. Our categories are setup to show who is working on which email request. Is there any problem if the categories are not uniform between the users? Is there any reason to have all users have the same categories? Each category is a color and an employee's name, but each user has a different list of categories. Please let me know your thoughts. THANKS!
Diane Poremsky says
It might be better if the names are uniform and added to each users master list (uniform color is less important)- this way they'd all be highlighted in a color for each user. If they aren't uniform, the category name is on the item but it won't be colored will be less obvious.
Lori Williamson says
Not sure if my reply posted or not. Trying again. Yes exchange account. We see the desktop alert, system tray icon and the new unread message counter increases in inbox, but the new message does not appear at top of list when in category view. If you click in list, it appears. Also if you open and close it does not change to read.
Lori says
Yes this is an exchange account. No if you stay in category view and click in on other messages then the new message pops to the top, and if you open it, and close it. It still shows as unread. Interestingly enough, it is happening on both our 2007 and 2013 clients. Of course if you sort by "received" this problem doesn't occur. It is when she is in category or sorted by category. If you look at the inbox, the # of new messages indicator, shows a new message. Plus we also see the pop up notification through the system tray etc. but the message simply will not refresh to the top.
Lori Williamson says
We have a client that is reporting that since last week, she states that in Outlook 2007 SP3, she works consistently in the Category View. She states that previously in this view new messages would appear at the top of the list. This behavior no longer happens, there is no automatic refresh. She needs to click in etc. for it to refresh. I can reproduce the behaviour on my machine. The thought was that maybe a security patch last week caused this. I have since uninstalled all patches and still the behavior persists. Can you confirm what is "suppose" to happen? Also if you read a message, it will not mark itself unread.
Diane Poremsky says
This is an Exchange email account? Typically, it should refresh as new messages arrive, but firewalls and routers can prevent outlook from receiving the new message notifications.
Are messages switching from read to unread? That definitely shouldn't happen.
Liam says
Hi, i share a single mailbox with another user on Outlook 2010. Up until recently we used colour categories which idenitifed the particular email being managed by each other. However, i recently had to reinstall the email mailbox on both computers, and since then the colour categories arn't sharing properly between the two computers. Can somone explain what i should do?
Judy Martin says
Hi!
I've been categorizing my calendars for years so that I could separate my personal & my work calendars. It has been working fine with Outlook 2010. However, within the last few weeks, I suddenly can no longer separate my categories to make work & personal calendars. (View, Change View, Work or Full Calendar.) I have been able to do this with no problem for years until a few weeks ago, and suddenly it won't switch back to my work calendar. I even tried a few times to make a new calendar (filter, more choices, categories, check categories I want included in the calendar, then click OK. When I get to this window, the filter field shows all my categories. When I click OK again, it always says Filter: off. Can you help me resolve this problem? Thanks Judy Martin
Diane Poremsky says
Did you try resetting the view or deleting the view that you are currently using? It sounds like the view might be corrupt.
Bill says
Hi I was using Palm Pilot platform for NOTES with Categories many years ago. Then I transfer the NOTE to my Outlook 2010 but I found several duplicates categories. I have several email account in outlook 2010. I sync with BB and the notes duplicate again. Is there any way to assure the notes could be sync and not get duplicate. Could you help me . Thx Bill
Diane Poremsky says
No, other than not syncing. There are duplicate removers that check notes for duplicates.
Jenece says
HI i am a working graduate student and I am interested in tracking my practicum related appointments (hours) in my calendar. I have assigned them all a particular category. Is it possible to query all of my specific categories within a specified period of time to determine how many hours I spend doing a particular activity?
Diane Poremsky says
Yes, use a list view, filter (or group by) category. You can select all, copy and paste into Excel to add up the time if necessary.
Jody says
Thanks very much! Not the answer I was hoping for, but I sure appreciate your responding so quickly!
Jody says
Hi, my boss and co-workers all share their calendars with me and I keep them in overlay view to keep track of everyone's schedules at a glance. It's confusing when they add category colours--if I have assigned pink to X's calendar and their appointments appear in green or orange or whatever, it defeats the purpose of the at-a-glance tracking. Is there any way I can see their calendar appointments with only the colour I have selected and not their category colours?
Diane Poremsky says
The only way to do this is to make sure the categories they assign are not in your outlook. If you both use the same categories, the colors will apply.
marybethpottratz says
Hi, I had categories set in Outlook 2013 for weeks. Suddenly today, all categories disappeared, both color code and category name! There are two old categories showing up that I had been using about two years ago on an old PC. Is there anyway to get my categories back? It took hours to set it up. Thanks for any help you can offer.
Diane Poremsky says
I'd first try restarting Outlook. An Outlook 2007 bug might be resurfacing - in that case, the categories came and went - the problem was caused by an update.
If you open one of the items you know was assigned a missing category, is the category on the item? If so, running Upgrade to color categories command should bring them back.
Diane Poremsky says
I have a more complete macro at Automatically change Appointment categories using VBA
Matthias says
Thank you so much, it would be a big help since I am still fairly new to VisualBasics.
Diane Poremsky says
This is a very basic macro - when a reminder fires, it opens the appt and sets the category and dismisses the reminder. If you want to keep the reminder, you don't want to save it as it causes the appt reminder to fire again and again and again...
Private Sub Application_Reminder(ByVal Item As Object)
If Item.MessageClass <> "IPM.Appointment" Then
Exit Sub
End If
Item.Categories = "Complete"
Item.Display
Item.ReminderSet = False
Item.Save
End Sub
Matthias says
Hey, do you have a macro I could use to automatically assign a specific category to my appointments in outlook, as soon as they are over? Thanks
Diane Poremsky says
I don't have one, but it is possible as long as you have a trigger - the next reminder (or the meetings own reminder) or something to kick off the macro. I'll see if i can slap something together.
ブルガリ ネックレス says
Just how do i switch firefox with recollecting my fb details?
Diane Poremsky says
I'm not sure I understand what you want to know. Switching to Firefox shouldn't affect outlook.
Alan says
I have a user that is trying to share a new calendar with another user. They set them up has an owner and the new person is able to do add, change, and delete various events on the calendar. They are also able to select the different categories that are listed. However, they are not able to create any new categories. They are both using Windows 7 computers with Outlook 2007 installed. Is there anything else that I can try to be able to allow the other person to create new categories? Thank you
Diane Poremsky says
You can only create categories if the mailbox is opened as a mailbox, not as a shared folder. Sorry.
Justin says
Diane, I am trying to set up categories that can be seen by others in my org when I categorize an email and send it. I have downloaded the CodeTwo Cat Man software and had others point to the internal link- that is working well. I also added the Registry Key per above. However, when I categorize an email and send it, the other person doesn't see the category. Thoughts? I set a rule to always include the category if the person had my company email address @companyname.com
Diane Poremsky says
Do they not see the category or not get the color? The category will be white if it doesn't exist on their computer.
Does the other person have a rule that removes categories?
If you add the calendar manually before sending, can they see the category?
Cheryl laski says
Going from outlook 2007 to 2010, I am seeing an issue with appointments that do not have a category assigned (white). They pick up the color of the calendar tab. In addition, the color can change when I add an appointment. Seems to go from green to pink. By the way, this is on public calendars. We use a purchased category manager.
Diane Poremsky says
That is the correct behavior. Maybe I should say "expected behavior". I'm not sure why the color would change, unless you are copying them from a green to a pink calendar. This screen shot is from 2013, but 2010 works the same way - the events pick up the calendar color if you aren't using categories (then they pick up the category color) so you can see which calendar they belong on when you use overlays. The little sidebar will change to indicate free/busy status, but it's just a darker or patterned it indicate free/busy.
The color shouldn't change, unless you add a category or move it to a different calendar. When you add a category, the color is visible on the calendar that is in focus. In my screenshot, some of the pink and green calendar events are categories but the gray calendar has focus.
Jeanne Ackerson says
Thanks so much for your prompt reply. I really appreciate it.
malcolm padina says
Yes it was Outlook not Office 365. - Um!
malcolm padina says
Thanks Diane. My contacts list is long and has been with me for more years than i can remember. So the current list was fine, including its categories, when i was running my Outlook 2010 to my domain using exchange server. Since i migrated to outlook.com all the categories have disappeared?
Help!
Diane Poremsky says
Outlook.com as in formerly Hotmail? Outlook.com doesn't support Outlook categories, it uses them for contact groups. If you create the categories online and assign them to the contacts, it will work.
If you mean you migrated to the Office 365 hosted Exchange service, the categories should be on the contacts but lack color and are not on the master lsit. Right click on the root of the mailbox, choose Data File Properties and then Upgrade to Color Categories.
malcolm padina says
Hello Diane
I have converted my private domain to use outlook.com. I also use outlook 2010 on windows 7. As suggested i have two email accounts in outlook 2010 - one for my domain and one for outlook.com.
All my contacts in the outlook.com contact list have lost their categories!
An thoughts?
Regards
Diane Poremsky says
Categories are used online to create contact groups. The categories generally 'stick' in outlook as long as you don't edit the contact online. If you want to use categories with contacts and make sure they stick or edit them online, you need to add the categories online and assign them to the contacts online.
jeanne.ackerson@ed.gov says
I have my categories set up in Outlook 2007 and use mail merge frequently by clicking on the category with contacts of whom I want emails sent to. I have contacts that might have 3 or 4 different catagories assigned to it. If I select 2 or 3 categories to send email to via mail merge - and the contacts are assigned in each of the categories - how can I get rid of sending duplicate emails via mail merge? Am I making sense. Thanks.
Diane Poremsky says
You are making sense. There is no good way within outlook to do it, short of using a macro or an add-in. Usually the mail server will see the two addresses and only send one message, but if the server is not doing that, you'll need to use code/addin.
Valerie says
Hi, is there a way to sort the tasks alphabetically withing the categories in Outlook 2010?
Diane Poremsky says
Yes, hold Shift as you click on the Subject field name. This will add a second sort to the view (works with other fields too). You can also do this in the View Settings dialog, but its easier to shift click in the view.
Kris Barr says
Category Colors Not Working in E-mail. I just upgraded to 2013 because I was losing emails when trying to file them in 2010, so we thought we would try the upgrade. One of the first things that I notice because I used it so much to osrt my emails is that the category colors are not showing up in my list, instead the name of the category is displayed and therefore doesn't really help with sorting. Is there something that can be done to fix this?
Webmaster says
try using upgrade to color categories.
Lawrence says
yes.
Webmaster says
Hmmm. If you use the category field name, the search is should be limited to that field. I'll see if i can repro it in the iCloud.
Lawrence says
I use icloud with outlook 2010 to sync my contacts and calendar on my pc laptop. I just categorized all my contacts (blue = past clients, green = current clients and so on). When I went to search for one of the categories I created, using Outlook, only a few contacts came up or contacts came up that I did not categorize but contained words similar to the category name I created. This is frustrating and I wanted to know why this is happening and if there is a solution. All I need to do is simply pull up contacts by category.
Diane Poremsky says
Did you search for those words in the category field?
category:="Category1"
Mike Caudle says
That stinks...I was able to do that before we upgraded to 2010 and loved that feature. I really miss being able to do that so I sure wish that could be changed back.
Pasha says
And also, if my category names have more than one word, it's not an obstacle to the AND operator? I tried putting quotation marks around category names. Doesn't work with them or without them.
Diane Poremsky says
No, it works here - i entered mine as Federal Holiday AND Make Call, no quotes at all. Only items in those two categories came up.
Pasha says
Exactly! And not working this way. Gets me zero. If an item has categories A,B and C, is the filter of "A and B" supposed to filter it out? Doesn't work like that in my case. Just to make clear, I'm typing the filter parameter ... and here forgive my translations from Russian Outlook... by going to "adjust current view", then the forth button from the top "filtering", then the third tab "Additional", and then "set additional conditions", from the drop down menu I select frequently used fields, then category, then the condition of "contains" and under value I type the filter parameter.
Diane Poremsky says
It should work (just tested it here - it does work.) - I used Categories contains A AND B (Lower case and also works, but I always use caps for the operator. Do not use "A and B" with quotes. Even if it has C, it's still shown because of the A and B category match.
Pasha says
I have Outlook 2003. I seem to be unable to filter view by more than one category via the use of the AND operator as described. Shows zero contacts.
Diane Poremsky says
So you are looking for items marked with 2 categories? AND would get your only items with both categories. OR will get either or both.
Joe says
I've given that a go this morning but unfortunately its acting as above still.
I think I may be left with creating the profile again as I've tried duplicating it in a few places now with reading pane on and off and am unable to replicate it! it's an odd one that's for sure.
Joe says
Hi Diane, it's been a while since anyone posted here, lets see if I can change that!
I have a user who has the below problem from seemingly nowhere. They are on Outlook 2010 without reading pane using Office 365.
When they sort their 'Inbox' (and only Inbox) folder by the Categories column, they expectedly see categorised emails first / last and everything else in the middle. The problem here is that they work from this 'view' and when they open emails that are unread and come back out of it, the email stays as unread, if you then sort the inbox by Date, From, To, Subject, etc. the same email marks itself as read correctly, but only after re-sorting.
It only seems to be once Outlook is sorted by Category that it doesn't mark emails as read and I can't replicate it!
Have you seen this behaviour before?
Thank you
Joe.
Diane Poremsky says
I haven't seen this exact behavior and plan to test it - i know the views don't update automatically, but the read/unread state should update.
Have you tried resetting the view on the inbox?
Lisa Stratton says
Are there changes to catagories/colors in Outlook 2013 that affect this posting?
Diane Poremsky says
Nope, categories are identical in 2010/2013. The only change is with the quick click category field in email - they removed it from the compact message list view.
claus says
Diane,
is it possible to also apply an icon to a task category instead of just using colors like it can be done in onenote? I am already using categories for my outlook task like @phone but instead of using the word "@phone" I would rather like to have a phone symbol in front of the task.
Diane Poremsky says
No, categories are colors only. It would be possible to use a custom form and a different icon in place of the task icon - but you'd need to open the custom form before creating the task. It's not practical for a large number of categories.
Victor says
Hello Diane, thanks a lot for this thread.
I've got a problem in Exchange 2010.
I want to assign categories to groups of mailbox so I can have the same categories for each group of my company. I saw that there were 2 software wich can do that (Exchange category manager and category manager for Outlook/Exchange) but they're not free. There must be a solution, but i can't find anything on the internet to help me ...
Thanks a lot for your help.
Diane Poremsky says
The free solutions are more effort... VBA code (gets the colors right) or send a contact (name it !Categories so its easy to find) with all the categories added to it, have user drag to the contacts folder then run upgrade to color categories. Color category VBA. They can delete the contact when its done upgrading the categories.
Oh, there is one more solution - group policy. This pushes category names out but not colors. I'm not sure if all versions of Outlook support gpo's for categories though. It's been awhile since i last looked at policies for 2010 and 2007.
Svetlana says
Dear Diane, thank you for your answer but unfortunatly it did not lelp. I selected all contacts in the category and pressed *Creat e-mail* . The contacts did not come in e-mail form... May be something wrong with options or something else?
Diane Poremsky says
Something is definitely wrong, but I'm not sure what. What type of email account is in your profile?
Svetlana says
I have Outlook 2010. I was trying to send e-mails by Categories how it was shown in the lesson https://www.youtube.com/watch?v=OdTm5MwSMtc but… this function is not working… At the end of all my actions the e-mails from category do not come in e-mail form all together (only one)
Please could you help me with this problem? May be I have to change somewhere some options or something else?
Diane Poremsky says
Try selecting all of the contacts in the group rather than the group header. Select the first contact in the group then hold shift and select the last one.
Melissa says
we use a shared calendar for all appointments and tasks. the 'owner' of the calendar wants to change the categories and colours. he has figured that out. I as the 'keeper' of the calendar can not see the new categories. he has tried to share them through contacts but all the colours disappear. how can he create the categories and share them with the other 3 users?
Diane Poremsky says
The categories should be on the items but the colors are per user. Are you caching shared folders?
Megan says
Thanks so much for your help! :) That makes total sense! Have a great day!
Monika says
I have not much hope, that anybody might see my question. Isn't there an easy way to expand the list? Why use the last 15? I am always lost, I need too much ... and my Monitor would be quite big enough
:-(
Yes, there are some Managers, but isn't his just a regkey or something?
Diane Poremsky says
No, it's not just a reg key and its not possible to enlarge the most recently used list or resize the All Categories dialog - if you need a bigger dialog, Category Manager can be re-sized.
Megan says
I believe it is in a shared mailbox because when I click on the main calendar categories it'll let me change them, but not when I click on the other calendar that is shared. Does that mean I can't change those categories and colors since it's a shared calendar?
Diane Poremsky says
Correct, you can't change the category names or colors if you are not the folder owner.
Megan says
Diane,
I am using Outlook 2010 and was able to change some of the category names for my calendar in the past. Now when I go to rename the categories or change the color, everything is greyed-out and I cannot choose any of the following: New, Rename, Delete, Color, or Shortcut Key. I'm not sure why it is not letting me have those options anymore, but it is important that I have them and would much appreciate it if you could help me out! :) Thanks!
Diane Poremsky says
What type of email account do you use? It sounds like the calendar is not in your mailbox, but in a shared mailbox.
TJ says
Diane,
Your work is certainly meeting a community need by providing clear answers to sometimes complicated questions - thanks!
I have read all of the questions and have one that was remotely similar: We color code our appointments and work to projects and would like to report total time by category within a reporting period. Are you aware of any utility, tool or technique that does this?
Diane Poremsky says
You can use a custom view that shows the start & end times, duration, and category. Group and/or filter by category then copy and paste into excel to get totals.
shaiju says
how can use previous pst files categories in current pst - In all mail option can use more than one pst but that time experiencing with previous categories not showing in instant search panel.
Diane Poremsky says
Did you upgrade to color categories? That should add the categories to the master list.
Brian Tillman says
In the second yellow box on this page is a link labeled "Outlook 2330, 2007, 2010". Outlook 2330? I suspect this should be "Outlook 2013".
Diane Poremsky says
Actually, I think its supposed to be 2003. I have no idea how it typoed that one. :)
Julie Haeflinger says
Diane,
Thanks for all the helpful info re. categories!
Is it possible to create a report on all the categories? I want to quantify the total time used in meetings and then the breakdown of time spent in each category.
Possible?
Thanks,
Julie
Diane Poremsky says
Yes and no. You can't do the report by category but you can get the data for each item and work with it in Excel to get the total time and add the times by category.
Switch to a list view, add the fields you need to the view (and remove ones you don't need). Select all, copy and paste into Excel.
Edoardo says
Hello Diane,
just normal view, sorted by "received" date.
What I also found is that I lose the info on selected email not only going to "category" sorting, but also coming from it. E.g.: when I sort by category and select a mail, if I sort by something else (e.g. received) I also lose the email.
Thanks again
Edoardo
Phil Gencher says
found an easy tool to migrate categories: https://www.yourlocaltech.com/importexport-outlook-20072010-categories/
https://klemid.de/tools.aspx
Edoardo says
Hello Diane, have you found time to re-check my question here above ? I copy it here:
I experience a small issue while sorting messages.
If I click on a message, then I click on (e.g.) Date received tab, all messages will be sorted by that parameter AND the message I selected will be highlighted. This works for every other field, except category. That is: if I click on the Category tab, all messages are sorted by category, but outlook brings me to the first message - therefore I lose a lot of time to retrieve the message I had selected at first. Is it a normal issue? Is there a solution?
as said, I have Outlook 2007.
Thanks
Diane Poremsky says
I wasn't able to repro it in outlook 2007 when i tried but will try again. Which view are you using in Outlook 2007?
Edoardo says
Hello Diane,
my Outlook version is 2007 with Windows 7.
I sincerely don't know what "conversation view" is...
Thanks
Edoardo
Diane Poremsky says
That's because Outlook 2007 doesn't have a conversation view. :) It was added to Outlook 2010.
TTruax says
Although slightly off-message, I would like to show the Message Options ("Properties") dialog box to categorize my message before it is sent. How do I programmatically show that dialog box?
Diane Poremsky says
item.ShowCategoriesDialog should work - replace the code in the itemsend macro at Add a keyword to the subject of all messages sent with item.ShowCategoriesDialog and the category dialog will come up when you hit send. Click in the application startup macro and press run to kick start it.
Deborah Gardiner says
I would like to create a pie chart from my bosses monthly calendar which is color coded to show where he spent the majority of his time that particular month. Can you help by telling me how to do this, is it even feasible? Thank you!
Diane Poremsky says
its not possible directly in outlook but you can export the calendar to csv format and work it in excel.
Edoardo says
Hello Diane, thanks for the good work you do.
I experience a small issue while sorting messages.
If I click on a message, then I click on (e.g.) Date received tab, all messages will be sorted by that parameter AND the message I selected will be highlighted. This works for every other field, except category. That is: if I click on the Category tab, all messages are sorted by category, but outlook brings me to the first message - therefore I lose a lot of time to retrieve the message I had selected at first. Is it a normal issue? Is there a solution?
Thanks
Diane Poremsky says
What version? If Outlook 2010, are you using conversation view? It works as expected in Outlook 2013 as long as I don't use conversation view - then a message from the conversation is selected, but not the one I was viewing. I'll check it in other versions when i bring up the VMs.
Christian says
With Exchange 2010 you could have another problem
by default that setting have that value "ClearCategories $True"
you must have to modify that value
Set-TransportConfig -ClearCategories $False
https://technet.microsoft.com/fr-ca/library/cc308574(v=exchg.80).aspx
https://technet.microsoft.com/en-us/library/bb124151.aspx
Jenn says
We are using public folders for a Master Department Contact List and each contact has a category assigned. Multiple people enter contacts into this list and assign categories. They have to enter the category each time and of course, there are spelling errors and inconsistency in the naming. How can we get them to pull from a Master Category list and just select the Category instead of entering it each time when using a Public Folder?
Judi Francisco says
Can i add color categorized mails under "Favorites"?
Diane Poremsky says
You can add a search folder that shows only color categorized email to the Favorites list but not individual messages.
Jeff says
Hi Diane,
I'm trying to use the conversation view but also group my emails by category (helps me do triage on my inbox). Outlook doesn't natively allow this (once you use the conversation view you can't group by category).
Alternatively, I'm just trying to use the conversation view and then sort by category, but category isn't an option in the "sort by" list.
Any ideas?
Thanks - Jeff
Michael Reed says
Thanks hope you enjoy your vacation!!!!!!!!!!!
Michael Reed says
Hi Diane,
this looks a bit above my geek grade and i would be afraid i would lose it all, are you or someone else at your firm available for a fee to remote in with team viewer etc and do this process?
Thanks,
Michael Reed
540-687-5117
Diane Poremsky says
I'll be available next week - I'm supposed to be on vacation this week. I'm doing a good job of staying out of the office but not much more. Shot me an email to diane [at] slipstick
Michael Reed says
i have read this but still have a question.
I have outlook and recently changed from mail street to 123together for my hosted exchange.
The tech dept at 123together had me do an export of my profile to the desktop and them import it under a new profile
Categories didn't make it! if i open the old profile they are there just not in the new profile.
How can i move categories from one exchange profile to another on the same computer with the same outlook 2010
Hope someone can help I imagine its moving something around in the registry
Diane Poremsky says
Did you try using Upgrade to color categories command? That should add the categories to the master list. You'll need to adjust the colors as needed though.
Actually, this is a good use of a macro - try this: Get color categories and restore them using VBA
Run the first macro on the old mailbox then use the second one on the new one, using the list of categories created with the first macro.
Tim Holt says
Is it possible to share a calendar but only have selected categories of events shown to them? I'd like to share my calendar with a couple of admin staff members, but only show them some events that they need to see rather than the details all my appointments.
Diane Poremsky says
You'd need to mark the other items as private to hide them.
Heather says
After I have assigned a category to an incoming email, how do I print that email without having the category show up on the print out?
Diane Poremsky says
You'd need to remove the category then reassign it after you print.
Steve says
Diane,
Have a wierd category issue. We have a user who was upgraded from Office 2007 to Office 2010. She can set the category in the Exchange inbox portion and wverything is fine. Problem arises when she then moved the email from the Inbox to the PST. The category is tripped from the email. When she tries to re-apply the category, there is only the color options and none of the labels.
Any ideas how to fix this? this is the first time I've run across this after numerous upgrades.
Thanks for the great information.
Steve
Diane Poremsky says
On the second part, categories are per store so the a pst won't have the categories until you upgrade to color categories.
Losing the color is expected but the category name should be on the item - if she looks at the category button, it will say 'category name (not in master list)'. If she really lost the category names, is she dragging the messages to the pst?
Linda Segal says
We at Visiting Nurse Association use Outlook 2007 for 3 conference rooms, assigning VNA1 as yellow; VNA2 as purple, and VNA3 as white. When we set up recurring meetings, they're usually all in the same conference rooms--and with 2003 we did not have trouble changing the meeting room color. However, now that we've upgraded to 2007, we can no longer change the color of a single occurrence without changing the whole series. (Sometimes a meeting needs to be moved into a different conference room. These are posted on the Conference Room doors so everyone knows what is going on where.)
HELP, please. There has to be a way to change the color of a single occurrence of a recurring meeting.
THANKS!
Diane Poremsky says
In 2003 you used labels to change color. These are moved to color categories, and categories are per series (were in outlook 2007 too) The only solution I am aware of is to not make recurring appointments, or to break them into singles as needed. I have VBA code you can use for this at Copy selected occurrence
Rose Fowler says
What do the colors of the flags mean?
Diane Poremsky says
Red and pink? Red is due today, pink is due tomorrow and really light pink is due in the future. As time advances, the light pink flag will turn pink then red. If the flag doesn't have a date, it's also red.
Matt says
Diane - Great article and feedback. In Outlook 2003 when utilizing categories it would display a count of emails in that category. How can I add this to the 2010 version?
Diane Poremsky says
You should see the count next to the group name when the groups are collapsed or in the tooltip when you hover over the group header.
Sharee says
Diane - I just want a list of the names of the 25 colors in the categorize function. whenever I try a search for that [i.e., colors in color categories, category colors, category color list, 25 colors in Outlook, and many more ...] all I get are "how to" instructions on use of the categories. I need a list and wonder if I am to go to all the trouble of creating it myself since I don't want to waste more time on this, but could surely use that list. Thanks, Sharee
Diane Poremsky says
The list is in the object browser and if you know the right keyword, it's easy to find - https://msdn.microsoft.com/en-us/library/bb208064%28v=office.12%29.aspx.
As an FYI, I added the color names to the page, just above tools.
Diane Poremsky says
Not sure why you need the color names, but I now have a macro at Print a list of Categories and their Colors if you need to make a list of category names and their assigned colors.
Raul says
Outlook 2003 allowed me to replace a calendar category from blue (appointment) to green (successful). This helps me focus on appointments or tasks that need attention.
Outlook 2010 will not always allow me to do these changes. I get the message "You can only make changes by opening the series"
I wonder what the difference is for allowing to change or not since I set these categories on the recurring appointment feature.
I hope you can help. Thanks!
Chris says
Diane,
Thanks for this column! Great information.
In Outlook 2010, I use categories for my e-mail. I had one category named. When I renamed it, it showed up alphabetically in the categories list as it should. But when I got to an e-mail, right click to give it that category, it doesn't show up. It is actually the first alphabetically on the categories listing, but it doesn't show up when I try to use it with the right click. Help?
Karen says
Diane-
Everything was fine...then it wasn't. In the month view of calender (Outlook 2010), when I set a recurring event over several days and assign a category color, the background color of the days change to the selected color as well at the "event bar" at the top of the boxes for the days. This is new. Before, only the event bar at the top changed color and the background color of the boxes for the days of the recurring event did not change color. I don't know why this happened now but would like to not have the background colors change. How can I do this? Thank you.
Tom Hicks says
Dear Diane,
Thanks for the quick reply.
I came across a default rule setting in Outlook 2010, which is "clear categories on mail
(recommended) (client only)". What does this do and will disabling this help to maintain the category assigned during subsequent email exchanges?
Thank you,
Tom Hicks.
Diane Poremsky says
If someone sends you an email with a category assigned, it is removed. You need to enable the reg key in the Assigning Categories to Sent Email and as long as the recipient doesn't remove categories, they will see the category you assigned. Colors are per user, so it might be white or in another color on their end, only the category name is sent.
Tom Hicks says
Dear Diane,
Thanks for posting these useful features for categories. I am interested to work out the following functionality
Let's say, I received email A from User A and I categorize this email under "Blue" category. I reply to this email and User A replies back on the same email as a further followup. Is there any way to maintain this assigned category in the subsequent correspondence?
Thank you,
Tom Hicks
Diane Poremsky says
No, Outlook doesn't send categories and doesn't automatically pick up categories from other messages in a conversation. You can use rules, although that can be unwieldy as you'd need one for every conversation.
While not automatic, you can apply a category to all messages in a conversation if you click the category field in a Conversation group header. It will apply to all items currently in the conversation.
Cass says
Please help - we use colour coding daily for appointments in the calendar - when I try to change an appointment occurrence it says I can only do it for the series - I cant find a way to change one appointment in a series to a colour, can you please help?
Diane Poremsky says
That is how it works with Color Categories - the category is applied to all items in the series. The only solution is to not create recurring appointments.
Peggy Wayne says
Is there any way to customize the drop-down list for the "most used" categories? Categories appear there that I don't want and I can't get the ones that I do want to appear there. It would be easier than having to open all the categories every time I need to choose a color.
Thanks
Diane Poremsky says
No sorry. That is a most recently used list - the last categories you assigned to items should be listed there.
Lenny says
Hi,
I have a user who wants her Inbox emails to be coloured and sorted by category colour is there anyway to do this in Outlook 2010? She is adamant that this is how she did things before we upgraded her to 2010 and 'needs' this to manage her emails. Grateful for any clues,
Marshal says
In my current version of Outlook 2007 there are only color catagories. I have gone through all my contacts and added my catagories only to have them dissapear after restarting the computer , Any ideas would be great.
Gordon says
I have allocated Color Categories to my Contacts in Outlook 2007. I would like the Category colour to be displayed in Business Card view.
Is this possible? If so how?
Diane Poremsky says
No, its not possible. Sorry. Well, at least not automatically. You could edit each card to add color.
You could also use the VBA at Using VBA to Change Business Card Image & Layout to change the color or image (the gray vertical bar) based on category.
DR Smith says
Diane, in Outlook (2007) in this case, is there any way to "merge" categories? After 7 years of Outlook emails/archived et al - their are a few duplicate categories and would like to be able to effectively merge them together under one or the other existing categories - or better yet; merge to a new category and delete old ones... help!
Diane Poremsky says
i know how to do it when all items using the categories are in one folder, but that is not practical for multiple item types.
Group by category, drag from one category to the other or select the group and choose the new category, deselect the old. For mail, use search folders to find all of the items and right click add the new and the deselect the old category.
HiHo says
I work in a business where users need Category update go much faster.
HiHo says
Why does it take up to 30 seconds after changing a colour of a category ( in f.eks. a shared mailbox ), to be updated in another user's Outlook? This happens in Outlook 2010. It went almost immediately in outlook 2003.
Diane Poremsky says
i'll look into it, but the speed is probably related to cached mode. if so, you might be able to speed up the caching updates but it wont improve the speed a lot. What may help is disabling cached mode for the shared mailbox, but then you lose offline access. (Outlook 2010 caches shared boxes by default, 2003 only cached calendars.)
Peter Burke says
Is it possible to set up another field to create a basic Category list? Until I imported my contacts to Outlook I always Categorized by a descriptive name like Personal, Business, Prospect, Customer etc.
Diane Poremsky says
You can still categories by those names - go to Categorize, All Categories and edit the default names.
If you are using contacts categorized in older versions, right click on the root folder (where outlook today is) and choose properties, then upgrade to color categories. that will add them to outlook - you may need to change the colors to suit after you do that.
Pat says
Do you have to use colors in 2010 Outlook? How do I find my Master List?
Diane Poremsky says
Yes, you do. You can assign "none" as a color, but its really white.
The master list is now stored in the data file.
Eddie H. says
I would like to remove catagories that I do not use from the Master Catagory List. When I "delete" a catagory, all it does is change the color to a white box. I would like to completely remove the item from my list leaving only the catagories I have created. Is that possible?
Diane Poremsky says
Do you want to remove the categories from the items they are assigned to or just remove them from the master list? If you delete a category from the list, any item assigned to the category will show a white block instead of a color. But the category should be removed completely from the master list.
Steve says
Just to follow up on this. I too have the same issues. I have cleaned out all my existing categories. There is always one category that comes back with every email that I receive. It says i cannot delete this category because it is not in the master category list. I've have many different IT help desks look at it and no one can figure it out. Help!
Betsy says
I just lost all my designated assigned Categories. Where did they go on my machine? What is the file name to Restore my designated Categories? I don't recall clicking the Clear Categories option but I could have as it is at the top of the listing on the drop down. Please help to Restore my assigned Categories as I have spent years creating this file or option to categorize all my 8,000+ Contacts. Thank you.
Diane Poremsky says
Right click on the top level of your mailbox - it usually says your name or email address - and choose Properties then Upgrade to color categories. Does that restore them?
Kree says
For my calender appointments when I add a category and then remove that category and choose a different category the first category gets added back for some reason. How do I get it to go off of the appointment permantly?
Ania says
I want to assign two color categories to the same Outlook calendar event. One to tell me what conference room I have the meeting in (such as dark blue) and another to tell me if I need to order food for the meeting (such as orange). Is that possible? I've added the two different colors to one event but only the dark blue shows up for the item on my calendar.
Diane Poremsky says
While you can assign two (or more) categories only the last category color shows in the day, week, month views. In your scenario, i might assign the food category last - then once the food order is placed, remove and readd the room category so you can see which room it is in.
Sarah says
Help! If I categorize inbox messages in Outlook 2010, the category then shows to the recipient I reply to and continually in the conversation. My category read ' Must reply to' and the recipient sees. Also it is annoying becuase if they reply back it looks as if I still need to action 'must reply to'. How can the category be 'swiched off' when replying to an an email?
Diane Poremsky says
The default is to not include the category in sent messages - but if you set the sendpersonalcategories registry key, they will be sent out.
Ivan says
This reg entry works only for sent email. Example:
I receive an email from Tom - categorize it manually with "Personal".
I reply to Tom's email and see in my sent folder that this reply has the same category "Personal" (reg entry takes care of this).
I receive a reply from Tom and have to manually categorize this email again.
So most my emails are conversations with more that 2 replies but I end up manually categorizing them all over again every time I receive them :(
Diane Poremsky says
Ah... the only way to avoid adding the category manually is by using rules to set a category on all mail from Tom. It can get to be unmanageable though.
Ivan says
Is there a way to automatically categorize mail that is a reply to already categorized mail in my inbox? For example I receive an email with subject "Test" and categorize iz manually, reply to that email and receive another reply from that person now with subject "Re: Test". In this case I would like that Outlook auto-assigns this reply with the same category I assigned to the original mail.
Hope this makes sense...
Diane Poremsky says
Do you have the reg entry at Outlook 2003/2007/2010 enabled? That should keep the same category that was on the message you replied to.
Nicholas Tardent says
Thanks for such a good article Diane. I came across it as I was trying to find out how to backup the category name that has been applied ot each of my 2000 contacts within Outlook. We use exchange server so if there is a local machine failure, a user's Outlook can easily be setup again with all e-mails, calendars and contacts. BUT: we recent had an unexplained problem that meant a user's contacts completely lost ALL category information. We setup up their outlook again form the server and everything was safely there EXCEPT no categories were applied to any contacts. We had to manually reassign each contact to a category! Do you have any suggestions as what files we could backup that would allows to save this information and reassign it if this problem occurs again?
Jeff says
Is there a registry hack or some other means to make Outlook 2010 show more than the most recent 15 categories under the Categorize button?
Diane Poremsky says
No, I'm not aware of any such hacks. Sorry.
Ken says
Thank you Diane! I will test this out.
Diane Poremsky says
I'll add an article on it (or add it to this article, but it's getting pretty long) . Note that I missed one step - the rule needs to apply to contacts in a specific address book, which just happens to be the contacts folder you moved the contacts to.
Ken says
Diane! I was skipped! I have tried working with the conditional formatting every way I can think but there seems to be a disconnect between the categories and filter view. Would you be able to offer any direction?
Much appreciated.
Ken
Diane Poremsky says
Sorry I missed it. There is a disconnect between contacts assigned to categories and messages - rules and filters don't cross reference contacts and their assigned categories.
To create the view you want, you need to use a rule to assign the category when mail arrives - if the contact list is short and fairly static, add the names to the rule individually. If it's large or you are always adding and removing names, a separate Contacts folder for the "category" members works better. Next, make a custom view for messages assigned to the category. If the list is short, you can skip assigning categories and create a conditional formatting view and list the addresses in the From field - this field accepts domain names so you can apply it to all addresses from a domain.
Cathy says
Outlook 2010 - It seems that I can only set up 15 x Calendar Categories - when I add more they drop off the list.
Is there a limit of only 15?
Diane Poremsky says
There is not a limit - well, there might be, but its well above 15. The list shows only the last 15 used. Click the All categories link at the bottom to see the full list of categories.
Ken says
I want emails coming in from color categorized contacts to have a different view when coming in. I see where you can change settings for the view and I create a conditional format that says change the font of the email when it comes in if the contact is in this category. This is not working. any suggestions oh outlook guru? :)
Szymon Szczesniak (CodeTwo) says
@Katie
If you want to share color categories with others in Outlook, be it in a shared calendar, shared tasks, mailbox or any other Outlook folder, there is a freeware tool developed by a company I work for called CodeTwo Catman. We use it ourselve to categorize tasks in Outlook:
https://www.codetwo.com/freeware/catman/?sts=1885
BTW: Great article Diane!
katie says
We want to assign a color category to each person's appointments in a shared calendar. However, it seems that these colors don't "hold" when the secretary assigns the colors. Only she sees the colors. Would we each have to have identical color categories assigned to be able to see the appointments in the colors that she assigned to us?
Diane Poremsky says
Yes, you need to have the categories installed on each mailbox - the colors are per mailbox.
Maria says
I deleted the Master categories from outlook 2010 CALENDAR, I have no idea how to restore them. Could you please help me? However I still have them in the Mail Window.
Diane Poremsky says
You want to right click on the top level of your data file or mailbox and choose properties, then Upgrade to color categories. This will add all the categories assigned to items in your data file to the master category list. See Upgrade to color categories if you need screenshots or a tutorial.
Liz says
Can I turn a big color category into a group to send an email to?
Diane Poremsky says
Yes, use a group by category view then select the category and use it in a mail merge or to send a group message. I can be more specific if i know the outlook version.
Malik says
Hi, i'm an IT and have a problem
1 i did an exchange migration 2003 to 2010
2 I import NK2 file and Categories
3 on one comptuter theyre are categories on Public contacts alla of them are not in the master list.
My question is : how i can remigrate theese categories in master list ?
what i do : Import all public contacts in a random mailbox and try Outlook.exe /remigratecategories
but it dosent work this time.
do you have an anser for me?
Diane Poremsky says
Categories in public folders are not global - each user needs to add them to their own category list and also set the colors. You can push the categories in to the master category list using group policies (get the office ADM file). You won't be able to set the colors though - each user may have the categories in different colors.
Bill Thornburgh says
How can I stop Calendar from changing colors (white to whatever selected) when in "Month" view as I scroll forward month to month?
Diane Poremsky says
You can't. "this month" is the main month in the view and is white, the past and future months are dark - sorta like how a monthly paper calendar has grayed dates for the last and next months. But since the calendars in outlook scroll, the colors shift as the calendar does. If you use the arrow icon at the top and jump by full months, it won't be so annoying. (Ok, it's even more annoying if you use 2 calendars side by side - one keeps shifting light to dark.)
Woody Grant says
I wish to add a legend beside my calendar fto show what the colors mean. How can I do this?
Diane Poremsky says
You'll need to write the legend - one option is to use the page footer - you can save it in a page style so you won't need to retype it every time.
BTW, the footer doesn't support colors - you'll need to use words for the colors.
Ryan Bretzel says
I read this article but I still don't fully understand. Can I assign contacts into certain catagories and then export them (contacts info and catagories assigned to) to a cvs or other file type in case I want to import them into another computer without having to re-catagorize hundreds of contacts again?
Also is there a way to search contacts by other fields like spouse name?
Diane Poremsky says
Yes, exporting to pst, csv, or excel will include the category field. It may be included in other export formats however formats supported by other applications may not be able to use the Category field.
You can use instant search to search any field - in most cases you just need the common field name and if it is a two word field, like Full Name, you type it as one word, no spaces: fullname. In the case of spouse, you just need spouse but using only partner also works. The format is like this:
spouse:chad
Diane Poremsky says
Sorry, you can't sort or order the color categories, other than by changing the names. The MRU flyout (when you expand the Categories button) is ordered by the most recently used categories. The All Categories list should be alphabetical.
Diane Poremsky says
To remove the categories you added and restore the defaults in Outlook 2007 and 2010, close Outlook and in the Start Search field (Windows 7) or in the Run command (Win XP) type or paste the following command and press enter.
outlook.exe /cleancategories
This will not remove the categories assigned to items and if you want to add those categories back to the master list, you can use the Upgrade to color categories command.
Diana Baker says
How do I color code incoming e-mails from specific persons in Outlook 2010? In the previous version, we clicked on the messeage received from a sender then went to Tools, Organize, Using Colors, then applied a color. All in-box messages from the specified sender are highlighted with the chosen color. Is there a way to do this in Outlook 2010?
Thank you,
Diana
Diane Poremsky says
See Where is Organize? - you need to customize the view yourself now.
Kurt says
I want to restore my 'Category Names and Colors" back to their default setting. How do I do this?
Thanks -
Kurt
Kat says
Hi
How can I sort out my 'colors' in outlook 2010. I want to be able to rearange color categories in specific order.
thank you
kat
Rita says
How can I stop Outlook 10 from automaticly adding catagories to my appointments. It even adds additional catagories I don't want after I've assigned a catagorie.
Diane Poremsky says
Outlook doesn't do that. What addi-ns are installed? In Outlook 2010, go to File, Options, Addins to check.
Check for VBA macros by pressing Alt_F11 to open the VBA editor. They would be in ThisOutlookSession (under Outlook Objects)
Darlette Gayle says
How can I change the title of a category? Mine have the colors assigned to specific events (i.e., birthday, baby, phonecall, etc.). I would like to chang these titles. Is there an easy way to do this?
Please advise.
Thank you!
Diane Poremsky says
Click the category button to expand then choose All Categories at the bottom. You can manage your categories from that dialog.