Outlook has always supported categories and Outlook 2007 introduced Color Categories by merging the short-lived colored flags with categories. This page sums up a few things I've learned about Outlook categories and color categories, with suggestions for using and managing categories along with troubleshooting tips.
You can assign one or more categories to any Microsoft Outlook item and consistent use of categories makes it easier to locate specific items.
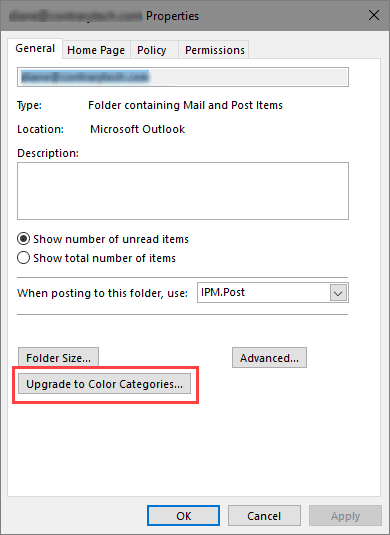
Outlook does not use the registry for a master category list; they are stored in the default message store (mailbox or pst). If you are setting up a new system and using your old pst the color categories will be available on the new system. If you imported from an old data file, right click on the root folder (Outlook Today), choose Properties and click the button to Upgrade to color categories. This will assign random colors to the categories assigned to items in your data file.
You can use Group policy to push Categories out to users, merging new categories with their existing categories. In the Group Policy Editor (with the Outlook 2007 or greater ADM files installed), look under Miscellaneous. You can also add the categories by adding a string value under the policy registry key. Add the categories in a comma or semicolon separated list. If you have more than one Email account in Outlook, categories added to the registry are available only to the default account or default data file. (nn = your version of Office.)
HKEY_CURRENT_USER\SOFTWARE\Policies\Microsoft\office\nn.0\outlook\preferences
String: newcategories
Value: New Category 1; New Category 2
The same path in the CURRENT_USER hive also works.
HKEY_CURRENT_USER\Software\Microsoft\Office\nn.0\Outlook\Preferences
String: newcategories
Value: New Category 1; New Category 2
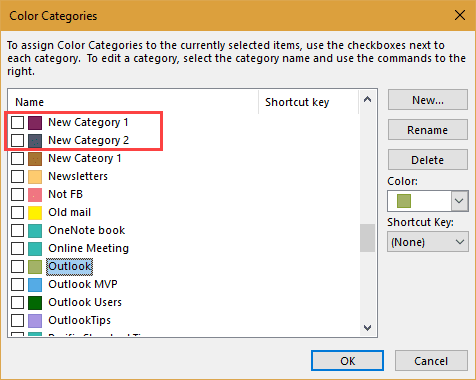
Note: if you remove a category name from the registry key (or edit the name in the registry), it remains available in the Category list (ex. misspelled Cateory 1 in my screenshot).
To print a list of the category names and their colors, we have a macro and instructions Print a list of Categories and their Colors.
How to Upgrade to Color Categories in Outlook (video tutorial)
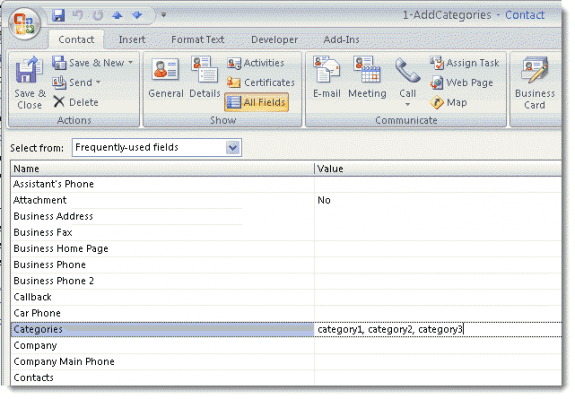
Unlike with older versions, you cannot paste a comma separated list of categories into the master category dialog and add them all to the Outlook master list. With the exception of the All Fields page of an Outlook contact, the only way to add categories to items is using the Category picker menu or dialog. You can use the All fields page to bulk add categories to Outlook 2007 or Outlook 2010.
Assigning Categories to Sent Email | Categories in Shared FoldersManaging Categories | FAQ: Color Categories | Master Category ListKeeping Categories Consistent | How To | Category-based Mail MergeMore Fun with Categories | Things You Can't Do with CategoriesColor Names & RGB code | Tools | More Information
Color Categories and IMAP Accounts
Color categories are not available in IMAP accounts by default, since they are not supported on all IMAP servers. However, there is a way to add color categories to IMAP messages. See Outlook Categories, Flags, and IMAP Accounts for more information and the workaround.
Assigning Categories to Sent Email
By default, Outlook does not allow you to assign a category to mail before sending it. This change was made to prevent user data from "leaking". For example, if you use a category named "PITA Customer" you would not want it included on email sent to customers. (Yes, this type of scenario really happened, more than once.)
If you need to include the categories all the time, use the SendPersonalCategories registry entry. Exchange admins can configure Exchange to remove categories. If you use Exchange and it's configured to remove categories, adding the key to Outlook will not work, you'll need to speak to your admin.
This key works with Outlook 2003 and up, you'll need to use the correct path in the registry for your version. This can also be set using Group Policy; look for it in the Office adm files, under Outlook > Miscellaneous.
Create the key or path if it does not exist.
Outlook 2016
HKEY_CURRENT_USER\Software\Policies\Microsoft\Office\16.0\Outlook\Preferences
DWORD: SendPersonalCategories
Value Data: 1 to keep categories on sent mail, 0 to not include categories
Outlook 2013
HKEY_CURRENT_USER\Software\Policies\Microsoft\Office\15.0\Outlook\Preferences
DWORD: SendPersonalCategories
Value Data: 1 to keep categories on sent mail, 0 to not include categories
Outlook 2010
HKEY_CURRENT_USER\Software\Policies\Microsoft\Office\14.0\Outlook\Preferences
DWORD: SendPersonalCategories
Value Data: 1 to keep categories on sent mail, 0 to not include categories
Outlook 2007
HKEY_CURRENT_USER\Software\Policies\Microsoft\Office\12.0\Outlook\Preferences
DWORD: SendPersonalCategories
Value Data: 1 to keep categories on sent mail, 0 to not include categories
If you don't want to edit the registry yourself, download and run the registry file for your version of Outlook.
Outlook 2016 Outlook 2013 Outlook 2010
Outlook 2007 Outlook 2003
Remember: if you set this key, the categories will be included on the sent message and the recipient will be able to see the category (unless the recipient uses a rule to remove categories from messages they receive).
Categories in Shared Folders
Only category names are visible on items when you share folders on Exchange server; colors are per user. Other users will see your categories in a white color (unless it's already in their color category list).
When you open a shared mailbox, your permission level determines whether or not you can use and edit the category list
![]()
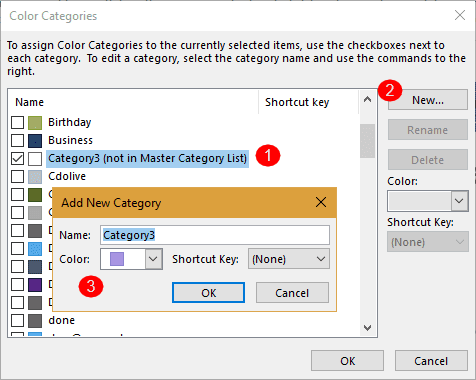
To add a category that is not in your master list, to your master list:
- Select it (so it's highlighted)

- Click the New button.
- Outlook will assign the next unused color; change the color and set a shortcut key, if desired, then click Save.
Shared Mailboxes
When you open a shared mailbox in your profile, your permission level determines whether or not you can use and edit the shared mailbox's category list.
Editor and above: You can use the category list.
Managing Categories
To add, remove, rename, or assign shortcuts to categories, expand the category selector and choose All Categories from the end of the menu to open the Color Category dialog, shown below.
Select the category on the left then the appropriate button in the dialog to add, edit, delete categories, or assign colors or shortcuts to categories.
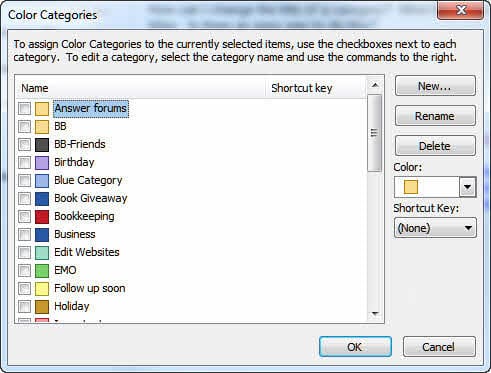
You cannot add categories in bulk using this dialog.
Bulk Add Categories in Outlook 2007 and up
While you can bulk add categories to any item in older versions of Outlook by typing in the category field; beginning with Outlook 2007, you need to use the category menu or dialog to select categories.
Also possible in older versions, you could type (or paste) a comma-delimited list in the master category dialog then add the list to your master list. While this is not possible to do from the master category list in newer versions of Outlook, it is possible to type a list of categories and add them to the master list.
- Open a contact form and switch to the All Fields page.
- Select Frequently used fields from the Select from menu, then type (or paste) a comma-separated list of categories into the Category field.
- Next, right click on the top level of your data file (where Outlook Today is) and choose Properties
- Click Upgrade to Color Categories button
FAQ: Color Categories
Q: How do I reset the categories?
A: In Outlook 2007 and newer, you can remove the categories you added and restore the defaults using the /cleancategories switch. Close Outlook and type or paste the following command in the Start Search field (Windows 7) or in the Run command (WinXP):
outlook.exe /cleancategories
This will remove all categories from the master category list and restore the default category placeholder names (Red Category, Blue Category etc). This will not remove the categories from individual items. To remove categories from Outlook items, create a search folder to find the items that have categories assigned then remove the categories using Select All, then right click and choose Clear All Categories.
If you decide you want to restore the categories to the master list (and haven't deleted them from the items yet), use Upgrade to color categories.
In Outlook 2003, go to Edit menu, Categories, Master Category List. Click Reset and close the dialog.
Q: How is the Category list organized?
A: When you expand the Categories button, the flyout is ordered by the most recently used categories. If you click All Categories to open the Color Categories dialog, the list should be alphabetical.
Master Category List
In current versions of Outlook, beginning with Outlook 2007, the master category list is stored in the Outlook data file. If you use a pst file and move the pst file to another computer, you'll keep your categories. If you use Exchange server, including Office 365 email or Outlook.com, your categories are stored in your mailbox.
In Outlook 2003 (and older) the master category list is stored in the Windows Registry. Each user has a different category list.
To back up the Master Category List in Outlook 2003:
- Run Regedit and go to HKEY_CURRENT_USER\Software\Microsoft\Office\11.0\Outlook and select the Categories key.
- Choose Registry | Export Registry File to make a copy of the Categories branch of the registry. Note that this list is in Unicode encoding and is not compatible with versions other than Outlook 2002.
To use any of these methods to move categories to another computer using a compatible version of Outlook, you'll need to change the version number in the key before importing.
You can use this exported branch to distribute a category list to other Outlook users. See the MSKB article How to Migrate Custom Categories to Other Users. CAUTION: Using a .reg file to propagate a category list does not update a user's own list; instead it completely replaces it. I personally do not recommend this method, because it eliminates much the utility of the Category feature for users. See the next section for what I think is a better method.
If you remove a category from the master list, any items marked with that category are not affected. In the Categories dialog box, that category is listed as "(not in master list)."
Keeping Categories Consistent
I'm convinced that many people worry too much about keeping the Master Category List consistent from user to user, when what they really want is to keep the categorization of the items themselves consistent. It is critical to remember that the category set on an individual item is totally independent of the user's Master Category List.
For example, you can set a category of Blue on an item, then delete Blue from your personal Master Category List. The item is still categorized as Blue. In the Categories dialog, you should now see its category as "Blue (not on master list)." Anyone who has never had Blue on the master list will see the same thing.
Yes, it would be nice if Microsoft had made this easier, but the real issue usually is making category assignment consistent. In a public folder, consider handling that with a custom form that forces users to pick from an "official" list of categories. I've put together a sample form at Required Categories Contact Form.
Another approach would be to use code behind the form to make category assignment automatic based on the value of other fields in the form.
One situation where the Master Categories list makes a difference is when you are working with a large folder and dragging a large number of items between categories. When a category is not in the Master List, you risk losing the original categories from items added to new categories. You can avoid problems by dragging fewer items at a time or select the items, right click and choose Categories.
How To ...
To filter a folder on multiple categories ...
On the More Choices tab in the Filter dialog, type the names of the categories separated by "AND" Do not use the Categories button.
For example, to display contacts who are in both the Personal category and the Business category, type in "Personal AND Business."
Use the Advanced tab to create the filter. Use Categories for the Field, select contains as the Condition and enter the category names, separated by AND in the Value field.
The QueryBuilder can be used to create the AND filter if you use Outlook 2002, 2003 or 2007. See Using QueryBuilder for more information.
Remove Categories From Messages
To remove categories from incoming messages, create a rule and choose the condition to "clear message categories".
If you use an older versions of Outlook, Rules Wizard doesn't have an option to remove categories from messages you send or receive, it can only add more categories. You'll need to use VBA to remove categories.
Private Sub Application_ItemSend(ByVal Item As Object, Cancel As Boolean)
      Item.Categories = ""
End Sub
Category-based Mail Merge
You can filter or group by category, select the contacts in the category and start the mail merge.
Some of the third-party mail merge tools also support merging by category.
More Fun with Categories
See Microsoft Exchange and Outlook Distribution Lists for details on how to use categories to create instant Personal Distribution Lists.
You can use categories in Rules Wizard rules, both as part of conditions and as actions, assigning one or more categories to an item. For example, I used to use an autoresponder to handle subscription requests for my Exchange Messaging Outlook newsletter and marked the incoming requests with a category of "Response sent."
If you create a new Outlook item from another item, the categories carry over. Back to the autoresponder example: I manage the mailing list in a Contacts folder that uses a custom form. New items are created by dragging the incoming message to the folder. When the new recipient is created, it has the category of "Response sent." This also works with replies and forwards; as long as you send in RTF format, the recipient will see any category you apply.
Helen Feddema's Code Sample 55 demonstrates how to use an Outlook form to display all contacts by category. It's up to you to take the next step of writing code to do something with all those contacts.
Also see:
Things You Can't Do with Categories
You can't create a view that shows both categories and subcategories. In other words, the Categories field can be used for grouping just once. What you might try is a set of categories that themselves include a subcategory: Friends - Good, Friends - Very Close, etc.
You can't search and replace a category directly without writing code. However, you can select a bunch of categories, then right-click, choose Categories from the pop-up menu and work with the Categories for the entire group of items.
Problems and Issues
We have a report that GoContactSync (an Outlook/Gmail sync utility) resets the master category list. Categories are not removed from the Outlook items, but the categories are shown as "not in master Category".
Color Names
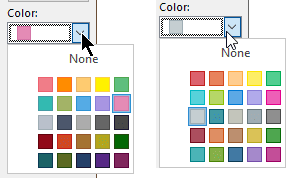
Microsoft updated the category colors beginning with Outlook 2019 / Outlook 365, in most cases the colors are lighter and brighter, as seen in the image on the right. The 25 color names are as follows.
| Category Color Names | ||||
|---|---|---|---|---|
| Red | Orange | Peach | Yellow | New: Light Green Old: Green |
| New: Light Teal Old: Teal | New: Lime Green Old: Olive | Blue | New: Lavender Old: Purple | New: Magenta Old: Maroon |
| New: Light Gray Old: Steel | New: Steel Old: Dark Steel | New: Warm Gray Old: Gray | New: Gray Old: Dark Gray | New: Dark Gray Old: Black |
| Dark Red | Dark Orange | New: Brown Old: Dark Peach | New: Gold Old: Dark Yellow | Dark Green |
| New: Teal Old: Dark Teal | New: Green Old: Dark Olive | New: Navy Blue Old: Dark Blue | Dark Purple | New: Dark Pink Old: Dark Maroon |
| White: No color assigned | ||||
Although knowing the names of the colors is less than useful for most users, they are in the Object model as OlCategoryColor[name], with the new category colors using the old name.
To print a list of the category names and their colors, see Print a list of Categories and their Colors.
These colors are in the order they appear on the category color picker in Outlook 2016. The color names are as listed in the color picker.
RedHEX : #F07D88 RGB : 240,125,136 HSB : 354,48,94 HSL : 354,79,72 | OrangeHEX : #FF8C00 RGB : 255,140,0 HSB : 33,100,100 HSL : 33,100,50 | PeachHEX : #FECB6F RGB : 254,203,111 HSB : 39,56,100 HSL : 39,99,72 | YellowHEX : #FFF100 RGB : 255,241,0 HSB : 57,100,100 HSL : 57,100,50 | GreenHEX : #5FBE7D RGB : 95,190,125 HSB : 139,50,75 HSL : 139,42,56 |
TealHEX : #33BAB1 RGB : 51,186,177 HSB : 176,73,73 HSL : 176,57,46 | OliveHEX : #A3B367 RGB : 163,179,103 HSB : 73,42,70 HSL : 73,33,55 | BlueHEX : #55ABE5 RGB : 85,171,229 HSB : 204,63,90 HSL : 204,73,62 | PurpleHEX : #A895E2 RGB : 168,149,226 HSB : 255,34,89 HSL : 255,57,74 | MaroonHEX : #E48BB5 RGB : 228,139,181 HSB : 332,39,89 HSL : 332,62,72 |
SteelHEX : #B9C0CB RGB : 185,192,203 HSB : 217,9,80 HSL : 217,15,76 | Dark SteelHEX : #4C596E RGB : 76,89,110 HSB : 217,31,43 HSL : 217,18,36 | GrayHEX : #ABABAB RGB : 171,171,171 HSB : 300,0,67 HSL : 300,0,67 | Dark GrayHEX : #666666 RGB : 102,102,102 HSB : 300,0,40 HSL : 300,0,40 | BlackHEX : #474747 RGB : 71,71,71 HSB : 300,0,28 HSL : 300,0,28 |
Dark RedHEX : #910A19 RGB : 145,10,25 HSB : 353,93,57 HSL : 353,87,30 | Dark OrangeHEX : #CE4B28 RGB : 206,75,40 HSB : 13,81,81 HSL : 13,67,48 | Dark PeachHEX : #A47332 RGB : 164,115,50 HSB : 34,70,64 HSL : 34,53,42 | Dark YellowHEX : #B0A923 RGB : 176,169,35 HSB : 57,80,69 HSL : 57,67,41 | Dark GreenHEX : #026802 RGB : 2,104,2 HSB : 120,98,41 HSL : 120,96,21 |
Dark TealHEX : #1C6367 RGB : 28,99,103 HSB : 183,73,40 HSL : 183,57,26 | Dark OliveHEX : #5C6A22 RGB : 92,106,34 HSB : 72,68,42 HSL : 72,51,27 | Dark BlueHEX : #254069 RGB : 37,64,105 HSB : 216,65,41 HSL : 216,48,28 | Dark PurpleHEX : #562685 RGB : 86,38,133 HSB : 270,71,52 HSL : 270,56,34 | Dark MaroonHEX : #80275D RGB : 128,39,93 HSB : 324,70,50 HSL : 324,53,33 |
Outlook 365 and Outlook 2019 have updated color category names and colors.
RedHEX : #DC626D RGB : 220,98,109 HSB : 355,55,86 HSL : 355,64,62 | OrangeHEX : #E8825D RGB : 232,130,93 HSB : 16,60,91 HSL : 16,75,64 | PeachHEX : #FFCD8F RGB : 255,205,143 HSB : 33,44,100 HSL : 33,100,78 | YellowHEX : #FDEE65 RGB : 253,238,101 HSB : 54,60,99 HSL : 54,97,69 | Light GreenHEX : #52CE90 RGB : 82,206,144 HSB : 150,60,81 HSL : 150,56,56 |
Light TealHEX : #57D2DA RGB : 87,210,218 HSB : 184,60,85 HSL : 184,64,60 | Lime GreenHEX : #B6D767 RGB : 182,215,103 HSB : 78,52,84 HSL : 78,58,62 | BlueHEX : #5CA9E5 RGB : 92,169,229 HSB : 206,60,90 HSL : 206,72,63 | LavenderHEX : #B1AAEB RGB : 177,170,235 HSB : 246,28,92 HSL : 246,62,79 | MagentaHEX : #EE5FB7 RGB : 238,95,183 HSB : 323,60,93 HSL : 323,81,65 |
Light GrayHEX : #C5CED1 RGB : 197,206,209 HSB : 195,6,82 HSL : 195,12,80 | SteelHEX : #4497A9 RGB : 68,151,169 HSB : 191,60,66 HSL : 191,43,46 | Warm GrayHEX : #C3C5BB RGB : 195,197,187 HSB : 72,5,77 HSL : 72,8,75 | GrayHEX : #9FADB1 RGB : 159,173,177 HSB : 193,10,69 HSL : 193,10,66 | Dark GrayHEX : #8F8F8F RGB : 143,143,143 HSB : 300,0,56 HSL : 300,0,56 |
Dark RedHEX : #AC4E5E RGB : 172,78,94 HSB : 350,55,67 HSL : 350,38,49 | Dark OrangeHEX : #DF8E64 RGB : 223,142,100 HSB : 20,55,87 HSL : 20,66,63 | BrownHEX : #BC8F6F RGB : 188,143,111 HSB : 25,41,74 HSL : 25,36,59 | GoldHEX : #DAC257 RGB : 218,194,87 HSB : 49,60,85 HSL : 49,64,60 | Dark GreenHEX : #4CA64C RGB : 76,166,76 HSB : 120,54,65 HSL : 120,37,47 |
TealHEX : #4BB4B7 RGB : 75,180,183 HSB : 182,59,72 HSL : 182,43,51 | GreenHEX : #85B44C RGB : 133,180,76 HSB : 87,58,71 HSL : 87,41,50 | Navy BlueHEX : #4179A3 RGB : 65,121,163 HSB : 206,60,64 HSL : 206,43,45 | Dark PurpleHEX : #A589CB RGB : 165,137,203 HSB : 265,33,80 HSL : 265,39,67 | Dark PinkHEX : #C34E98 RGB : 195,78,152 HSB : 322,60,76 HSL : 322,49,54 |
Tools in the Spotlight
Category Manager allows sharing of color categories; it adds a sidebar to the folder view as well as opened items, in which you can group your categories and assign them lightning fast; and it adds a reminder, which optionally prompts you if you forget to assign a category. Version 3 | |
ReliefJet Essentials is a set of 162 utilities for Outlook, Office 365 and Exchange Server. It can backup, import, export and convert data into different formats. Perform personalized mass mailings. Save, remove and optimize attachments. Find and remove duplicate messages, contacts, appointments, meetings, and other items. Retrieve statistics on email usage and get reports on Outlook data and settings. You can run the utilities directly from Outlook, automatically in rules, via standalone app, or from the command line. |
Tools
This first release displays all categories in one menu and contains all the basic functionality of the new Categorize button for Outlook 2013. | |
CodeTwo CatMan allows sharing of Outlook categories with other users on the local network. Centralized management using a shared configuration file. Version 3.0.1 | |
Exchange Category Manager is a plug-in for Exchange Server and Office 365. It enables you to manage the Outlook categories and colors that are available in Outlook. Define an unlimited number of groups with different users. Each group can have it's own set of categories and colors to choose from. You can add categories to the existing category list that a user has in Outlook or replace everything with the predefined list. As it integrates with Exchange server directly, the users do not have to do anything, their category list is automatically managed. No software has to be installed on the client pc's. | |
SimplyTag helps you categorize Outlook messages quickly and efficiently. It learns about your tagging patterns and enables you to assign the right tag to a message literally with a single click. Works on sent and received messages. Also support searching messages by categories. |
More Information
To set up subcategories
Categories vs. multiple Contacts folders
Backing Up Master Categories (Outlook Tips website)
The power of Outlook Categories (Michael Bauer)
How to Upgrade to Color Categories in Outlook (video tutorial)
Mail merge help:
Mail Merge
Printing Labels or Envelopes for Contacts
Start a Word letter from an Outlook contact


Hi Diane, I started just now to be annoyed by the fact that when you arrange an address book by categories, each category is preceded by the completely useless "Categories: ". Wonder if that can be suppressed somehow.
If you edit the Field name. View > View Settings > Format Column - edit the display name for categories.
Screenshots
still no hack to show more than the 15 most recent categories in the contextual menu?
No, not at this time. Sorry.
Diane, thank you for this write up. I am wondering if you can help clarify something for me regarding color categories for calendar events.
Sarah creates a calendar and shares it with James, and gives him edit access. Sarah creates some events within this calendar and assigns them color categories, some blue, some purple, etc. James signs into OWA and sees all of the events categorized by color exactly how Sarah has set. But then James signs into his Outlook desktop client to view the calendar, and none of the events have the correct colors - they all just have one color - whatever James' local default is within the desktop client. How do we get James' Outlook desktop client to reflect the appropriate color categories as Sarah has set them?
It seems odd to me that they show up in James' OWA but not his desktop client.
Does anyone know of any MAC OS mail client that works with Outlook (or rather Office 365) categories?
I have been searching high and low. Have got really close with Outlook for Mac but even in that the categories don't filter accurately.
If Spark could add this feature I think it would be a game changer for me.
Is there anything else I am missing?
Thanks in advance.
I have not tried eM client on mac, but its a good replacement for Outlook on windows. (Am installing it on my MacBook now to check it.)
When I try to setup a "Categorize and Move" Quick Step in a shared Mailbox, the dialogue shows the categories setup under my personal mailbox rather than the shared mailbox categories. Any ideas?
The quick steps work with the account - you would need the shared mailbox open as an account to use it's color categories. Or add the categories to your mailbox too.
How does one do this for Outlook for Mac? I don't see any options to be able to backup color categories on Outlook for Mac.
The mac version does not have an option to back up the category list. Sorry.
Dear Diane
' By default, Outlook does not allow you to assign a category to mail before sending it. This change was made to prevent user data from "leaking". '
This is really helpful because I had been wondering about this inability to categorise a message in Outlook before dispatch for years.
It makes a lot of sense!
Thank you for mentioning it!
(User name@ londondas)
Hello, when you create a shared calendar for a group, how do you remove the connection to your own categories? I would need the shared calendar to show as new blank Colors only - Category topics/names not yet created? Thanks.