How to show the sender’s e-mail address and other fields in a column in message list view.
Many Extended MAPI properties are added to messages when they are committed to Outlook message store or the Exchange mailbox but Outlook doesn't have a built in way to expose the value. You can view them using a configuration form that exposes the value in a custom field.
Below are configuration files that expose the Sender ID, SCL (spam confidence level) and sender's email address in the message list and instructions on installing them in Outlook. If the SCL form doesn't seem to install in Outlook 2007, see Troubleshooting below.
Added July 26 2007: 'Replied to' Time. Use this to display the time the 'last verb' executed. This will be the time it was replied to or forwarded.
Added August 7 2008: Extended-Properties. Along with the Sender's email address and Replied to time, the Internet Message ID is also exposed.
Notes:
Sender ID only works with Exchange 2003 SP2
SCL requires Exchange 2003's IMF
Everything else works with all versions of Outlook
CFG Files | Install CFG | SenderID Labels | Replied Time | Create your own CFG
CFG files
If you'd rather not create your own CFG file, even though it involves only copying text from a web page and pasting it into notepad, the following ready-to-use CFG files are available for download. (Right click on the links and choose Save target as...)
| CFG form files |
|---|
| Sender's email address |
| SCL value |
| Sender ID value |
| Replied to time |
| EXTENDED-PROPERTIES Includes replied to time, sender address, and Message ID fields |
| Show on Behalf of Address |
Place the CFG's into the same Office folder with the *.ICO files, in the \Microsoft Office\OfficeXX\forms\[4 digit language ID] folder, replacing OfficeXX with your version of Office. For a US English install of Office 2007 on 32-bit Windows, the path is C:\Program Files\Microsoft Office\Office12\FORMS\1033.
Outlook 2013/2016's Home Premium 32-bit suite puts the FORMS folder at C:\Program Files (x86)\Microsoft Office\Office14\FORMS\[4 digit language ID] (32-bit Office, 64-bit Windows)
Outlook 2016
Home Premium, Business subscriptions:
C:\Program Files\Microsoft Office 16\root\office16\FORMS\[4 digit language ID]
32-bit Office, 64-bit Windows:
C:\Program Files (x86)\Microsoft Office 16\root\office16\FORMS\[4 digit language ID]
Volume licenses (often called MSI)
C:\Program Files\Microsoft Office\Office16\FORMS\[4 digit language ID]
32-bit Office, 64-bit Windows:
C:\Program Files (x86)\Microsoft Office\Office16\FORMS\[4 digit language ID]
Outlook 2013 Home Premium, Business subscriptions:
C:\Program Files\Microsoft Office 15\root\office15\FORMS\[4 digit language ID]
32-bit Office, 64-bit Windows:
C:\Program Files (x86)\Microsoft Office 15\root\office15\FORMS\[4 digit language ID]
Volume licenses (often called MSI)
C:\Program Files\Microsoft Office\Office15\FORMS\[4 digit language ID]
32-bit Office, 64-bit Windows:
C:\Program Files (x86)\Microsoft Office\Office15\FORMS\[4 digit language ID]
Outlook 2010:
C:\Program Files\Microsoft Office\Office14\FORMS\[4 digit language ID]
32-bit Office, 64-bit Windows:
C:\Program Files (x86)\Microsoft Office\Office14\FORMS\[4 digit language ID]
Outlook 2007:
C:\Program Files\Microsoft Office\Office12\FORMS\[4 digit language ID]
64-bit Windows:
C:\Program Files (x86)\Microsoft Office\Office12\FORMS\[4 digit language ID]
Windows 7, 8, and 10 users: Depending on your configuration, you may need Administrator permissions to save the CFG in the Program Files path. I do this by opening Windows Explorer with "Run as Administrator" permission.
Install CFG
Remember:
Sender ID only works with Exchange 2003 SP2
SCL requires Exchange 2003's IMF; works with newer versions of Exchange, including Outlook.com and Office 365 Exchange Online.
To install a cfg file:
- In Outlook 2007 and older, go to Tools, Options, Other, Advanced Options, Custom Forms, Manage Forms.
- In Outlook 2010 / 2013 / 2016, go to File, Options, Advanced, Custom Forms, Manage Forms.
- Click the Install button. Choose the CFG file and install it into your Personal Forms Library
- Click OK and return to the main Outlook screen
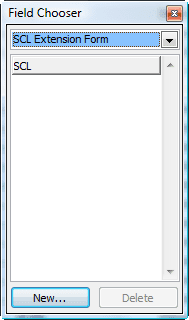
- Right-click on the Column row in your Inbox (or other any other folder) and choose "Field Chooser"
- Scroll down and choose "Forms"

- Select Personal Forms, choose the Extension Form you added, then click Add
- Add (or Drag) the field to your column headings to see the values.
Repeat for each cfg file you wish to add. If Step 6 fails, see Troubleshooting below.
Steps 4 - 7 need to be repeated for each folder where you want to use the field.
Screenshot of the Choose fields dialog showing the SCL Extension Form selected and the field associated with this Extension form CFG.
Install a CFG Video Tutorial
Sender ID Labels
For the Sender ID field only.
If you prefer labels instead of numbers, Outlook allows you to create custom fields based on the formula. To do that, follow the following steps.
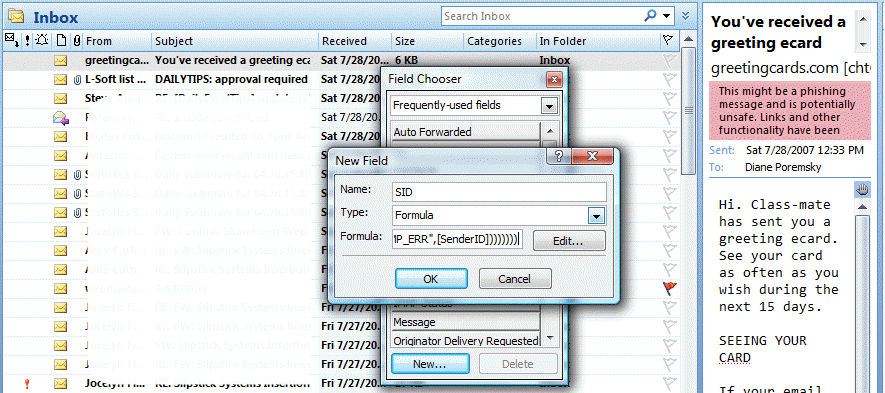
- Right-click on the Column headings in your folder where you enabled SenderID field and choose "Field Chooser"
- In the Field Chooser, click New. Type SID as the field name, use Formula as the Type.
- Copy and paste the following formula in the formula field:
IIf([SenderID]=1,"NEUTRAL",IIf([SenderID]=2,"PASS",IIf([SenderID]=3,"FAIL", IIf([SenderID]=4, "SFAIL", IIf([SenderID]=5, "NONE", IIf([SenderID]=-2147483641, "PERM_ERR", IIf([SenderID]=-2147483642, "TEMP_ERR",[SenderID])))))))
Click OK and add the newly created SID field into your column headings. Remove the numerical SenderID field from the view, if desired.
Replied to Labels
To replace the Last Verb Exec Type value with a friendly name:
- Right-click on the Column headings in your folder where you added the "Last Verb Exec Type" field and choose "Field Chooser"
- In the Field Chooser, click New. Type Action (or any name you choose) as the field name, choose Formula as the Type.
- Copy and paste the following formula in the Formula field:
IIf([Last Verb Exec Type]=102,"Replied to",IIf([Last Verb Exec Type]=103,"Replied to all",IIf([Last Verb Exec Type]=104,"Forwarded")))
Click OK and add the newly created Action field into your column headings. Remove the numerical "Last Verb Exec Type" field from the view, if desired.
Note: you can sort by the Last Verb Exec fields but you can't sort by the formula fields, so if you want to by the reply action, leave the numerical "Last Verb Exec Type" field in the view.
Troubleshooting
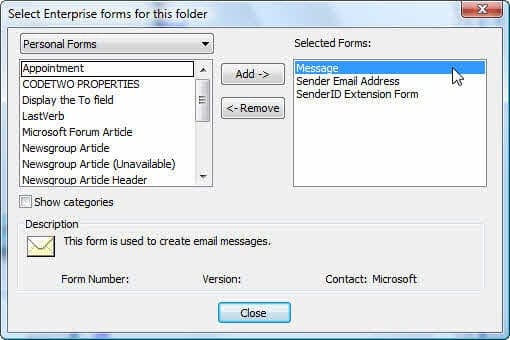
If you have problems adding the SCL form to the Field Chooser and have an entry called Message on the right side of the dialog, select and remove it. SCL should work now.
Create your own CFG
All you need to create a new field in a form is:
- A sample CFG file. You can use one of the CFG's on this site or NOTE.CFG from
C:\Program Files\Microsoft Office\Officex\xFORMS\xxxx\ - OutlookSpy or MFCMAPI to check MAPI tags of properties.
This is how Michael (from codetwo) did the Internet Message ID which you can find in
EXTENDED-PROPERTIES.CFG.
First you need to find the property (field) you are looking for in OutlookSpy or MFCMAPI and read its "Tag num". It is 0x1035001E for the Internet Message ID field.
Now you edit the CFG file. In the [Properties] section add a new Property=.
is a next number relative to other PropertyXX entries already existing in the [Properties] section.
is the name of a property. It might be anything, it is used as a reference in CFG only.
Sample:
Property04=InternetMessageID
Next, add a new section [Property.<property name>] that describes the property.
Sample:
[Property.InternetMessageID]
Type=30
;PropTag=PR_INTERNET_MESSAGE_ID
NmidInteger=0x1035
DisplayName=Internet Message ID
First about "Tag num" 0x1035001E. It consists of two hex parts:
1035 - property ID
001E - property type; this is a string
Type field from the example above contains the property type but in decimal form
001E hex == 30 dec.
;PropTag=PR_INTERNET_MESSAGE_ID is commented out and it contains MAPI constant for this property (as seen in OutlookSpy), it is for reference only.
NmidInteger contains the property ID in hex.
DisplayName is the display name of property, it will be the display name of the field in Outlook. I noticed that sometimes Outlook changes this name in a view.
It's done and ready to install.
Note: The above regards "constant" MAPI properties, which always have the same "Tag num" on every computer. There are also "named" MAPI properties which are identified by their Tag, Namespace and Type. Michael didn't define them in CFG: "I suppose that additionally to NmidInteger you would need to use also NmidPropset, which you can also read in OutlookSpy."
More Information
Original information on each configuration file:
- SCL value from the "You had me at EHLO" blog
- Sender ID value from the "You had me at EHLO" blog
- File Format of Form Configuration Files
Sergey says
Would it be possible to make a similar CFG for the Unread property?
Deepak v says
I have installed CFG of '"Replied to' Time" we are using IMAP and replied time shows as None. .
erkan says
I tried this and it works lile i want.
I just have 1 problem.
If the sender is from my company, mail address shown very weird.
What should i do?
Darryck Luiz says
I have the same problem....assume it's exchange server related, but this just presents as useless gobbledigook. I can't believe this is what we have to do to try and make outlook useful for sorting and viewing recipients other than through their own display name...well and I also can't believe it doesn't work.
Diane Poremsky says
A macro might work better for this situation - it can get the alias for the exchange account - it could get the smtp address but needs to do a lookup in the gal.
This will show the address if its a smtp address - but its not sortable.
IIf(instr([From E-mail Address],"@")>0,[From E-mail Address],"")
ETA: an option is to use the sender email field, set to very narrow and sort by it - the addresses show in the new formula field.
The macro method is here - because its a text field, it is sortable.
https://www.slipstick.com/outlook/email/sort-messages-sender-domain/
Diane Poremsky says
That is the Exchange x500 address. You can use a formula field to show a blank if the address is an x500 or you may be able to pull the alias from the x500. If you need the SMTP address, you would need to use a macro.
Holly Jahangiri says
Thank you so much, Diane! This was just what I needed.
Grateful User says
Hey this worked great for me with O365 and Win10.
thanks a ton. ability to sort by SMTP address a godsend when dealing with 300+ emails daily.
Thanks
your site is bookmarked now for sure
Claudiu-Daniel TOMA says
Hello, thank you for this very good article. Can anybody please help me with the cfg file for: "sent to"?
Not the display name, but the e-mail address or something similar with the condition ("with specific words in the recipient's address") from rules wizard.
I want to use this form with the query builder.
thank you
Diane Poremsky says
I don't believe you can't use a CFG for those fields (that's why i don't have a CFG for this already), but i will double check to refresh my memory.
I have a macro that will add the addresses to a new field - its under Add the Sent To domain at https://www.slipstick.com/outlook/email/sort-messages-sender-domain/ (it will be easy to convert it to return the full addresses).
Joshua says
I am running Exchange 2010 and Outlook 2007. I install SCL.cfg, and it shows in the forms list, but it has no fields. If I open Field Chooser, there is nothing in the field list. How can I fix this ?
Diane Poremsky says
Is it listed by name at the bottom of the choose forms dialog (in the list of forms) and you select it but the next screen doesn't list the fields? The only reason I knoe for this is the fields are already in the view - try resetting it.
boe says
Thanks for the article. I added the SCL cfg and was able to add the column however in my inbox the SCL column has no values in Outlook 2016
Diane Poremsky says
Sorry I missed this earlier. It works with outlook 2016 - in both outlook.com and office 365 accounts. It should work with on-prem exchange accounts too, but i don't have a server to test it anymore. It wont work with pop3 and imap.
Brian Tyrrell says
Dear Diane
This is super, very clear and easy to follow. I am trying to link my outlook 365 inbox to an Access (2010) database and wanted to use the sender email address as the unique id to link the email to client files in access, each client is identified by their email address, "should be easy" however it appears that outlook will only expose predefined fields and the new "Sender Email" is not one of them, any ideas?
Regards
Brian
Nate Krake says
Can I display the "X-Sender" or "Return-Path" of the email in a column? Is there a .CFG file for this??? I've tried the CFG files given above but they only display the sender's email address, not the X-sender (which could be different)
We had a spoof email thing going on here and the "X-sender" or Return-Path email was different than the actual email address
Thanks!!!
Diane Poremsky says
i will check on it - it needs to be a separate mapi property or you could use a macro to get it from the header.
Nate Krake says
Awesome, let me know, would be happy to paypal donate...
Diane Poremsky says
if you need an easier to view full header, see https://www.slipstick.com/developer/code-samples/outlooks-internet-headers/
Combine that with regex and we can grab parts of the header. I added a second macro to that page that gets the return path. It displays the return path address in a new email message but you can add it to a custom field.
If you want to add it to a field in your view you'd use
' with the other Dim's
Dim objProp As Outlook.UserProperty
' do something with the result
Set objProp = olItem.UserProperties.Add("Return Path", olText, True)
objProp.Value = strResult
olItem.Save
While I don't expect payment, I accept donations at paypal - address there is drcp AT cdolive.com
liora says
Hi
I add the cfg file for display the sender e-mail,
but when the sender is locally , exchange 2013 It's show the LDAP/X400 string instead of the SMTP mail address
How can it be solved?
Dave Doster says
I had the same thing here. The problem is that NmidInteger in the config file is referencing a property that shows the long LDAP/X400 string (PR_Sender_Email_Address_W) instead of the "simple" email address (at least it seems that way for me, using Outlook2013 against an Office365 account).
I found a better property to display using OutlookSpy, but I'm not sure if this is the best one to use - there were a couple of other properties that show the simple email address, so I chose the first one and it seems to work.
First, remove the original custom form in Outlook.
In the cfg file, change the line
NmidInteger=0xc1f
to
NmidInteger=0x5D0A
save the file, then add it back in to Outlook as a custom form.
Fernando do Vale says
Hello,
I'm try export thesse view to a csv file, but the column not appears. How can i do this?
Diane Poremsky says
Outlook's Export feature only exports a set of predefined fields. You'll need to create a view with the fields you want, select all, copy (Ctrl+A,C) then paste into Excel.
K.C. says
This is great info and solve one of my "upgrade issues". Is the a way to display the email address for the "on behalf of" person? When I use the above CFG code it only pulls the "current sender" not the on behalf of.
Diane Poremsky says
I don't think so, but will look into it.
Diane Poremsky says
That was easier than expected- emailbehalf.cfg
Giuseppe Russo says
Hello Diane,
really good tool! By the way, is there any way to create a new fields which results as a combination of two existing fields? I know this is possible through customizing fields with formulas directly in the Outlook view, but formula fields cannot be sorted. I'd like to combine the From field with the User field and let it appear only one field, something like "Company User" but having the possibility to make sorting which is a function which we use a lot in our company. Any suggestion? many thanks in advance!
Diane Poremsky says
You'll need to use a macro to set that field - as long as its a text field, it will be sortable. Use the method at https://www.slipstick.com/outlook/email/sort-messages-sender-domain/ - change the fields as needed.
Fernando Giannini says
Hi Diane,
Many thanks for your tutorial! The Last Verb Exec Type trick is a life saver!!
One question, though: I'm using Search Folders to show emails that I have not replied to, but I have several pst files stored in my hard disk and I only got it working in one of them. Can't figure it out why, since all the pst files are pretty much the same technically speaking (I have one pst for each quarter of the year). Maybe I'm missing something...
Thanks in advance!!
Best regards from Brazil
Diane Poremsky says
You either need to apply the view that includes the field to the folders in each pst or customize the view and add the field to the view.
Steve H says
This looks ideal, however in Outlook 2013, When Ive Installed the CFG files, then go to field chooser and Forms, IM unable to click "Add" as it is greyed out?!?!?!?!
Diane Poremsky says
Which forms library is listed in the dropdown at the top of the dialog?
What type of email account do you have configured in outlook?
Steve H says
It is in the "Personal Forms" library, and I am connected to Office365 Exchange.
Diane Poremsky says
So the Add button in this dialog was disabled? It's possible the administrator has it disabled using a policy, otherwise, I don't know why it's not working. Sorry.
Lasse says
Great tool!
However, while at first I thought this would fit my needs perfectly - I needed to log reply time to see if a deadline for answering mails was overdue - I have found out that I do not need to see the last verb action, but the first, so to say.
Is this at all possible? To see the first action taken on a specific email?
Diane Poremsky says
The value only shows the most recent action - for most people this would be the one and only reply (or forward). It would be possible to use a macro to write the time to a custom field when you hit reply if the custom field doesn't exist.
Rahul says
Excellent, this really helped. Thanks a Lot.
I have a question, when I reply the CFG settings and the columns, the columns are not added to all folders in the Email( Including PST).
Also If I search Inbox for a Email, the Search Results do not display the columns as desired.
Diane Poremsky says
You need to add the fields to view then apply the view to the other folders. The default is often "one offed" so changes to it won't always apply to the other folders unless you first start outlook with the cleanviews switch, to delete all custom views.
Search uses the default view and won't include custom fields, you'll need to add them after doing the search.
Bob says
This follows up an earlier comment/posting. I found the arcane path to save the CFG file for Windows 8 Office 365. It is Computer>OS(C:)>Program Files>Microsoft Office 15>root>office15>FORMS>1033
Diane Poremsky says
Correct, that is the path for the click to Run suites (Home Premium and business suites). Volume licensed suited use the more familiar path.
Bob says
I am using Office 365 Home Premium and I can not find where to save the CFG file. I was unable to locate the folder per your directions "Place the CFG's into the same Office folder with the *.ICO files, usually found at C:\Program Files\Microsoft Office\OfficeXX\forms\[4 digit language ID] - replace OfficeXX with your version of Office."
Perhaps there is a different location with Office 365?
Karthick says
Diane, finally we were able to update this, the problem we identified was when we copy the Codetwo.Lastverb.CFG file in Windows & it automatically removes the Extension coded on the file. Later we updated it from the older file and now its working fine.
Just thought of Sharing as it will be useful for others too.
Many thanks.
Karthick says
the user has administrator rights too and we followed all the steps correctly as suggested by you.
Karthick says
Diane, basicially we configured using all steps provided by you. But when we try to enable the forms it gives an error msg of " The KEY DISPLAY NAME is either MISSING or has an Incorrect Value" i believe the platforms provided in the code doesnt include windows 7. can you please help to update the same.
Please help....
Diane Poremsky says
I use it with Windows 7 and 8, it would be more likely a problem with Outlook versions but I've used it with all versions. Which Office suite or Outlook version are you using it with? I'll double check it in that version. The error sounds more like a SQL error - if you are trying to use it with a BCM contact, I'll test it.
Karthick says
Hi Diane,
We tried using the replied time calculation but we were unable to get this installed under WINDOWS 7.. is there any seperate steps to be followed for configuring in Windows OS.
Please help....
Diane Poremsky says
What exactly happened when you tried to install it? Because user accounts don't have permission to save to all folders, you need to either give yourself full permission to the folder or open Windows Explorer using the Run as Administrator option.
Angie says
Very helpful. Thanks!
Kevin says
Im using exchange 2010 and can see the string of the header on internal and externally received mails in 0x007D PR_TRANSPORT_MESSAGE HEADERS. Is there no way to pull the To: out of there? just trying to help :)
Diane Poremsky says
See read-mapi-properties-exposed-outlooks-object-model/ for some of the available property accessors.
Andy Liao says
Thanks for the quick reply, at least I can tell the guy now and sleep better tonight :P
Andy Liao says
Hi Diane,
Thanks for the great article. I don't think my question is the same as Anthony so I thought I'd ask. I am trying to get the email for the 'To' field in the Sent To folder to show instead of the display name. I had tried to modify the cfg from else where, but had not luck getting it going. Is this not possible?
This is what I did (didn't want to post the whole thing and clutter up the comment section)
[Properties]
Property02=ReceiverEmailAddress
[Property.ReceiverEmailAddress]
Type=30
NmidInteger=0x3003
DisplayName=To E-mail Address
Thanks,
Diane Poremsky says
The To email address is not exposed in the Sent folder. You can show the senders address in the Inbox (or in any folder with received mail) but it's not accessible on Sent messages. Sorry.
Dennis says
In Outlook Express 2007, to determine a sender's email address, all I had to do was to right click on a sender's name and then click on Properties to get a screen that included the sender's email address. This was handy. It seems that Outlook 2010 does not include that functionality. How can I obtain a sender's email address in Outlook 2010?
Diane Poremsky says
You need to set the TurnOnLegacyGALDialog reg key. See Using contact cards.
Herrick Andrews says
Thank you so much for this sample code. It solved a problem for me (how to get the message id) that has been causing me grief for 3 days.
Charlie says
Hi and thanks for the assistance.
Can you export the EXTENDED-PROPERTIES? Is there a way to run a vba code that exports all the extended properties?
Thanks!
Diane Poremsky says
You can create a custom view and select all, copy and paste into Excel.
Simple VBA will get the sender and sender email as both are exposed in the object model. To get the other fields you need to get the property accessor values.
Option Explicit
Const PT_LONG As String = "0003"
Const PT_STRING8 As String = "001E"
Const PT_SYSTIME As String = "0040"
Public Sub ShowCreatedDate()
Dim oItem As Object
Dim propertyAccessor As Outlook.propertyAccessor
Set oItem = Application.ActiveExplorer.Selection.Item(1)
Set propertyAccessor = oItem.propertyAccessor
Debug.Print "Sender Display name: " & oItem.Sender
Debug.Print "Sender address: " & oItem.SenderEmailAddress
Debug.Print "Message ID" & CheckBlankFields("PR_INTERNET_MESSAGE_ID", propertyAccessor.GetProperty("https://schemas.microsoft.com/mapi/proptag/0x1035" & PT_STRING8))
Debug.Print "Last verb excuted: " & CheckBlankFields("PR_LAST_VERB_EXECUTED", propertyAccessor.GetProperty("https://schemas.microsoft.com/mapi/proptag/0x1081" & PT_LONG))
Debug.Print "Last excuted time: " & CheckBlankFields("PR_LAST_VERB_EXECUTION_TIME", propertyAccessor.GetProperty("https://schemas.microsoft.com/mapi/proptag/0x1082" & PT_SYSTIME))
Set oItem = Nothing
End Sub
Private Function CheckBlankFields(FieldName As String, FieldValue As Variant)
CheckBlankFields = ""
If (FieldValue <> "") Then
CheckBlankFields = FieldValue
End If
End Function
Akhilesh says
Excellent, and much appreciated. Thanks a Ton to you guys for this.
Akhilesh says
Can we see the Reply or Forward date and time of email in a column
Diane Poremsky says
The replied to time field will show the replied to or forwarded date and time. Install EXTENDED-PROPERTIES then add the field to your view.
Neil Boekend says
This is awsome. One of the pointless obfuscation layers removed!
Garrydene says
How can you automate those steps using vbscript installing the .cfg file in Outlook 2007.
I wrote a vbscript to install .oft files from the c: drive to the personal forms library and it works perfectly.
But how do I convert that to doing the same for the .cfg file
dim filename
dim Temp
dim mylength
Set myOlApp = GetObject("","Outlook.Application")
filename = "letter.oft"
mylength = Len(filename)
'strip off the extension from the filename. This will be the name of the form
strTemp = left(filename,mylength-4)
'publish the outlook forms into the personal forms library
set myItem = myOlApp.createitemfromtemplate("C:\custom\" & filename)
set myForm = myItem.formdescription
myForm.Name = strTemp
myForm.PublishForm olPersonalRegistry
Set myOlApp = Nothing
msgbox("Published the file " & strTemp)
Diane Poremsky says
You'd need to use sendkeys or ExtendedMAPI to install a CFG as the dialog is not exposed in VBA or Redemption.
Daniel says
Hi Diane,
I just wanted to add a HUGE thank you from rainy Scotland for your help!
Best wishes,
Daniel.
Anthony says
Excellent article.
Question - How can this approach be used to show the actual "To" e-mail address that an e-mail was sent to? For example, when the e-mail has been sent to a alias of the main account.
Thanks
Diane Poremsky says
Unfortunately that is not a MAPI property and can't be exposed. (You need to see the address when you view a message using OutlookSpy or MFCMAPI to expose it using MAPI properties).
I use rules to either move or categorize messages sent to secondary addresses - the rule looks for words in the header, where the word is the full address. It doesn't work with BCC / Bulk mail unless you use a script to stamp the address in the header. (Vamsoft has a script to stamp the address on the header.) This also won't work for Internal email as there is no header.
Mark Wilson says
Hey, this is all very good, but at the end of it all I can get the Last Verb Exec Type to work out fine and even get it to say "Replied To", but the problem is that all my Last Verb Exec Time return "None" in Outlook.
Any tips on how to fix this or format the field, (like you did for Replied to Labels)???
THANKS!!!
Diane Poremsky says
It should always works if the field has a value. There are a few things that can affect the value stored in the field - if you use IMAP, imported the mail, or replied to it in a different client.