My article at "Create a Task from an Email using a Rule" shows how to create a task from an email message but what if only want to include the actionable part of the message in the task?
You don't actually need a macro to do this - Outlook has a pretty cool feature built in that makes this easy: just select the text and drag to the Tasks button on the navigation pane and drop. A new task form opens with the selected text in the task body, ready for you to fill out the subject and dates.
You can drag text to any folder to create an item with the text in the body field; this method can be used to create an appointment, contact, new message, or a note.It's not limited to content already in Outlook - you can drag a selection in a web page in Edge in Windows 10 (this worked in IE in old versions of Windows & Outlook) or Word.
If an application doesn't support dragging, you can copy and paste in a folder to create a new item. You'll need to use Ctrl+V to paste after clicking on the list pane - the folder should be highlighted gray (inactive selection), not blue.
While you don't need a macro to do this, using a macro can save time. It can automatically add a subject (any predefined subject of your choosing, such as using the sender's name, received date, or message subject) and it can set start and due dates.
Dropping text on the Task button creates the task in the default Tasks folder; a macro can add it to a different tasks folder. If you're not good at dragging (not ususual if you're using a touch pad), a macro is one click.
If you routinely create tasks using content copied from other applications, a macro can create the task using the content on the clipboard.
Create Task Using Selected Text
To use this macro: Select the text you want in the Task then run the macro (add it to the ribbon for easy access). If you want to copy the entire message body, the macro can select it for you, by adding .WholeStory before the .Copy line.
This macro creates a task with a date date 3 days from the email's received date and adds the original message as an attachment. The formatting of the selected message carries into the task (including images).
Before using this macro you need to do two things: get the GetCurrentItem function from "Outlook VBA: Work with Open Item or Selected Item" (this allows you to use the macro with open or selected messages) and select the Microsoft Word Object Library in the VB Editor's Tools, References. You also need to have macro security set to low.
By using the Word Object Library, we can use Word's VBA commands to copy a selection in the message body and paste it into the Task or Appointment, all of which use Word as the editor.
Sub ConvertSelectionToTask()
' You need the GetCurrentItem Function from
'http://slipstick.me/e8mio

    Dim objTask As Outlook.TaskItem
    Dim objMail As Outlook.MailItem

    ' Add reference to Word library
    ' in VBA Editor, Tools, References
    Dim objWord As Word.Application
    Dim objInsp As Inspector
    Dim objDoc As Word.Document
    Dim objSel As Word.Selection

    On Error Resume Next

   Set objMail = GetCurrentItem()
   Set objTask = Application.CreateItem(olTaskItem)

  If Not objMail Is Nothing Then
        If objMail.Class = olMail Then
            Set objInsp = objMail.GetInspector
            If objInsp.EditorType = olEditorWord Then
                Set objDoc = objInsp.WordEditor
                Set objWord = objDoc.Application
                Set objSel = objWord.Selection
        With objSel
           'use wholestory to copy the entire message body
            ' .WholeStory
             .Copy
       End With

            End If
        End If
    End If

 Set objInsp = objTask.GetInspector
 Set objDoc = objInsp.WordEditor
 Set objSel = objDoc.Windows(1).Selection

With objTask
    .Subject = objMail.Subject
    .DueDate = objMail.ReceivedTime + 3
    .StartDate = objMail.ReceivedTime + 2
     objSel.PasteAndFormat (wdFormatOriginalFormatting)
    .Categories = "From Email"
   ' .Save
    .Save
    .Display
    .Attachments.Add objMail
End With


    objMail.Categories = "Task" & objMail.Categories

    Set objTask = Nothing
    Set objMail = Nothing
    Set objSel = Nothing
    Set objInsp = Nothing
    Set objWord = Nothing
 End Sub
Create Appointment and Insert Selection
This version of the macro creates an appointment and inserts the selected text (including formatting) into the appointment body. If you want to copy the entire message body, the macro can select it for you, using .WholeStory before the .Copy line.
Instead of inserting a copy of the original message as an attachment as the Task macro does, it inserts a link to the original message (the link may not work if the message is moved).

This macro uses the next appointment period for the start date and time (Outlook's default).
Sub ConvertSelectionToAppointment()
' You need the GetCurrentItem Function from
'http://slipstick.me/e8mio

    Dim objAppt As Outlook.AppointmentItem
    Dim objMail As Outlook.MailItem
    Dim strID As String
    Dim strLink, strLinkText As String

    ' Add reference to Word library
    ' in VBA Editor, Tools, References
    Dim objInsp As Inspector
    Dim objDoc As Word.Document
    Dim objSel As Word.Selection

    Set objMail = GetCurrentItem()

    strID = objMail.EntryID
    strLink = "outlook:" & strID
    strLinkText = objMail.Subject

    On Error Resume Next

  If Not objMail Is Nothing Then
        If objMail.Class = olMail Then
            Set objInsp = objMail.GetInspector
            If objInsp.EditorType = olEditorWord Then
                Set objDoc = objInsp.WordEditor
                Set objWord = objDoc.Application
                Set objSel = objWord.Selection
        With objSel
           'use wholestory to copy the entire message body
            ' .WholeStory
             .Copy
       End With

            End If
        End If
    End If


    Set objAppt = Application.CreateItem(olAppointmentItem)
    Set objInsp = objAppt.GetInspector
    Set objDoc = objInsp.WordEditor
    Set objSel = objDoc.Windows(1).Selection

With objAppt
    .Subject = objMail.Subject
    .Categories = "From Email"
    '.Attachments.Add objMail
    objSel.PasteAndFormat (wdFormatOriginalFormatting)

    objSel.Range.InsertParagraphBefore
    objSel.Range.InsertParagraphBefore
    objDoc.Hyperlinks.Add objSel.Range, strLink, "", "", strLinkText, ""
    objSel.Range.InsertBefore vbCrLf & " Link to message: " & vbCrLf

    '.Save
    .Display
End With

    objMail.Categories = "Appt" & objMail.Categories
    Set objAppt = Nothing
    Set objMail = Nothing
End Sub
Clipboard to Tasks
This macro creates a task with the contents of the clipboard added to the task body. As with the other macros, you need to set a reference to Word's Object library in Tools, References.
 Private Sub ClipboardToTask()
    Dim objTask As Outlook.TaskItem

    ' Add reference to Word library
    ' in VBA Editor, Tools, References
    Dim objWord As Word.Application
    Dim objInsp As Inspector
    Dim objDoc As Word.Document
    Dim objSel As Word.Selection

    On Error Resume Next
    Set objTask = Application.CreateItem(olTaskItem)

 Set objInsp = objTask.GetInspector
 Set objDoc = objInsp.WordEditor
 Set objSel = objDoc.Windows(1).Selection

With objTask
    .DueDate = Now + 3
    .StartDate = Now + 2
    .ReminderSet = True
    .ReminderTime = .DueDate + "2:00:00 PM"
     objSel.PasteAndFormat (wdFormatOriginalFormatting)
    .Display
End With


    Set objTask = Nothing
    Set objSel = Nothing
    Set objInsp = Nothing
    Set objWord = Nothing
 End Sub
How to use the macros on this page
First: You need to have macro security set to the lowest setting, Enable all macros during testing. The macros will not work with the top two options that disable all macros or unsigned macros. You could choose the option Notification for all macros, then accept it each time you restart Outlook, however, because it's somewhat hard to sneak macros into Outlook (unlike in Word and Excel), allowing all macros is safe, especially during the testing phase. You can sign the macro when it is finished and change the macro security to notify.
To check your macro security in Outlook 2010 and newer, go to File, Options, Trust Center and open Trust Center Settings, and change the Macro Settings. In Outlook 2007 and older, look at Tools, Macro Security.
After you test the macro and see that it works, you can either leave macro security set to low or sign the macro.
Macros that run when Outlook starts or automatically need to be in ThisOutlookSession, all other macros should be put in a module, but most will also work if placed in ThisOutlookSession. (It's generally recommended to keep only the automatic macros in ThisOutlookSession and use modules for all other macros.) The instructions are below.
The macros on this page should be placed in a module.
Open the VBA Editor by pressing Alt+F11 on your keyboard.
To put the code in a module:
- Right click on Project1 and choose Insert > Module
- Copy and paste the macro into the new module.
Set a reference to other Object Libraries
If you receive a "User-defined type not defined" error, you need to set a reference to another object library.
- Go to Tools, References menu.
- Locate the object library in the list and add a check mark to it. (Word and Excel object libraries version numbers will match Outlook's version number.)

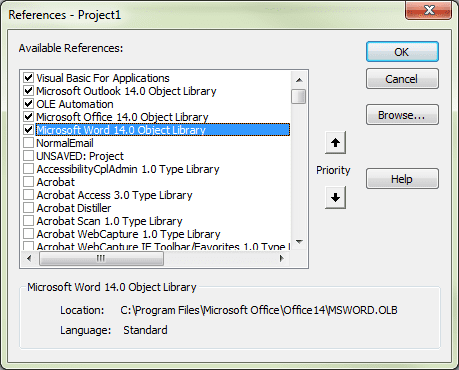
Commonly used libraries are Microsoft Word, Microsoft Excel, Microsoft Forms, and VBScript Regular Expression.
More information as well as screenshots are at How to use the VBA Editor
Rob says
@5
Wanted to follow up on my comment from last year. I've come back to this topic, trying to see if I can get it to work correctly. Still seeing same behavior: the selected text only gets added to the task when I have the VBA editor open. Otherwise only the email gets attached, while the selected text is not inserted.
Any thoughts on why this happens - and how I could solve it?
I'm using Outlook on M365.
Rob
Rob says
Hi Diane - thanks for this code, it's exactly what I was looking for: creating a task with both the email body text AND the email attached to the task.
Strange thing that I'm coming across is that the macro works well when I have the VBA editor open - both email body and attached email are there.
When I close the VBA editor though and run the macro, the task gets created only with the attached email. The email body text doesn't get copied into the task - when going back to the email I do see that the whole email body is still selected.
Any idea what causes this to happen? I'm on Outlook 365 BTW.
Thanks.
Rob
Caleb says
Hi Diane and thank you VERY much for all the great work and examples on your site!
I too am trying to get the attachments in the email added as attachments to the task, but do not succeed. (whereas the rest is working, i.e. adding email text in body of task and email also as attachment) .
Per your posts I add the following to the bottom of your original command. I do NOT get any errors, but the attachments to the email fail to be created as task attachments...
Sub CopyAttachments(objSourceItem, objTargetItem)'Cannot get this part to work (to copy attachments)
Set fso = CreateObject("Scripting.FileSystemObject")
Set fldTemp = fso.GetSpecialFolder(2) ' TemporaryFolder
strPath = fldTemp.Path & "\"
For Each objAtt In objSourceItem.Attachments
strFile = strPath & objAtt.FileName
objAtt.SaveAsFile strFile
objTargetItem.Attachments.Add strFile, , , objAtt.DisplayName
fso.DeleteFile strFile
Next
Set fldTemp = Nothing
Set fso = Nothing
End Sub
Is there anything more one should do than add the above under your original command?
Thanks in advance!!
username says
Hi Caleb. Did you ever figure this out? I have the same question
A Colmenares says
Another question. Is there a way of adding to the task any attachments that came in the original message? That is actually the only reason i need to attach the original message: to be able to access the attachments that are in the original message. But if there is a way of copying the text and adding the attachments, that would make it.
Diane Poremsky says
you can. You'd save the attachment from the message then add it to the task. A working sample of the method is at
https://www.slipstick.com/outlook/email/reply-replyall-attachments/
You'd use
CopyAttachments oItem, oTask
when you create the task and use the copyAttachments function:
Sub CopyAttachments(objSourceItem, objTargetItem)
Set fso = CreateObject("Scripting.FileSystemObject")
Set fldTemp = fso.GetSpecialFolder(2) ' TemporaryFolder
strPath = fldTemp.Path & "\"
For Each objAtt In objSourceItem.Attachments
strFile = strPath & objAtt.FileName
objAtt.SaveAsFile strFile
objTargetItem.Attachments.Add strFile, , , objAtt.DisplayName
fso.DeleteFile strFile
Next
Set fldTemp = Nothing
Set fso = Nothing
End Sub
A Colmenares says
Thank you for your quick response. I'm glad to know it can actually be done. I'm not very good at VBA, so after trying for a couple of hours to figure it out on my own and not succeeding I figured it would be easier to ask. Could you send me how the whole macro goes? (The one to create the task with the text and the original message attached works fine, I would just need to add the part of adding also the attachments). I hope it is not too much to ask.
A Colmenares says
Thank you for your response. I already added the copyAttachments function at the bottom. I didn't understand the part of adding the CopyAttachments oItem, oTask part. Where and what exactly would I have to copy into the macro?
A Colmenares says
Great Macro. It has saved me a lot of time. One question. Is there a way of having the original message attached at the beginning of the text and not at the end? I guess it's a matter of changing the order of the commands in VBA, but I haven't been able to figure it out yet.
Diane Poremsky says
It might be possible using word object model to insert the attachment object at the top. I don't think i have any code samples that do that using an attachment though.
Doug says
How about adding a calendar appointment to a shared calendar, and pasting the clipboard contents into the body? I've gotten close, but can't seem to make it work. Thanks!!!!!
Diane Poremsky says
I use the macro here to copy a message body to an appointment.
https://www.slipstick.com/developer/code-samples/create-outlook-appointment-from-message/
You'd set the folder and use items.add (or move to the shared calendar)
Set objOwner = NS.CreateRecipient("maryc")
objOwner.Resolve
If objOwner.Resolved Then
'MsgBox objOwner.Name
Set newCalFolder = NS.GetSharedDefaultFolder(objOwner, olFolderCalendar)
set olAppt = newCalFolder.Items.Add(olAppointmentItem)
A Colmenares says
What would I need to add to the script if I want the original message deleted from the inbox after the task is created?
Diane Poremsky says
add objMail.Delete after the task is created.
Peter Hawkes says
Running Create Appointment and Insert Selection gives me an error - Compile Error: Cant find project or library on the line Set objWord = objDoc.Application
I have the Microsoft Word 16.0 Object Library selected in References?
Diane Poremsky says
That should be the cause of that error. If you didn't have the GetCurrentItem Function, i'd expect a different error. Try unchecking it, click ok then reselect it.
Ed Corcoran says
.Attachments.Add objMail does not seem to be working for me.
Diane Poremsky says
any error messages?
I had that problem and fixed it by changing the order in the code - but i thought it wiped out the text in the body if its too high up the list.
does it work if you move it and display below the end with
objTask.Attachments.Add objMail
objTask.Display
Ed Corcoran says
There is no error message. I tried moving outside the End With and that did not work. Adding your CopyAttachments method before objTask.Attachments.Add objMail does work. Strange since CopyAttachments is simply doing an Attachments.Add.
Diane Poremsky says
Copyattachments is needed to move attachments from one item to another and shouldn't be needed for this.
Ed Corcoran says
That worked for me also. Thank you. I am using CopyAttachments because I am trying to turn the entire email into a task with a copy of the email and the attachments at the top and the entire formatted email body below the attachments.
Issac says
Dear Diane and Ed,
Can you please share the entire code as i was trying to do the same with no success (and with no knowledge at coding). Getting the whole mail as attachment worked but i want the mail attachments.
I've tried adding the below lines before the .save ( as i've seen else were in the site but it didn't work).
If itm.Attachments.Count > 0 Then
CopyAttachments itm, objTask
End If
Thanks in advance
Diane Poremsky says
if you want just the attachments in the message, you need to get the attachment collection, save them to the drive then add them to the task.
The sub saves it from the original email and this line adds it to the task- the first macro with this change added is at save-task-attachments.txt
CopyAttachments objMail, objTask
Sub CopyAttachments(objSourceItem, objTargetItem)
Set fso = CreateObject("Scripting.FileSystemObject")
Set fldTemp = fso.GetSpecialFolder(2) ' TemporaryFolder
strPath = fldTemp.Path & "\"
For Each objAtt In objSourceItem.Attachments
strFile = strPath & objAtt.FileName
objAtt.SaveAsFile strFile
objTargetItem.Attachments.Add strFile, , , objAtt.DisplayName
fso.DeleteFile strFile
Next
Set fldTemp = Nothing
Set fso = Nothing
End Sub
Abel says
Hi Daine,
I am trying to apply a similar concept to manage my projects tasks in Outlook. I am using a subfolder under the default Tasks folder, to list all my projects as tasks and enclose the [Project Name] in brackets, in the 'Project Tasks' -subject field, in order to differentiate from regular – non project related tasks.
When creating a new Project ('Main Project Task') I also add the next steps of the project to the task note field, listing one action per line. Ideally, I would the macro to create the next project task using the [Project Name] and the first line in the notes field as the task subject. As soon as I complete such task, create the next task, following the same criteria with the second line in the notes field, and marking the first line in the notes field (previously completed task) with an “x" at the beginning of the line, in order to show project progress. Example:
Project list under a Task subfolder, comprised of [Main Project tasks], like these:
[Project A]
[Project B]
[Project C]
Project next steps listed in the notes field of the main project task, like this:
[Project A]
Notes:
Task 1
Task 2
Task 3
Project related task with subject line, created like this:
[Project A] Task 1
After completing project related tasks, project progress is shown like this:
[Project A]
Notes Field:
x Task 1
Task 2
Task 3
As always, thanks in advance for any help that you can provide on this matter.
Diane Poremsky says
This is working here
With objTask
.Subject = objMail.Subject
.DueDate = objMail.ReceivedTime + 3
.StartDate = objMail.ReceivedTime + 2
objSel.PasteAndFormat (wdFormatOriginalFormatting)
.Categories = "From Email"
' .Save
.Display
End With
objTask.Attachments.Add objMail
Ed Corcoran says
Saving to the file system as a .msg works.
Diane Poremsky says
adding the attachment after displaying it works too
.Display
.Attachments.Add objMail
End With