The following tutorial shows you how to create a new profile in Microsoft Outlook. The second part of the tutorial shows how to use an existing personal store (pst) with a newly created profile. For best results, always add the *.pst to the new profile before you open the new profile in Outlook.
- With Outlook 2016 and newer, you can access the dialog to create a new profile from within Outlook or using the Control panel.
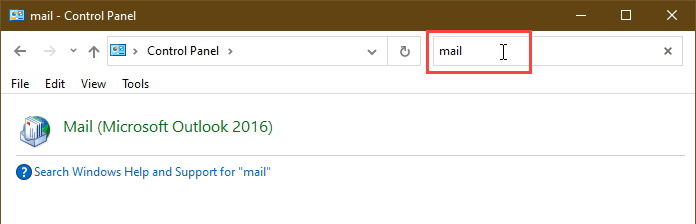
- In any version of Outlook: To use the control panel, start typing Control panel on the start menu and open it when it comes up, then Search the Control panel for Mail . Open it to open the Mail profile dialog. Note: it will say "Mail (Microsoft Outlook 2016)" if you have Office 2019 or Office 365 installed.

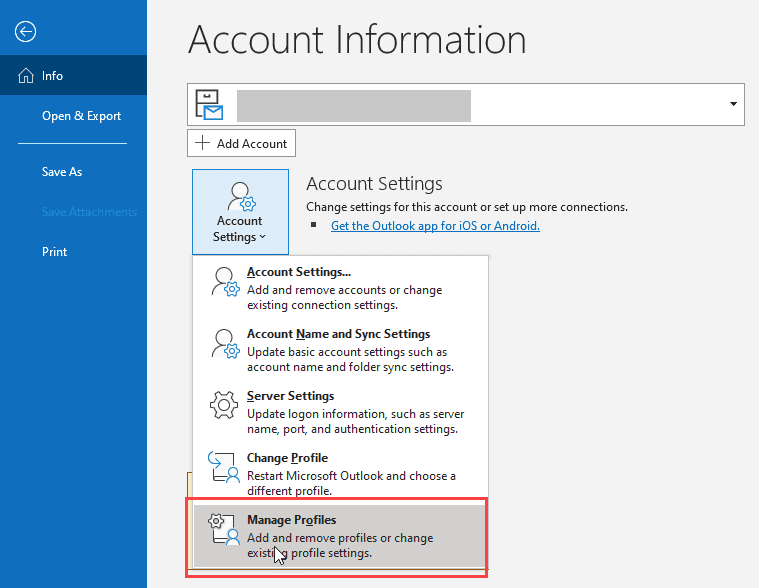
- In Outlook 2016 and newer: To create a new profile from within Outlook, go to File > Account Settings > Manage Profiles. This will open the Manage profiles dialog directly. (You can also choose Change Profile and restart Outlook to have the opportunity to create a new profile.)
- In any version of Outlook: To use the control panel, start typing Control panel on the start menu and open it when it comes up, then Search the Control panel for Mail . Open it to open the Mail profile dialog. Note: it will say "Mail (Microsoft Outlook 2016)" if you have Office 2019 or Office 365 installed.
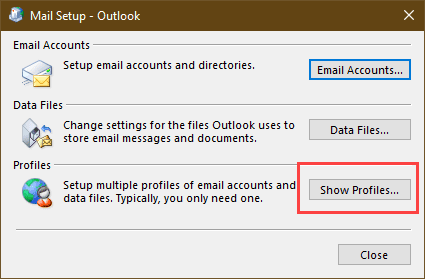
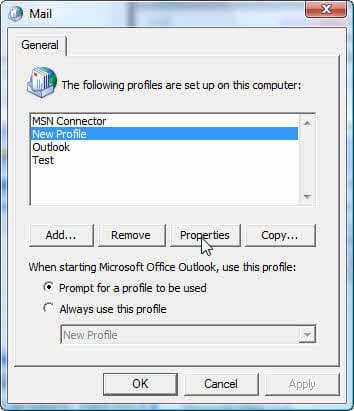
- Click Show Profiles
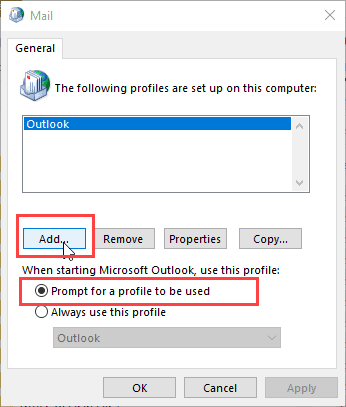
- Click Add. (Tip: After you create the profile, select the preferred profile then select the option to Prompt for profile. Outlook 2016 and newer can switch profiles from within Outlook, using File > Account Settings > Change Profile dialog.)
- Type a name for your profile.
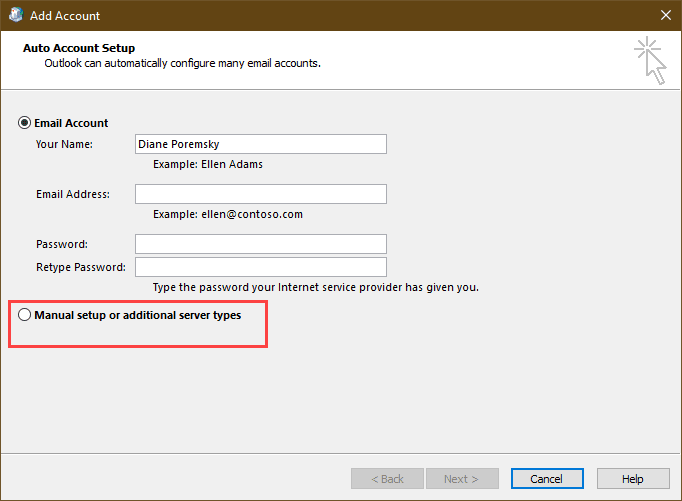
- In most cases, you'll want to use Auto discover, allowing Outlook to set up your email account automatically. Enter your name, email address and password and Outlook will try to set up the profile. If you need to add the account manually, such as if you want to set the account up as POP, you'll need to choose the option for Manual setup or additional server types, then choose POP or IMAP and enter the server information.
- After the auto account setup completes, click Manually configure account settings to verify the alternate ports are correct or change outgoing server authentication.
- If auto account setup fails, you want to use POP, or if you know your ISP doesn't support it, check the option to create the profile manually. You'll need to enter your account information, account type, and email server names. If you are unsure, check your ISP's support site.
- After the account information is entered, press the Test Account button. If it fails, correct the problem and try again.
- While you can click Next and exit the wizard after entering the account information, many ISPs require authentication to send outgoing email, so you'll want to click More Settings.
- More Settings dialog allows you to set a reply to address, configure outgoing server authentication, and connection information. The Advanced tab is used to set custom server ports, time outs, and whether to leave mail on the server.
- When you are finished, you can either close the Profiles dialog then double click on the Outlook icon to run Outlook, or add another personal folder (or more accounts) to the profile.
- To start Outlook using the new profile, Outlook 2016 and newer can switch profiles from within Outlook, using File > Account Settings > Change Profile dialog.
Using an existing Personal folders (*.pst)
If you need to set up Microsoft Outlook to use another personal folder (*.pst) do so before you open the profile in Outlook.
- When you are in the Mail dialog, select the profile and click Properties.
- You can choose either Email Accounts or Data files, both open the same dialog but to different tabs.
- Click Add on the Data tab.
- Select the type of PST you are adding. If you aren't sure, choose the Outlook data type.
- Select the PST you want to add.
- Select the PST and set it as Default.
- Finish the wizard and close the Mail dialog.
Now you are ready to start Outlook.
While this tutorial was recorded using Outlook 2007, the steps are similar for all versions.
Create a new profile in Outlook 2010 (and newer) Video Tutorial
This video tutorial shows how to remove a corrupt profile and create a new profile, using Windows 7 and Outlook 2010 or newer. The steps are identical for Outlook 2007 and Outlook 2013 or Outlook 2016. On Windows 8 and 10, search for Mail in the Control panel.
If your profile is not corrupt, you do not need to delete it; you can have more than one profile in Outlook.
More Information
In the video, drag the slider to jump to the following segments:
- More Settings Dialog - Leave mail on server segment begins at 0:49
- How to add a PST to the profile segment begins at 1:15.
- Profile Selector - How to choose which profile segment begins at 1:53.
If you are told to make a new profile because your profile is corrupt, do not copy an existing profile. Make a new one totally "from scratch" as described above.
George says
Incorrect info. Step 3 - have to select "Prompt for Profile to be used" before you select "add"
Diane Poremsky says
Thanks
Roman says
Wonderful, thank you! I had to recreate my Outlook profile after our PC support mangled up my existing one. I used your steps and I am now back in business.
Thanks again!
Maria says
I cannot make a new profile, when I get on control panel en mail applet nothing happens (Windows 10, Outlook 2013) - I can keep clicking as long as I wish... I just don't get further. Tried everything but cannot get my Outlook work again. It opens, I can see may mails come in and then it crashes :-(
Diane Poremsky says
Does Outlook crash in Safe mode? To open Outlook in Safe mode: Close Outlook then hold Ctrl as you click on the Outlook icon. You'll get a message asking if you want to start in Safe mode. Click Ok.
Have you tried Repairing outlook?
Henk says
Our Outlook 2010 is very slow to respond to 'creating or replying to email'. The window opens after more than 1 minute each time.
Would making a new profile make a difference? We have many existing folders with many saved email. How can we make a new profile and keep all this information. Can I test a new profile that is linked to the exact same email address to test everything - so leave the current one in place just in case?
We're kind of desperate as even our IT support hasn't been able to help us.
Diane Poremsky says
It's possible a new profile would help... but i have my doubts. I'd definitely try a repair first.
If the saved mail is in a pst, you'd just add the pst to the new profile. If it's in IMAP or exchange mailboxes, it will resync. If you are concerned, export to a pst as backup before doing anything to the account. If there are folders named 'this computer only' definitely export those to a pst.
If the account is an Exchange account, are you using cached mode?
Kkarsten says
Still having problems with contacts. Using Outlook 2007 under Imap. My service provider recently changed from POP to IMAP and since then I have some problems/confusions. I have created new profile and changed my existing pst to default. Email send/receive works. Contacts autocomplete works in new emails. But, my contact page does show nil contacts and also the address book shows as empty. How can I rectify that?
Diane Poremsky says
Address book is empty: https://www.slipstick.com/outlook/contacts/outlooks-address-book-empty/
Lily says
How would I completely reset all settings and everything but keep all email?
Diane Poremsky says
Creating a new profile and reusing the old pst in it would mostly do this. Most people are satisfied with the reset they get with the new profile.
If you also wanted to reset all options that are not limited to a profile (like settings in Options), so that it is like a new install on a new computer, you'd need to delete the outlook key from the registry - HKEY_CURRENT_USER\SOFTWARE\Microsoft\Office\16.0\Outlook (replace 16 with your version) then repair the installation and create a new profile.
Larry Black says
Thank you, thank you, thank you. You saved my bacon.
Karen says
I'm using Outlook 2013 and suffered a corrupted profile when I set up backups to Dropbox. I followed the advice above, including that in the video, but I don't get the option to use an existing .pst file during setup - instead it insists on creating a default .ost file. I did try adding my existing pst file after setup and changing that to be the default, but as soon as I open Outlook it starts synchronising and inporting all my emails on the server into a new email folder (which is loads!).
What am I doing wrong?
Diane Poremsky says
The account is being set up as an IMAP account, not POP3. If you want to use pop3, you need to create the account manually, not using auto account setup, or if you just need the pst for calendar and contacts, open it in the profile then set it as default data file.
Deborah says
I have searched for help, and this is the closest but I'm still not there. Can you help? I have located and moved my pst file to my NEW laptop that is a windows 10; now I am not familiar with windows 10 and am trying to figure out my mail and I only want to use my calendar, but can't figure out where to put the pst file so I can open my calendar and it will access it. I know where to open the calendar but it doesn't SEEM to give me any options on installing new info for the calendar.
Diane Poremsky says
Put the pst into your Documents folder then open it in the profile. If you are making a "no mail" profile with only the pst in it, see https://www.slipstick.com/tutorial/how-to-create-a-no-mail-profile/
Scott Longnecker says
Having a terrible time creating a PRF with the OCT for Office 2016. I know now, not to add the server and login name, as exchange will find it. But we have 3,000 users that have personal folders, PSTs, based on their login name.
Before, I would just put in F: (that is their home drive)\%userprofile%.pst. in the data section for Outlook profile.
But that isn't working. What are the proper steps to create a PRF that will attach a new user to their stored PST on their home drive, when they log in the first time?
(What I did in the past, for Office 2013 and below, is just not working!)
Thank you.
RC says
Oh GOD!!!!! Thank you for this tutorial!!! It worked perfect!!! You saved me!!!! Thank you!! thank you!! thank you!!!
Shelley says
I somehow synced two email accounts and did not want this to happen. Can I undo it?
Diane Poremsky says
What do you mean by "synced"? If they were two different email accounts downloaded to the same pst file, you can use the Account field to see which messages belongs to which account.
K.P. says
Problems coverting .pst ansi files to Unicode in outlook 2010. Created new Unicode data file and it appeared in the mail folder list as it should. Some default files did not automatically appear - such as inbox, outbox and sent so I added new folders for each and transferred emails over to new inbox named New inbox, and subfolders. Did same for sent emails. The ansi pst file is still the default data file in my mail folder list. New mail will see go there. I cannot figure out how to set up a new folders for calendar, contacts, notes, journal in the newly created Unicode data file in my Outlook folder list. Tried adding new folders again, including calendar folder by clicking on the new unicode data file folder.and copying the calendar list to the new calendar file using the drop down menu that came up. Then a new email popped up with all the calendar items shown as attachment, and no longer in the old calendar! What happened? The folder names/icons for Calendar, contacts, journal and notes now have appeared under the old ansi data file (still the default mail folder). The original folders for contacts, calendar,etc. are still there as always in a separate bottom section of the folder list - these are still the ansi files one. I hope you can help! Thanks so much.
Diane Poremsky says
This: Some default files did not automatically appear - such as inbox, outbox and sent so I added new folders for each and transferred emails over to new inbox named New inbox, and subfolders. Did same for sent emails.
Is because of this: The ansi pst file is still the default data file in my mail folder list.
The default folders are only created when a data file is set as default.
On the calendar dragging problem, it sounds like you were moving the appointments to the other folder and they were attached to a message instead. Try dragging only a few at a time and recurring events one series at a time.
vikas vijay says
Hi
In my outlook I am able to received the mails but I am not able to send mails in outlook 2010
what is the issue
Diane Poremsky says
Any error messages? In File, Account Settings, double click on the account then More Settings and then Advanced tab - what port # are you using?
Chris says
Diane,
I was able to import them. For some reason it wasn't understanding I wanted to import them into the Outlook Data (local) file. Once we got that clear, they came in just fine.
Thanks again for your great site and all your past help!
Chris
Chris Thornton says
Hi Diane,
You have great help here. Thank you very much. I have a user who is using Outlook 2010 as an IMAP client. I set this up, but he has a number of contacts he exported from a previous client to a .csv file. I would like to import them but the import function is not available. I suspect I need to create a new .pst file (local) but am not sure and don't want to mess up this client. Can you help?
Thanks
Diane Poremsky says
The Import/Export wizard is under File, Open. The wizard is also accessible in File, Options, Advanced as Export (it opens the import/export wizard).
Heidi says
The password box keep on poping up. And I can not receive emails ?
Diane Poremsky says
What type of email account? Do you access the account using other computers?
See https://www.slipstick.com/problems/the-never-ending-network-password-dialog/ for possible causes.
Scott says
Thanks a million for the help, it works great now..
Dennis says
Hi Diane,
Quick question. I needed to migrate to a new profile and bring in my old PST. No problem, that was easy. Is there an easy way to bring in my email accounts? There are about 10 of them and I hate to have to set them all up again.
Please let me know, thanks! Great site :)
Dennis
Diane Poremsky says
No, not really. The accounts are stored in your registry and while you can export the profile key, it contains hard coded links to files on your computer, which ends up corrupting the profile.
Dennis says
Ok, thanks for the help!
Noel Lackey says
No message at all, I just keep clicking on the dialog box and nothing happens, I use Hotmail as my email account. I have,nt a clue how to even start renaming a registry key.
thanks,
Noel
Noel Lackey says
I installed Outlook 2010 on Windows 7 home, when I try to add an email account to it nothing happens when I click add an account, I go to control panel ,click on the profile and click properties, a dialog box opens and the top option is to set up an email account and directories, I click on this button and nothing happens, what do I do now?
thanks,
Noel
Diane Poremsky says
No error messages, just nothing? What type of email account do you use?
You could try renaming the Windows Messaging Subsystem registry key but I'm not sure if it will fix your problem - the symptoms are a little different. But you can try it and if it doesn't help, rename the key back to restore it.
Steven Rosen says
I am having the same problem. Can any one help?
Diane Poremsky says
Are the contacts in your contacts folders but not in your address book when you click the To button? See Missing Contacts
What type of email account do you use?
John says
why can't Microsoft with all those geeks figure out how to make the systems compatible. outlook 2010 will not allow update of new contacts. shows in contacts but not in address book. In Windows 7 was not a problem???
Diane Poremsky says
What type of email account do you have? Outlook 2010 should update contacts.
If you have Contacts in the Contacts folder but they are not accessible when you click on the To button, see Missing Contacts
Hemant says
Thanks Diane!!
Bonnie says
Thank you for the video tutorial. I can read and read and read some more, but being able to watch step by step and stop, back up and review is my best learning mode. I have been working on this for two weeks and finally have my contacts available. You will be my go-to-person for troubleshooting Outlook.
Lori says
Okay, creating a new profile worked and I can send and recieve. Now I want to import my Outlook 2007 pst files. Is there something I need to do to make sure the 2007 pst files will be compatible with 2010. Should I use the import function from 2010 or try to use the mail profile dialouge to browse to the external drive where the pst files are located?
Diane Poremsky says
The 2007 pst files are 100% compatible with Outlook 2010. Either copy the pst files to the local drive or use import - the risk of corruption is higher if you try to use pst files on a network or external drive.
Whether you choose to import or open the pst in Outlook directly is up to you. We usually recommend opening the pst directly as the default date file but that works best if you do it when you create the profile. Making the switch later can sometimes corrupt the profile. The big thing is that importing will not include custom views, custom forms, rules, and a few other things - but the majority of users do not use more than rules. If you only want the mail, calendar, contacts etc, Import is fine.
Bill Reese says
I recently downloaded backup files from Outlook 2003 from a external disk. My new computer has Outlook 2010.
I have configured the Profile. I still get the error message 0x8004010F after using the Send Receive button.
The emails do not download from ATT to Outlook.
Diane Poremsky says
The problem could be ATT. Does it work on another computer? If you log into the account online then try it in outlook does it work? (network password dialog details problems with AT&T)
garrick youngberg says
Hi
very nice... but the addresses still don't show up and the button is still grayed no matter how many times I add or delete the mail account...