While it's usually not necessary to relocate the offline cache (*.ost) used by an Exchange account, it is possible to move it to another folder or partition. For the most part, it only makes sense to move it if the C: drive is full or a smaller SSD.
Outlook 2013 and newer IMAP ost files are moved using the ForcePSTPath key.
Moving the offline cache so its easier to back it up is generally pointless: it's an offline copy of your Exchange mailbox and it can only be opened by the account that created it. If you try to use an old cache file, Outlook will complain that it doesn't match the server mailbox. If the server fails and there is no server backup, the contents of the current, most up-to-date *.ost can be used to repopulate the server. In short, if you want a usable backup of your mailbox, export the contents to a *.pst file instead of including the *.ost in a backup file.
If you need to recover data from an orphaned ost file, I have a list of commercial recovery software listed at Convert an Offline File (.ost) to a Personal File (.pst)
With that disclaimer out of the way, if you do need to relocate the offline file, you can move it using one of the following methods.
- Set the ForceOSTPath registry key. This is the recommended method but you need to set the key before creating the account in your profile.
- Use Symbolic links or Junction points in Windows to redirect the folder to a new location.
- Set the OST file location while adding the account to your profile.
- Trick Outlook into letting you choose the ost file by using a renamed PDF file.
Using ForceOSTPath to set the file location
The easiest way to change where Outlook says the OST files is setting the ForceOST registry key, however you need to do this before you add the account to your profile, or remove the account and add it back after setting the key. Administrators can set the key using GPO or a log on script.
The ForceOSTPath key is supported in current versions of Outlook. In Outlook 2010 and up, it will apply to new accounts in a profile, while in Outlook 2003 and 2007, it applies only to new profiles.
You need to set this key before you add the account to your profile.
To set the registry key:
- Open the registry editor (Press Windows key + R to open the Run command.
- Type regedit in the Open field and press Enter.)
- Browse to the Outlook key for your version (listed below).
- Create a string value named ForceOSTPath
- Right click on ForceOSTPath value and choose Modify
- Paste the path into the field and press Enter. (You can use variables if you are using group policy to push it out to your users.)
Outlook 2016
HKEY_CURRENT_USER\Software\Microsoft\Office\16.0\Outlook
Expandable String Value: ForceOSTPath
Value data: full path you want to use
Outlook 2013
HKEY_CURRENT_USER\Software\Microsoft\Office\15.0\Outlook
Expandable String Value: ForceOSTPath
Value data: full path you want to use
Outlook 2010
HKEY_CURRENT_USER\Software\Microsoft\Office\14.0\Outlook
Expandable String Value: ForceOSTPath
Value data: full path you want to use
Outlook 2007
HKEY_CURRENT_USER\Software\Microsoft\Office\12.0\Outlook
Expandable String Value: ForceOSTPath
Value data: full path you want to use
Outlook 2003
HKEY_CURRENT_USER\Software\Microsoft\Office\11.0\Outlook
Expandable String Value: ForceOSTPath
Value data: full path you want to use
Common variables
| Variable | Typical value (May vary) |
|---|---|
| %APPDATA% | C:\Users\{username}\AppData\Roaming |
| %LOCALAPPDATA% | C:\Users\{username}\AppData\Local (default for OST files) |
| %USERPROFILE% | C:\users\{username} |
| %WINDIR% | C:\Windows |
Symbolic Links or Junction Points
You can use Symbolic Links or Junction Points to repoint the file or folder where the .ost is stored. You can use this method to move the folder to the new location or just the data file.
To create a Symbolic Link, you'll use the MKLINK Command line.
- Close Outlook.
- Move the ost-file or pst-file from its original location to its new location.
The default location is %locaappdata%\Microsoft\Outlook - Open a Command window using Run as Administrator. Type cmd on the Start menu, right-click on Command Prompt or cmd.exe and choose Run as administrator. you'll need to enter the administrator password or Yes to allow the prompt.
- Use the mklink command in this format: mklink "C:\old-path" "D:\New path". If you are moving just the data file, you'll need to include the data filename. Quotes are required if the path contains spaces.
For example:
mklink %localappdata%\Microsoft\Outlook\diane@contrarytech.com.ost "D:\Outlook Data Files\diane@contrarytech.com.ost"
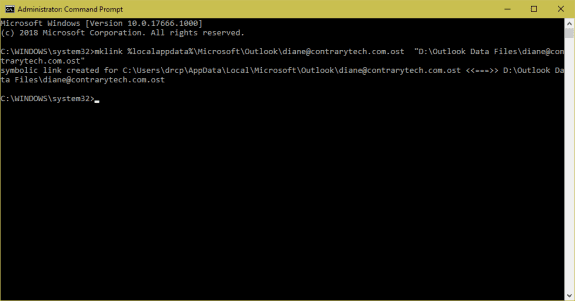
When you use a symbolic link to move a file, a shortcut is created in the default folder location. If you want to revert back to the original location, delete the shortcut to break the link.
![]()
If you prefer to use PowerShell to create the symbolic links, use the New-Item cmdlet. You'll need to use quotes if the path contains spaces. If you don't want to use the exact path, call the environment variable like this: $env:localappdata
You will need to move or rename the original file before running the powershell.
New-Item -Path $env:localappdata\microsoft\outlook\diane@contrarytech.com.ost -ItemType SymbolicLink -Value "D:\Outlook Data Files\diane@contrarytech.com.ost"
Create a Symbolic link for a folder
To create symbolic links to a folder, you need to move, delete, or rename the folder you are creating the symlink for. In this example, it's the Outlook folder. If the folder exists, the powershell will error.
New-Item -Path $env:localappdata\microsoft\outlook\ -ItemType SymbolicLink -Value "D:\Outlook Data Files\"
Move the OST and recreate the account
If you have an existing ost file, you can move the .ost file, remove and recreate the account in the profile using the Control panel, Mail applet and point it to the new location.
- Copy your .ost file to the new location. You can skip this step if you want to create a new .ost file.
- Open File, Account Settings or open the profile in Control panel, Mail.
- Remove the account from your profile.
- Click New
- Enter your username and password and let Outlook find your account information
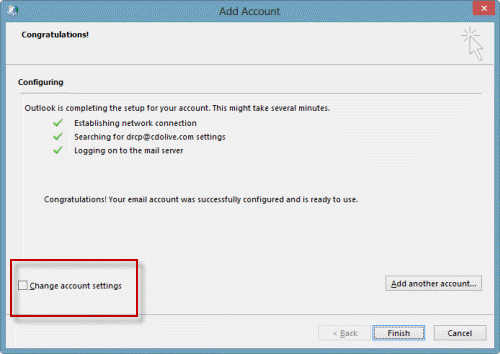
- Select the Change account settings option, and then click Next

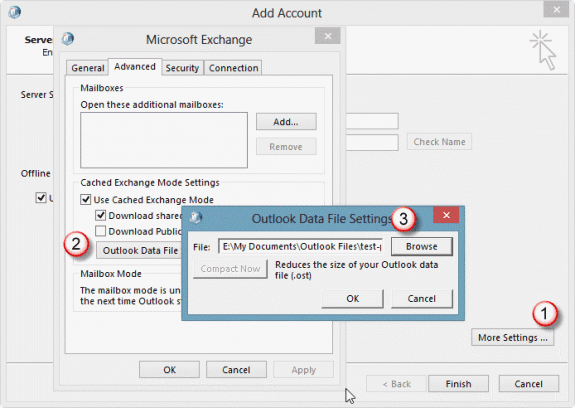
- Click More Settings (1)
- On the Advanced tab, click Outlook Data File Settings. (2)
- Click Browse (3), browse to the .ost file that you copied in step 1, and then click Open.
- If you want to create a new .ost file, browse to the new location, enter a filename, and then click Open. Outlook will create the new .ost file.
- OK your way back to Outlook then restart Outlook.
Tip: You can jump to the ost location in Windows XP, Vista, or Windows 7/8 by typing or pasting this command into the address bar of Windows Explorer and pressing Enter:
%localappdata%\Microsoft\Outlook
Move the *.ost in Outlook 2010 and older
In Outlook 2010 and older, you can move the ost used by cached Exchange to another location by disabling offline mode then changing the path on the Advanced tab of the Exchange account properties.
If you want to move the ost before you create a profile, use the ForceOSTPath registry value.
- Open Account Settings
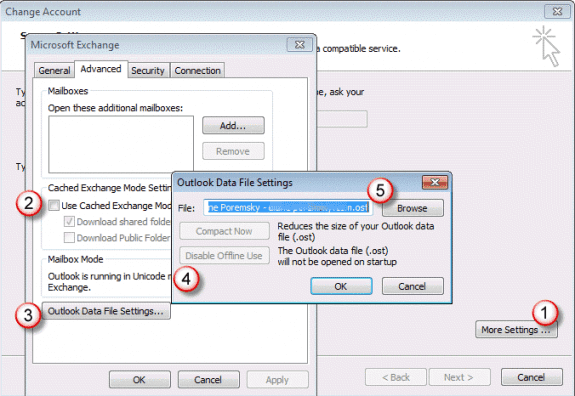
- Click More Settings (1)
- Deselect Use Cached mode (2) and click Apply.
- You can close Outlook and move the ost file now. If you want to create a new .ost file, you can skip this step.
- Click Outlook Data File button (3)
- Disable offline use (4) if Browse button is not enabled
- Click Browse button to select moved ost file (5)
Not Recommended PDF Method
This method is not recommended as it can break your address book. You'll need to let Outlook create new ost files and re-sync your mailbox.
- Close Outlook.
- Open Windows Explorer and type or paste %localappdata%\microsoft\outlook in the address bar then press Enter.
- Copy a PDF file into the folder.
- Copy the ost name, then rename the ost file by adding -old to the end of the name. (This is easier if you have Show Extensions enabled.)
- Rename the PDF file using the old ost file. You need to change the extension to ost.
- Open Outlook.
- Outlook will complain that it can't use the ost.

- Browse to the new location.

More Information
The steps to move IMAP, POP, Sharepoint or Internet calendar pst files are similar. Outlook 2007, 2010, and 2013 support the ForcePSTPath registry value, which changes the default *.pst path for POP3, IMAP, and SharePoint data files. See How to move the IMAP personal folder (*.pst) for more information.
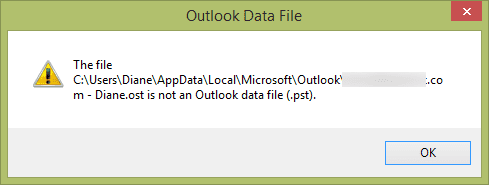
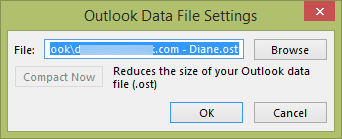
Outlook ignored the relocated+symlinked data files; it recreated and repopulated the data files in original (default) location, which is where the symlinks are.
Something isn't right... I'll test it again. Try junction points and move the folder.
Did the symlink method work for anybody?
I've used both (symlink and junction points) in the past and both worked for me. Which OS are you on?
Thnaks a lot for share
Wow.. The last trick did it all!
Thanks for sharing!
Thank you DIane!
That part about Symbolic Links helped me with problem of moving IMAP .ost file from C: to other drive - THANK YOU VERY MUCH! It was realy usefull! :)
Explained perfectly. Thx, thx, thx, ... * 100
Re Method #3, it should be noted that it won't let you remove an account if your only Data File entry is the OST. You'll need to add a dummy data file, perhaps the sample PST, first.
However, when you do that and you later try to remove that data location from the profile (even when done via Control Panel), you'll get "You cannot delete this outlook data file. Configuration information in the file is being copied. You can delete the file after this information is being copied."
And I don't think it ever is. So maybe it's best to create a new profile if going this route, all the more reason not to go this route and instead use the Registry.
Yeah... that is a problem any time you need to remove the last account and dont want to make a new profile.
After adding the pst, restart outlook, wait a minute or so then close it. You should be able to delete the pst now....