There are a few issues you need to be aware of when customizing an Outlook Appointment or Meeting form.
To open a form in Forms Designer in Outlook 2010 and Outlook 2013, you need to show the Developer ribbon.
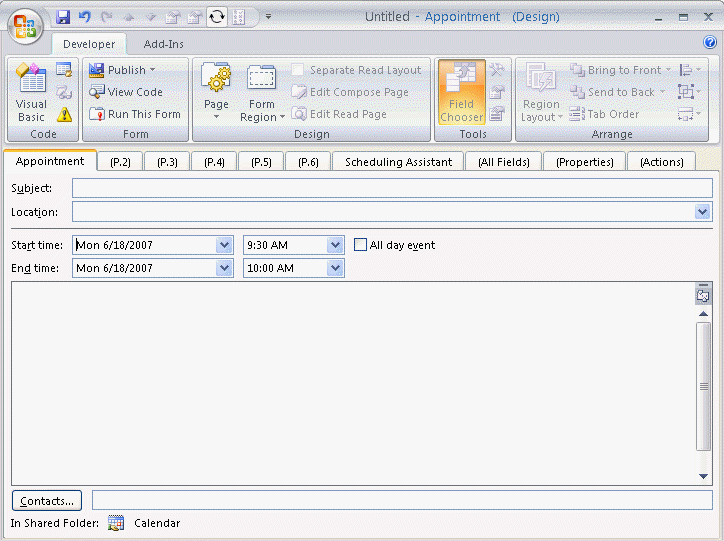
Open a new form and click Design this Form or select a form from all forms by clicking Design a Form. When a form is in design mode, it will look similar to the screenshot to the right.
Need help designing a custom form? See Designing Custom Outlook Forms and Publishing Custom Forms in Outlook.
Issues when designing Appointment or Meeting forms
The first page of the Appointment form is not customizable. If you want to customize appointment form, you can hide the front page and design a custom page that looks like the first page.
Adding a control to a page (tab) will display that page by default. To rename or hide a page, check the options on the Page button.
Doing this leads to the next issues:
Outlook does not include a date and time picker. Outlook 2007 introduced date and time pickers for use with form regions. However, these are not designed for use on legacy forms. Using the new controls on legacy forms may cause form corruption and the loss of code behind the form.
After you publish an appointment form, when you open a new item with that form (other than by double-clicking in a Calendar folder's Day/Week/Month view), the Start date may default to the date you published the form. The form will also have a reminder set if the user's default option is to use a reminder. To avoid this problem you need to use code in the form that turns off the reminder and causes it to default to the current date.
Function Item_Open()
  If Item.Size = 0 Then
   Item.Start = Now()
   Item.ReminderSet = False
  End If
End Function
You cannot use your own values in the Location drop-down list on the first page of an appointment form. Outlook maintains this list as a registry entry. See To clear the Location drop-down list on Outlook appointments
Ideas for custom Appointment or Meeting forms
Now that you know what to watch out for, there are a couple of useful uses for custom appointment forms:
Create one or more custom meeting form with the resources selected. If you always invite specific users to all meetings, add them to the form as well.
Set a field in every new appointment
When you open a new appointment form you can set a default value for any field using the Item_Open function in a script.
I'll demonstrate how to do this using a default setting that annoys a lot of people: Outlook's 30 minute duration when creating a new appointment.
Outlook's default duration is 30 minutes when you click the New Items button. To use a different duration you need use the day or week view with the desired scale then click in a time period. Or you can use VBScript in a custom form.
This simple script will set the default duration to 15 minutes when you click New Meeting or New Appointment command.
The basic steps to create a custom form are below. I have more information, including screenshots, at Designing Custom Outlook Forms and at Publishing Custom Forms in Outlook.
- If the Developer ribbon is not visible, go to File, Options, Customize Ribbon and add a check next to Developer.
- Click New Appointment.
- Switch to the Developer ribbon and click Design This Form button.
- Click View Code button.
- Paste the Item_Open function into the Script Editor.
Function Item_Open()
  If Item.Size = 0 Then
   Item.duration = 15
   End If
End Function
- Test it by clicking Run this form on the Developer ribbon.
- Return to the forms designer and click Publish, Publish form as.
- Type a name for your form and click Publish.
- Set the form to be the default calendar form.
When you use Exchange server mailboxes, you can easily share the form with coworkers if it's published to the Organizational Forms Library. See Create an Organizational Forms Library for more information.
Jason Tisdall says
Hi Diane
I have been searching for a particular Outlook Macro use case and haven't quite seen waht I need. I wonder if you can help me.
The end result is that I would like to create a number of buttons on my Quick Access Toolbar in Outlook that will create appointments with various properties pre-set. For example I would like to be able to click on a time in outlook and then hit a button to do:
button1 - creates a 15 min appt marked as free time, and with a particular category set and with alarm set to 0 mins. It opens the appointment ready for me to write in the subject.
button2 - creates a 30 min appt marked private and with a category set.
etc.
What I am trying to do is set various standard use cases up with minimum keystrokes.
Is this possible? Can you point me in the right direction to start digging?
I can write a bit of VBA.
many thanks in advance
Jason
Diane Poremsky says
Of course it is possible. Repeat the Type1 macro (with a new name of course) for each button.
Dim dStart As DateDim strSubject As String
Dim strCategory As String
Dim strFreeBusy
Dim lDuration As Long
Dim lReminder As Long
Sub Type1Appt()
dStart = Format(Date + 3, "mm/dd/yyyy") & " 8:30:00 AM"
strSubject = "Test 1"
strCategory = "Type1"
strFreeBusy = olBusy
lDuration = 20
lReminder = 25
CreateNewAppt
End Sub
Public Sub CreateNewAppt()
Dim objAppt As AppointmentItem
Set objAppt = Application.CreateItem(olAppointmentItem)
With objAppt
.Subject = strSubject
.Categories = strCategory
.Start = dStart
.duration = lDuration
.BusyStatus = strFreeBusy
.ReminderMinutesBeforeStart = lReminder
.Display
End With
Set objAppt = Nothing
End Sub
Jason Tisdall says
Hi Diane
Thanks for replying so promptly.
I gave this a go and followed the steps further up your web page i.e.
If the Developer ribbon is not visible, go to File, Options, Customize Ribbon and add a check next to Developer.
Click New Appointment.
Switch to the Developer ribbon and click Design This Form button.
Click View Code button.
Paste the code into the Script Editor (I copied in your code above).
Test it by clicking Run this form on the Developer ribbon
When I tested it I expected an appt with the properties set in your code (such as the subject etc), but just seemed to get the regular appointment.
Am I missing something?
Thanks
Jason
Diane Poremsky says
Did you run the Type1Appt macro? It sends the field values to the "master" macro named CreateNewAppt. This allows you to reuse the CreateNewAppt macro with Type2Appt, Type3Appt etc.
To use, click in the Type1Appt and click Run.
Rick says
Hello,
I have developed a custom meeting request but are hampered by a few issues. I cannot use vbscript due to Microsoft security restrictions and my IT department locking me out of Registry changes. There is also no date/time pickers that can be used and bound to the meeting start/end times.
So I am sort of forced to use the default Appointment form to enter the start and end times. I'm happy to do this and then use the custom form to enter the rest of the required information. However I want the form recipient to only see the custom form or at least have the custom form show by default.
If I hide the standard appointment page then I can't put in the start/end times. If I don't hide it then the recipient sees it which is not what I want.
Any idea's on how I might be able to do this will be greatly appreciated
Thanks
Rick
Diane Poremsky says
If you don't need the date/time picker, users can just type the date and time in, in the format Outlook 12:52 AM you could use the custom form. (users can use shortcuts like 12/25, 3w, and 3.30p)
Chad says
Diane,
I am trying to programmatically set the end time for appointments ( we have 4 standard start and 4 standard end times with 2 varying durations). I've tried setting the end time and the duration programmatically; however, the duration nor end date seems to save properly. If I switch over to scheduling assistant it will save the time, but the date is some time in the future.
Any way you can help me out? I've been working on this for 2 days with no success. I find it hard to believe something so simple can be so difficult to accomplish.
If you have an email address I can share sample code and forms with you.
Thanks in advance for any help
Chad
Diane Poremsky says
you can send me the sample at diane at slipstick.
You don't need to use both duration and end time - if you have the start time and set the duration, the end time is set based on the duration. Same for the duration if you set an end time.
Chad says
Thanks Diane, I sent it to you via email.
I only was setting one or the other, but there is something I'm missing to get it to save properly.
Hope you can help!!
Diane Poremsky says
I will take a look at it.
doryo says
I have the same Appointment requirement that you describe, Chad. Would love to know what you two learned. I would like to provide an add-in for my co-workers that would make these non-standard start/end times easier to select. doryowen at gmail
Kathryn T says
Diane, I manage several calendars for others. I want to track all appointments that I create. I created a "Created By" field in the P.2 Form Region which inserts my initials in that field. How do I use this form as the default new appointment form that is associated with the keyboard shortcut CTRL+SHIFT+A? Do you have a better idea for tracking "Created By"?
Diane Poremsky says
That will work - to set it as the default form, you need ot publish it, to an org library is best if its going to be used in other calendars, but it's ok if you can't. Publish it to the calendar folder(s) and set it as default for the folder - right click on the folder, choose properties then choose it for the default form. See https://www.slipstick.com/developer/how-to-apply-a-new-default-form-to-an-outlook-folder/ for more details.
Kasey says
Hi Diane,
This discussion was very useful and it helped me create the form that I needed to get appointments in the same format. My question is, is there a way to send my Form as a template so that others can use it?
I don't have a option to publish to MS Exchange...so I can only publish locally. I need to share this form with others so the entire team is using it. Is there a way?
Is there a way to do a template that results in a appointment being generated sent to the right people? Again I was able to do it with a form, but can't seem to share it.
Diane Poremsky says
You either save it as a template - open the form to create a new item and save it as a template, or if it is a published form, you can save it as a frm file in File, Options, Advanced, Custom forms button, Manage forms. find the form and then choose save as. The recipients will publish it using pretty much the same steps.
Andy C. says
Hi Diane. Great information on your site on your site on working with forms. We have a custom appointment form for our calendar that is shared among multiple locations. Recently it was asked about creating a reminder AFTER an appointment to go back and make sure everything was complete from that meeting. I am hoping you may have a suggestion that we could try, as we have used several different fields without success. Thanks for your help!
Andy
Diane Poremsky says
You'll need a script behind it - do you want to change the reminder on the initial appointment to reset it or create a followup appointment or task?
Kiran Prabhu says
Just one correction here, it includes while replying but the recipient doesn't receive appended new message text + original message.
Kiran Prabhu says
Hi Diane,
I have a custom form to compose and reply, for some reason while replying it does not include original message in the body. Initially I had chosen "Respect user's default" in "Actions" tab while replying, but that didn't work although my normal reply mails includes original text. Later i choose to "Include and indent original message text" and published the form, but still it doesn't work.
I have unchecked File->Options->mail->Ignore original message text in reply or forward.
Kiran
Diane Poremsky says
Did you create a separate read layout? That can cause issues such as this, although I would expect to see the quoted content in the message.
Does your form use script to set the message body?
Kiran Prabhu says
Yes i have separate form for compose and read. No i don't have any script.
The compose layout has some standard mail input like To,CC, subject and some custom input (Status and Ticket) set with user defined fields and read layout has labels to show this user defined fields.
Let me put the case i am doing in steps,
1. Compose a new message(A) with input in To,CC,subject, Status, Ticket and some text in message body(it also has the default signature set)
2. Send the composed message(A), Recipient receives the message(B) with the message body text and other fields including Status and Ticket fields.
3. Recipient replies the message, opens the compose message(C) with message trail of A in message body and adds some more text in the message body. Also changes the Status and Ticket custom field and sends the message.
4. Message(D) received by original sender(1) as a reply, but the text in the message body is empty, although the Status and Ticket fields are updated as sent in C.
5. Recipient in point 3 checks the message(C) in sent folder, the message body text is empty in message(C) but the status and Ticket fields are updated as sent in C.
Judy says
Hi Diane,
Is there a way to remove "Tentative" as a response to a meeting invite?
Judy
Diane Poremsky says
No, not to my knowledge. Sorry.
Gail says
Is there a way to change the label of an appointment of "Free, Busy, Out of Office" to something else like "Critical" or better yet add a custom choice to the existing 5 options?
Diane Poremsky says
No, sorry, that is not customizable.
Sarah says
Hi Dianne
I am trying to create a form in microsoft outlook 2007 for a custom calendar appointment. I have created the fields that I would like to show and can get them to show on page 2 when working in 'developer', but when I go to my outlook calendar I cannot see page 2. But what I would really like to do is add these fields to the appointment tab, not for them to show on page 2, can you please let me know if this is possible and if so how would I do that please?
Many thanks
Sarah
Janice says
Hi Diane, thanks a lot I've used this and it works great. What I can't figure out is if I am a publishing editor for a coworker's calendar and I want to book an appointment for them (not including me) it doesn't allow me to choose a form. Every time I do that it books the appointment for me, not my coworker. I've tried clicking on the time slot on their calendar that I want to book it and then select choose a form and every time it books it in my calendar. I've even gone as far as asked her to make me an owner of her calendar and that doesn't work either.
Do you know if this is doable?
Thanks.
Jeff Frost says
Dianne,
Great ideas! I have a couple of questions though:
1) I tried the Item_Open function above by pasting the script into the Script Editor (in Outlook 2010), but get a message that there is an error in line 2.
2) I'd like to be able to make a new appointment for a given Contact, and I always want to include some other fields (including Title) in the subject line. I can't seem to find any information about including what I think of as similar to Word Field Codes in the form. Do you have any suggestions?
Jeff
Diane Poremsky says
#2 would be easiest if you used a macro to create the appointment after selecting the contact. you can pull in any fields you need this way.
#1 works here - did you copy the code and put it in the form's code editor?
Daniel says
Hi Diane,
has anything changes regarding the date and time picker functions in 2013?
Diane Poremsky says
No, the picker functions haven't changed.
Carlos says
Hi Diane,
I have been trying long to change the "Meeting Form" in order to introduce two more fields similar to "Subject".
I created and modified the second page you talk about (since the first page ist not customizable); both "Edit compose page" and "Edit Read Page": I have introduced manually the different fields I want to appear (manually since as I have read in some places, it is not possible to "copy" it from the first page).
However, when I run the new Form, it does not look like the "default form" but different and not so "professional" at all. Do you know how to copy or modify it a bit more accurate?
Anyway, the main question is also, how can I introduce a "drop-down list" for the "To"; "Location" and "Start time" fields?
Thank you in advance!
Best regards,
Carlos
Diane Poremsky says
You can change the background colors on the new page, but that is mostly the extent of the customization. You'd need to use a combobox to create the list then link the to, subject and location fields to the combobox.

This won't work for the To field though.
Also, if the form definitions are sent to others, they could change the values. In most cases, they should only be sent if the meeting is sent internally.
It might be better to use a userform to select the fields - something like this - https://www.slipstick.com/developer/select-list-subjects-sending-message/
Nicolas says
Hi,
I want to show a calendar in my form (Custom form based on a message form). With this matter the user musn't introduce a date in the filed but simple click on the date of his choice.
Is it possible to add this ?
Regards,
Nicolas
Diane Poremsky says
I don't have any code samples, but if you have a calendar control, yes, you could do it.
Peter Kaye says
Thanks Diane - that's really good news !
Peter Kaye says
Hi Diane
Is there any way to hide the code (i.e via a password ) behind and OL 2010/13 form ?
Diane Poremsky says
You can. I'll get the instructions.
savvaskefvvas says
i am trying to develop a inflow-outflow app in Outlook. currently working with customforms.
1) do not know how to run a vba procedure from vbscript
also later i am thinking of turning the app int an addin
2)do you know hot to assign a custom form to a calendar
Blair says
Hello Diane,
i have created the form and it work well, i have a problem though if i go in to outlook afterwards to delete the appointment it wont?
Diane Poremsky says
Do you get any error messages when you try to delete it?
Peter says
I have just made a small program that allows you to change the meeting length our you outlook appointments to suit everyones liking.
(The idea was to allow 4 minutes of transport time to get from one meeting to another)
https://4minutes.ecomerc.com/
For that simple task there is no need to change the outlook forms.
Pierre says
Hi Diane,
I created a new form to filter rooms from my database (filter by number of people, resources ...)
Can I use the Rooms button in the New Meeting Form to call my new form (the filtration rooms form)?Do I need a code to do it or I can do it from properties?
Thanks for your help!
Diane Poremsky says
The rooms button wont bring it up. You can use code assigned to your own button to bring it up.
Sally Eastaugh says
Hi, Diane.
I have read your comments on using Outlook on many forums and websites and have found your advice invaluable! Your knowledge on the finer use of Outlook is expansive and I would like to extend our organisation's use of Outlook, so as to make processes simpler and more time-efficient. I would appreciate it if you could please advise me on the following:
I would like to create two calendar forms for staff to use for (i) their leave applications and (ii) Professional Development applications. I can see how to create fields in the form design to include the cost of the PD course, start date and time, end date (for leave), etc.
However, I would like to have the forms sent to their supervisor for approval. Should this be simply the "invite attendees" function and if so, when the supervisor "ticks" their acceptance, this would be notification of approval?
Once the supervisor has approved, the final approval has to be by the CEO, so can I automate the forwarding of the calendar item to the CEO after it has been approved by the supervisor?
Also, is there away of attaching scanned pages to the calendar item (ie medical certificates, PD information brochures, etc.)?
Are there already templates similar to the above that I can use?
Finally, what is the best reporting program to gather and summarise the information that has been entered into the calendar items? With PD applications, we would need to total the costs, etc. I've tried to import calendar items into MS Access, but it doesn't work properly and the fields are all transcribed into email message-type fields.
Thanks for your help!
Diane Poremsky says
I'm not aware of any templates that are ready to use with similar features - what you need is basically a workflow application. There are a number of different ways you can do it - from simple invitations to elaborate forms. It depends in part on if you can publish the forms to am organizational forms library so everyone can access it.
You can insert attachments in appointment bodies (notes field).
At the very simplest level, you can create a table view with the fields you need and select all, copy, and then paste it into Excel to create reports.
klmphd says
I followed your directions to set the item duration to 5 minutes. I ran it and it displayed 1:30pm start and 1:35pm end. But when I dropped the end times down, it reverted to !:30, etc. It also did this when I set the duration to 15 minutes, by the way. Anyway, will this change to all 5-minute intervals when I set the form to be the default calendar form? I could not find out how to do this, though! How do I do this? Thank you--
Diane Poremsky says
If you set the form to be the default for the calendar, all NEW items will be created with the form and will use the settings set by the script. Existing items won't be changed.