Many users have a problem with Outlook missing misspelled words. In many cases this happens because the person is typing in the signature field, either accidentally or intentionally.
Outlook uses the Email Signature style for the signature and the signature style is marked Do not spell check. While this is a good setting for signatures, it's a problem when users type in the signature area. This happens when users set up their signature to insert a block of text, such as a salutation or introductory text at the beginning of the message, or when a user accidentally types in the signature area. Either way, you'll know this is the problem when you right click on a misspelled word and see the signature menu instead.
If you are using signatures to add introductory text and your signature, with the message in between, you should use AutoCorrect or Quick Parts instead. It’s easy to insert test using either method and you don't risk losing the message if the signature or account is changed.
Avoid Accidentally Typing in the Signature Area
Rather than editing the signature style to allow spell checking, you should avoid typing in the signature field, especially if you use multiple signatures or accounts with separate signatures. When you change the account or signature, your message will be replaced by the new signature and the message you composed is lost forever.
The best way to avoid accidentally typing in the signature area is to clearly mark where it begins. We recommend adding two dashes and a space ("-- ") as the very first line of your signature. For more information, see Outlook signatures and spell check.
Why two dashes? They are defined in an RFC as the universal signature identifier and many mail clients use this to identify and hide the signature in their reading pane or delete it when replying.
Begin typing your message above the dashes.
Tip: Create a blank signature that contains just the two dashes and assign it to accounts where no signature is desired. Then if you change accounts, the signature will change too.
Workaround: Change the Message's Spell Check Setting
When you discover you typed in the signature area, the easiest fix is to change the spell check settings on the message. To do this you need to select the entire message then go to the Spelling dropdown and choose Language. Clear the Do not spell check box. Back out of the dialog and press F7 to initiate the spell check.
For those times you accidentally type in the signature field and discover it at the end, you can easily change the spell check setting.
- Select the entire message
- In Outlook 2010 and newer: Review ribbon > Language menu > Set Proofing language command
- Outlook 2007: Expand the Spelling button, choose Set Language.
- Clear the Do not spell check box.

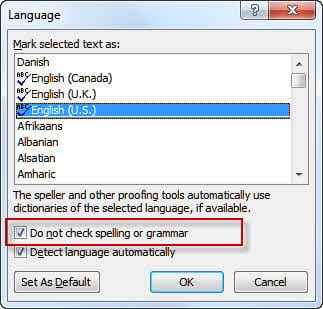
Now the whole message can be spell checked.
Use a macro to enable spelling
If need to change the spell check setting often, you can use a macro.
This macro will select the entire message and enable proofing for you. You'll need to set a reference to Word object library to use it. If you don't know how to use a macro, see How to use Outlook's VBA Editor.
Add the macro to a button on the ribbon and click it when you need to enable spell check on a message where you typed in the signature field.
Public Sub SpellCheckSigs()
 Dim objItem As Object
 Dim objInsp As Outlook.Inspector

 ' Add reference to Word library
 ' in VBA Editor, Tools, References
 Dim objWord As Word.Application
 Dim objDoc As Word.Document
 Dim objSel As Word.Selection
 On Error Resume Next

 Set objItem = Application.ActiveInspector.CurrentItem
 If Not objItem Is Nothing Then
   If objItem.Class = olMail Then
    Set objInsp = objItem.GetInspector
    If objInsp.EditorType = olEditorWord Then
        Set objDoc = objInsp.WordEditor
        Set objWord = objDoc.Application
        Set objSel = objWord.Selection

    With objSel
      .WholeStory
      .NoProofing = False
    End With

    End If
   End If
 End If

 Set objItem = Nothing
 Set objWord = Nothing
 Set objSel = Nothing
 Set objInsp = Nothing
End Sub
Problem: Using Signatures to Insert Headers
An Outlook user had this complaint:
"My signature block includes a salutation and signature information beneath it. Therefore, any text I type between the salutation and the signature is in the signature block. However, I can't get Outlook to spell check the signature block. Is there a way to do this?"
Don't use signatures to insert headers. (The feature is called signature, not header and signature for a reason.)
Use Quick parts for the header portion or create stationery with the header block in it.
Solution: Use Autocorrect and Quick Parts (Autotext)
Rather than using signatures to insert blocks of text, use autocorrect or autotext to insert text. When you type the keyword, the keyword is replaced by the full text.
Autocorrect is the feature which converts :) to a smiley face. Autocorrect entries can contain up to 256 characters and are assigned a keyword. When you type the keyword it's replaced by the autocomplete text. This makes autocorrect an excellent choice for replacing short phrases.
Set up autocorrect entries through Tools, Options, Spelling, Spelling and Autocorrection, Autocorrect options. Assign a unique keyword that is easy to type to insert the text. I use leading characters, such as # or /, with my keywords, such as #sal (for salutation)
For longer blocks of text, use Quick Parts. This feature is similar to Autotext in older versions. After setting up the entries, you'll need to either pick the entry from the menu or type the beginning of it (enough to form a unique phrase) then press F3.
Other Causes
If the problem is not that you are typing in the signature field, there are a few things left to check.
Proofing Tools Override key
One common cause (when you aren't typing in the signature field) is an errant registry key.
Check this registry entry:
HKEY_CURRENT_USER\Software\Microsoft\Shared Tools\ProofingTools\1.0\Override\en-US
If it exists, delete or rename it; if it doesn't exist, create it.
You can also delete the following key, but if you do, you'll need to reconfigure your spelling options. (Export it before deleting it.)
HKEY_CURRENT_USER\Software\Microsoft\Shared Tools\ProofingTools\1.0\Office\OutlookSpellingOptions
Yes, that makes no sense at all (and I'm not sure why the key is created to begin with), but many users report removing it fixes their problem and others say if it doesn't exist then creating it fixes the problem. Go Figure.
Is the Style Marked to Skip Spell Check?
While this is mentioned in the "Workaround: Change the message's spell check settings" section above, it's worth reminding users who aren't typing in the signature block to check the style and verify it is set for spell check, especially when only some themes, messages, or stationery is affected.
- Select the entire message
- Outlook 2010: Review ribbon > Language menu > Set Proofing language command
- Outlook 2007: Expand the Spelling button, choose Set Language.
- Clear the Do not spell check box.
In Outlook 2007, the Set Language command is found under the Spelling button:
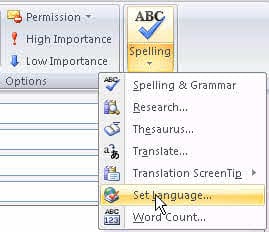
Now the whole message can be spell checked.
Mixed versions of Word and Outlook
When you use mixed versions of Outlook and Word, 'spell check on send' should always work (if enabled).
For the spell check as you type and grammar checking features, you need to have the same version of Word and Outlook, often installed from the same suite. If you don't have Outlook and Word installed from the same suite or are using mixed version, copy winword.exe into the same directory as outlook.exe This enables spell check as you type and grammar features.
The version of winword.exe doesn't make a difference, and it doesn't even have to be winword.exe; you can use almost any file and rename it winword.exe. (I have not had any luck with renamed text files, but renaming exe and dll files to winword.exe worked.)
Make sure you copy, not move, winword.exe!
Where can you find the Outlook and Word exes? It depends on your version.
Beginning with Office 2013, most people will have the Office suite under C:\Program Files (x86)\Microsoft Office\root\ (64-bit Windows and 32-bit Office) or C:\Program Files\Microsoft Office\root\ (both Windows and Office are 64-bit). Each installation will be in a subfolder called "OfficeXX", where XX is the version number.
Volume licensing's MSI installation and older versions of Office are found at C:\Program Files\Microsoft Office, or if using 64-bit Windows, at C:\Program Files (x86)\Microsoft Office.
Check Contextual Spelling Settings
This solution comes from Wendy:
I wanted to pass along that I am using Outlook 2010 with Office 2007. I could hit the F7 key and it would say it had checked the spelling and nothing was checked.Solution:
I finally found that I had to go into File / Options / Mail / [Spelling and AutoCorrect] / Proofing / {Uncheck “Use contextual spelling”].That fixed it for me. I don’t know how that got checked.
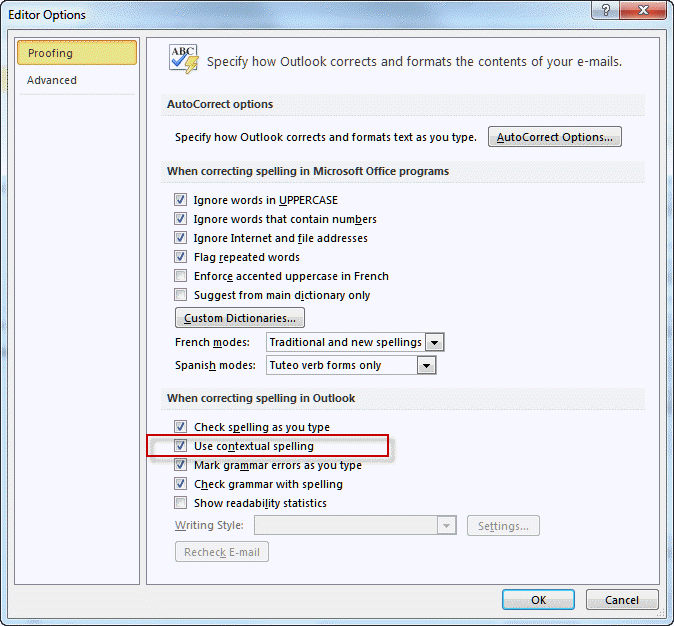
Contextual spelling is enabled by default if your computer has sufficient ram (more than 1 GB). It's part of the process that checks to see if words are used in context. It underlines the misused words in this sentence in blue: "I went their too pick up you're kids."
It may be related to using mixed versions of Office and Outlook. Spelling and grammar require both Outlook and Word to be from the same suite for best results.
How to use the macros on this page
First: You need to have macro security set to the lowest setting, Enable all macros during testing. The macros will not work with the top two options that disable all macros or unsigned macros. You could choose the option Notification for all macros, then accept it each time you restart Outlook, however, because it's somewhat hard to sneak macros into Outlook (unlike in Word and Excel), allowing all macros is safe, especially during the testing phase. You can sign the macro when it is finished and change the macro security to notify.
To check your macro security in Outlook 2010 and newer, go to File, Options, Trust Center and open Trust Center Settings, and change the Macro Settings. In Outlook 2007 and older, look at Tools, Macro Security.
After you test the macro and see that it works, you can either leave macro security set to low or sign the macro.
Macros that run when Outlook starts or automatically need to be in ThisOutlookSession, all other macros should be put in a module, but most will also work if placed in ThisOutlookSession. (It's generally recommended to keep only the automatic macros in ThisOutlookSession and use modules for all other macros.) The instructions are below.
The macros on this page should be placed in a module.
Open the VBA Editor by pressing Alt+F11 on your keyboard.
To put the code in a module:
- Right click on Project1 and choose Insert > Module
- Copy and paste the macro into the new module.
Set a reference to other Object Libraries
If you receive a "User-defined type not defined" error, you need to set a reference to another object library.
- Go to Tools, References menu.
- Locate the object library in the list and add a check mark to it. (Word and Excel object libraries version numbers will match Outlook's version number.)
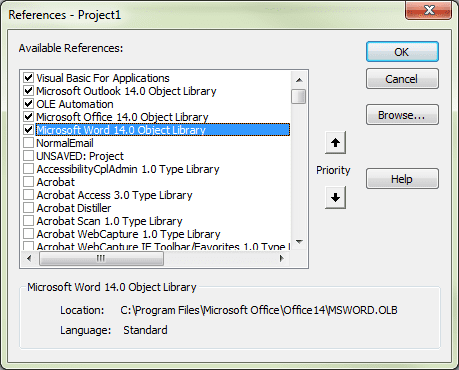
Commonly used libraries are Microsoft Word, Microsoft Excel, Microsoft Forms, and VBScript Regular Expression.
More information as well as screenshots are at How to use the VBA Editor
Russell says
Hello, I created the macro but I get an error when I press the macro button.
Compile error: User-define type not defined
Using Outlook 365
Diane Poremsky says
You need to add a reference to Microsoft Word object library in the VBA Editor, Tools, References
Cal Turney says
This info has solved this issue That has plagued me for many years. Thanks so much!
Mary says
None of the fixes above seem to work. When I click on hte e mail spelling icon I only get 2 boxes:
Hide all proofing marks
or Hide proofing marks in selected text
I do not have a language icon and I am not typing in the signature block. Currently I copy all e mails into word, fix the spelling and then paste into the email. It should not be this hard! I am on Windows 10
Diane Poremsky says
What is your version of Outlook? Do you have the full suite or just outlook?
Can you post a screenshot of the dialog with the boxes?
Farshid tafazoli says
To fix it simply press CTRL+A and then SHIFT+F1. In the opened bar on the right side of the document, under the fonts section click on LANGUAGE and from the opened windows choose English (United States) as the default font, make sure that the 'DO NOT CHECK SPELLING OR GRAMMAR' is UNCHECKED, then click on set as default. You can now browse the entire document and look for spelling errors as it will be back working.
Diane Poremsky says
...for this email only. It's easier to avoid typing in the signature area.
DennisG says
This morning I am seeing a new right-click menu to see spelling corrects. Is this new or is it a menu that just randomly got turned on? Can you turn it off? Thanks! SEE HERE:
Diane Poremsky says
it's new. i don't like it but there is no way to revert to the old menu. i can see the benefit for some misspelled works, but not for run of the mill typoes.
Phillip says
I have an issue for one user in office 2013 where his emails are not correcting the grammar so wont pickup up wont when it should be won't
Rick says
Hi Diane, I cannot seem to find any information on my issue, and that is Outlook 2013 has always worked fine for me until now, my French Dictionary no longer work, I check all the set up and everything looks normal, it detects the words are wrong but when i select French the listing for correct words does not update and give me anything I can change too. any thoughts.
Rick
John Aspras says
Thank you Thank you Thank you Thank you!!!
Marissa H says
Hi Diane,
I added two dashes in front of my signature to clearly indicate where the beginning of my signature box is to avoid typing in it which works great when I compose a new message and the cursor starts above it. However, when I respond to an e-mail, the cursor is automatically where the dashes are even if I hit "Enter" to shift it down, the misspelled text I type above it still does not get caught or corrected. Can you tell me how I can avoid this issue from happening? thank you!
Diane Poremsky says
Are you using stationery? Are all messages affected or just some? (like html ok, plain text not)
Mark Reid says
This was the most explicit explanatoin of a MicroSoftism that I've read in a long time. It stated the causes, how to approach the different aspect, and the implicaitons. Kudos.
Bart says
Thank you, Diane. Apparently some (well, ONE) guy is prominently displayed all over the web as claiming it is because we sue Word as our editor - but we don't really have a choice if we are going to use HTML, or am I wrong? And I am not clear on why they would think this is a Word action when it happens in Outlook.
But thanks again.
Diane Poremsky says
You don't have a choice of the editor since Office 2007. Technically, he is correct because Word is the only editor and this was not a problem back when we had an Outlook editor, but we couldn't change signatures with accounts with Outlook editor either. :)
Bart says
Diane;
I am searching for the solution to this - although readers may say "D'uh!" when they read this. Here's the deal - After typing in the subject line I then use the TAB to get to the body of the email. The problem is that sets the cursor in the actual signature itself, which then stops the spell check. I cannot seem to find the fix for this.
In further testing note that I have four email addresses that Outlook handles fo rme, each with different signatures. If I create a new email from the default email , enter the subject then tab to the body, all is good.
If, howver, I open a new email (which opens under the default address) then select a secondary account, tabbing from the subject puts the cursor at the begining of the signature line, even though Outlook created the message with two blank lines above the signature.
Do the people that create this stuff not use it?
This has made me crave sweet potato fries...
Diane Poremsky says
>>>> Do the people that create this stuff not use it? <<<< No comment. :) I think it's safe to say they don't use it in the same way we use it.Ah... I see what you mean. I know a lot of people complain about this but they don't include the steps. Thanks. I'll file a bug report on this.
David says
This really helped me. I am using outlook 2007 and word 2010. Copied winword.exe from my office 2010 directory into my office 2007 directory and all is fixed. THANKS!
Ram says
Very very helpful, its working absolutely fine after copying winword.exe, many many thanks for your help!
aaron says
deleting the registry key worked for me. Thanks,
Lisa says
you fixed me! thanks!
Bob McCall says
Wendy, I have been plagued with spell check working intermittently for months and thought that I had tried everything! Un-checking Contextual Spelling seems to have done the trick! Thank You!
Rich says
Thanks again Diane for your great help w/ Outlook. A user of mine had a PC with only Outlook 2010 (no other Office software). I tried all of the various registry hacks described her and in other fora, but NONE of those worked in my case. The ONLY thing that worked was to copy WINWORD.EXE from another computer to the same folder where Outlook.exe lives. Seems to work like a charm!!
Dan Wakeman says
Thank you so much. I would have never figured out that Winword.exe had to be in the same directory. I had downgraded from Outlook 2010 to Outlook 2007 so I would have the same version as my secertary. I kept the rest of the Office 2010 suite however. This caused the problem.
Rand Al Thor says
Cracked
Created autotext and then set the autotext in my signature. Now I hit return at the star tof every email and voila - my 'signature' appears that I can type into and spell check!
Diane Poremsky says
Cool. That's one way to beat them - and pretty effortless too. :)
Carl says
This issue dogs me from time to time using Outlook 2010. What works for me is to go to "Format Text" in the menu, select Plain Text, and then once this has been done, select HTML. Doing this makes everything I typed in the Signature area available for the spell-checker to do its job properly.
This trick works for 99% of my emails when I am not using any fancy formatting that would otherwise get lost when I select the Plain Text option.
Diane Poremsky says
Sure sounds like you are typing in the signature field. Add two dashes as the first line of you signature as you'll be able to see where the signature begins.
Fernanda says
Thanks a lot Wendy! That worked
David Beresford says
I knew something was up when ":)" didn't autocorrect... Using Office 2007 with Outlook 2010, so copying winword.exe to the directory with outlook.exe worked EXACTLY how I needed it to! Thank you very much :) (damn, no autocorrect here still... lol)
Eddie says
Many thanks! I use Outlook 2007 with Office Home 2010 and copying winword.exe to the same directory where outlook.exe is located did the trick.
Becky says
I just upgraded to a new computer, and for the past 12 years have used signatures for boilerplate emails that I have to send all of the time. I have 20 differnt signtaures, and I usually type additional text into them for customizing the emial. Spell check not does not work in signatures and is very frustrating it can't be enabled, or can it? I tried quick parts but this is not spell checked either if you type within the "part". Help!
Diane Poremsky says
There is no easy ay around spelling in signatures, you can disable it in a couple of steps each time. (Select all, Review Tab, Language, Set Proofing - should be able to reduce it a step or two by adding commands to the QAT.) The bigger problem, IMHO, is that it's very easy to accidentally change the signature, losing all the changes you added. (I did that more than once before I changed my signature to begin with -- )
Spelling should work in Quick parts- unless you saved the QP with the style marked for no spell check or inserted it into a style that was not set for spelling and grammar checking.
Robert says
Thanks for the tip. After spending months trying everything else that was suggested, this was the solution.
Wendy says
Very helpful information. Thank you!
I wanted to pass along that I am using Outlook 2010 with Office 2007. I could hit the F7 key and it would say it had checked the spelling and nothing was checked.
Solution:
I finally found that I had to go into File / Options / Mail / [Spelling and AutoCorrect] / Proofing / {Uncheck "Use contextual spelling"].
That fixed it for me. I don't know how that got checked. The only program I had loaded was Dragon Speak.
No proof it had anything to do with it. Just a thought.
Thanks!
Diane Poremsky says
Interesting. I don't know why it would cause spell check not to work. Contextual spelling is responsible for suggesting there over their. It also adds spaces after ' in some languages (French is one). See Tip 735: Contextual spelling for more information.