I can tell when users upgrade to a new wide screen monitor because they ask how to set the margins in email. Composing an email on a wide screen with windows maximized is not the best experience because lines of text are very long. It's more comfortable to read and compose email when the text is only about 6 inches wide. Rather than resizing the window, users decide that moving the margin is the better idea and it's very easy to do but adjusting the margins using the ruler.
Then users discover unintended consequences:
I used the ruler to adjust the margins but when my boss printed out the email, the text printed in a narrow column and used 13 pages.
The problem is not limited to printed email. Recipients who open messages in smaller windows or who use smaller monitors may also see a (badly) formatted message in a narrow column. Fortunately, the margin setting is ignored by the reading pane.
When you adjust the right margin, you aren't making the page a specific width, you are indenting the right edge by a specific amount. If the page is 12 inches wide and you set the right margin to 6 inches, then you are left with 6 inches of space to type in. However, when the overall page width is 8 inches wide, you're left with just 2 inches when the margin is set to 6 inches, resulting in a narrow column of text in printouts or when the message is opened in a smaller window.

Outlook doesn't have an option to set the width of a message - it uses the full width of the message window and wraps text in the window as needed. Trying to force line lengths using margins or the Enter key to break lines only results in readability problems for the recipient. It's better to adjust the width of the compose window if you need to make the lines shorter and easier to read while composing messages.
Check or adjust the margins
To check or adjust the margins in Outlook 2010 and up, you need to look at the Paragraph settings and Page Setup. Both the Left and Right Indentation should be set to 0 (zero).
On the Format tab, click the Expander icon to open the Paragraph dialog. (If the ruler is visible, you can point to the indentation triangles and double click to open the dialog instead.)

The Left and Right Indentations should be set to zero. If you want to use indentation, keep it very small. Do not use indentation or margins to make line wrap on wide screen monitors while you are composing them; this will affect the margins and format on the message the recipient receives. Adjust the width of the compose message form instead.
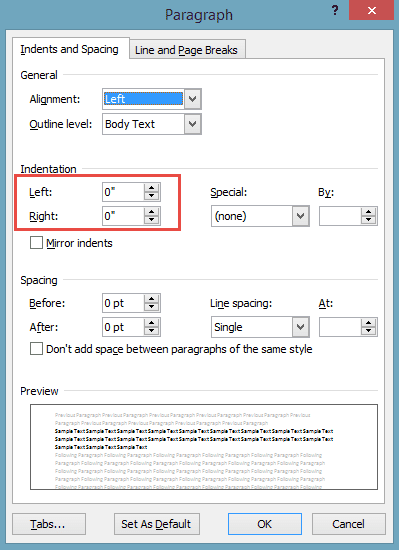
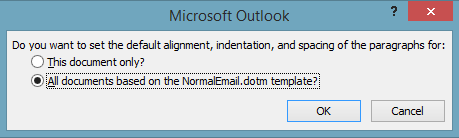
If you change the values, click the Set as Default button at the bottom of the dialog, then choose All documents based on NormalEmail.dotm template and click OK to commit the changes.
The default Margin setting is 72 points or 1 inch (or the equivalent) for top, bottom, left and right margins. To check the settings, you need to open the Page Setup dialog. You can do this with a double click anywhere on the ruler, or in the gray area on the right edge of the ruler (near the red arrow on the right in the screenshots containing the ruler) After resetting the value to 1 inch (or the equivalent), click Set as Default.
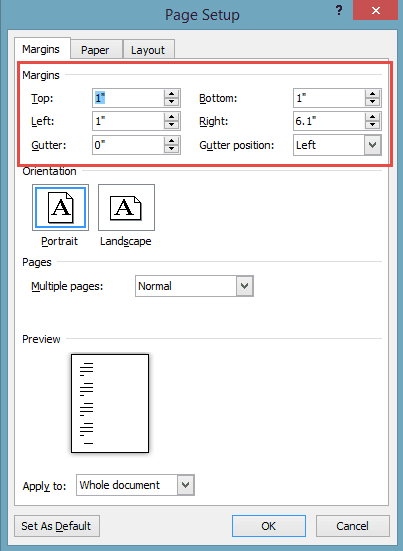
In this screenshot, the right margin is NOT set on the default.
Doug says
I was adjusting the spacing in the Inbox (OL.com) to expand the Subject line width and all the info except the Name and Time disappeared. I have not found the solution to expanding or even getting back the columns
Diane Poremsky says
If you are using the browser - changing the folder should reset it. If Outlook desktop, view tab > reset view. If that is not the issue, a screenshot should help me understand it.
Mike says
I'm using the theme Notebook under Mail > Stationery and Fonts in Outlook 2016. I have "Use theme's font" selected for the theme font. Everything else is default.
This theme places a spiral notebook graphic down the left side of the email body overlapping the body by about 1/2" wide. The problem is when I compose a new email, the left margins are not offset by this, and stay at 0, which puts my text in the graphic. You would think each theme provided would adjust the margins automatically for its theme graphic. I have tried to change it manually, but I can't find the Layout tab so I can set the left margin.
I tried using the Paragraph Settings under the Format Text tab, but it will not save as default, even when I select "Set as Default". Setting the left indentation to 5" seems to work, though I noticed if you press the back button to delete text, it will still go back to the far left margin at 0. So the only true way I believe to fix this is to set the Layout margins, but I'm beginning to think Outlook doesn't have this option.
Any suggestions?
sue says
hello. i have office 365 and composing emails in outlook. in my old outlook 2010 for mac, the left margins had some wiggle room. now, in this version, they are practically flush to the left. i would like to have more space and set a default to indent. i know you can choose indent but i don't want to do that with every email. when i right click on paragraph and move the margin, and even click apply to all, it does not apply to all. the next email is the same . is there a fix here??? thanks sue
Joann says
My difficulty is that when I send an email which looks in correct paragraph form (and I even shorten it some to allow for smaller screen readings) it is all over the place when the receiver reads it. One long line, then a line with 2 words, then a med. line of print, then next line 3 words. No consistency at all. How do I set my margins so that what I'm sending is the same format the receiver is reading it
Diane Poremsky says
You don't want to set any margins - you want it to free flow so it can adjust to the recipients screen. Only add paragraph breaks at the end of a paragraph, not after a specific # of characters. if you plan to do any kind of a fancy layout wih tables, you need to max sure they are free-flowing, not fixed widths.
Greg says
Diane, why would you tell Joann what she wants to do? Maybe she wants the reader to see the message in the form and boundaries that she envisions it. Telling her "you don't want that" is not helpful.
Diane Poremsky says
Setting margins really will mess the view up for the recipient. This is because margins are set 'in from the right' , not page width/in from the left. If you compose on a larger screen with a 6" right margin, someone on a smaller monitor will have a 6" right margin - and possibly an inch or two for text.
If you make no changes to the default settings - just type and hit enter at the end of a paragraph, the email will wrap nicely in almost every email client. (There will be occasional line break problems if the message is converted to plain text, but that can't be avoided. )
David says
Hi.. Thanks for this on setting margins in Outlook, but i have the 2016 version so none of this makes sense. Do you have instructions for my version?
Diane Poremsky says
You don't want to use margins with email. You can add a button for the ruler to the QAT and turn it on to see the margins or click on the expander in the paragraph group on the Format Text tab to access the paragraph settings.
Roderick Ramage says
Thanks and apologies for troubling you. I discovered the answer after posting my question. here is a margin command. Stat a new email and then: File \ Print \ Print Options \ Define Style \ Edit \ Paper \ and here you can set your margins \ OK \ close \ Cancel (ie cancel the print. That's it, and, lo and behold, next time you make an email it will print with our chosen margins.
Diane Poremsky says
oh, ok... i was looking at margins in the message, not in print options.
Roderick Ramage says
Surely there must be a way to fine page setup in Outlook 356 apart from looking for an invisible ruler or its grey area. If so, where please is it?
Diane Poremsky says
If using Outlook 2016, you can add the Ruler toggle button to the Quick Access Toolbar. That should be in Outlook 2013 too, will need to check in older versions.
Margins are not typically used in Email, so there isn't a margin command to load the dialog directly. if you need to set margins, show the ruler then click the gray square on the right end of the ruler.
Indentation is set in Paragraph options - Format text tab, click the little expander icon in the lower right of the Paragraph section. Look on the indents and spacing tab.
Marilyn Warrens says
Narrowing the space for messages received & sent by gmail. As it is now,
the text is spread over the whole wide space and even via landscape is too long and the text runs out of the paper.
Diane Poremsky says
This is on a wide screen monitor or printer paper? On a monitor, don't open messages full screen. Adjust the Outlook compose window to a comfortable width. Printed-to-paper should wrap words.
Lin says
It appears to me that this information is for Outlook 2010 for word docs. I requested info on how to change margins in Outlook 2010 email
Diane Poremsky says
No, it's about Outlook email (this is an Outlook site :)) Because Outlook uses Word as the editor, many of the commands and menus are identical between Word and Outlook.
Technically, email doesn't have margins - it wraps within the email Window - but you can set margins in the editor, you just have to keep them small, because of the way margins are calculated. If you need a specific message width, use a table (you can set table width in %, which can give you a narrow left and right margin)
Melanie Moore says
Thank you! That works. It wasn't so much about the wrapping width for me, it was about the images in the email moving around because the wrapping was shifting based on the screen. So figure one is really nowhere near where it was before.
Just re-sent myself the email with the text in a table and it was much better! Thank you!
fardin says
thanks a lot.it is very useful
John says
Thanks so much for such a thorough explanation of this. It was driving me crazy with people saying "why is everything in one line to the left?".
With your help, I think that I fixed my problem.
Rebecca Robin says
has anyone else tried placing their content into a table? That seems to work for me, but I'm having difficulty wraping text around images within the table.
Diane Poremsky says
It should work - unless the wrapping is handled by CSS in the head. For best results in all clients, styles need to be with each element.
Vickie says
No stationery
Vickie says
So after 2 days of absolute frustration, I stumbled across an answer indirectly from another forum; because Outlook uses WORD as default editor, changing Outlook 2007 new email message to Plain text format while typing allows me to see all text I'm creating...then when I'm ready to send I change mail format to HTML to get my pretty signature , etc... ...b-u-t recipient (me on large screen monitor has to scroll to right to see entire sentences...maddening)...so not really a solution
Diane Poremsky says
There is something wrong because the text should wrap on screen when you use html too. Are you using a stationery?
Vickie says
Only option to 'downsize' screen is to use 'restore down' button, top right next to 'red X' close button, but when opening new 'compose message' and I type it still scrolls right, way past the right edge of 'downsized' screen - what am I missing here?
Diane Poremsky says
Did it ever work correctly? Something is either corrupt or a changed setting is affecting it.
Vickie says
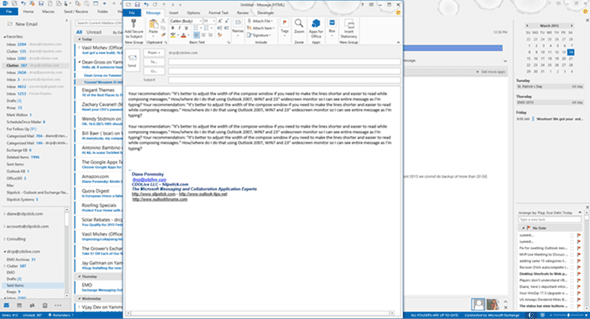
Your recommendation:
"It’s better to adjust the width of the compose window if you need to make the lines shorter and easier to read while composing messages."
How/where do I do that using Outlook 2007, WIN7 and 23" widescreen monitor so I can see entire message as I'm typing?
Diane Poremsky says
Don't open the message to full screen - position it in the middle of the screen, about half the width.
The top image is with the width of the compose window set to a comfortable reading width. The bottom is at full screen.
Len Raphael says
Funny the msft tech didn't point out what should have been obvious to me also. What threw me off was that I"ve used high resolution big lcd screens for years and never had this problem till I switched from local exchange to office365. And only on same machines with specific profiles.
Shailesh says
thanks, this worked for me
len raphael says
it's wrapping but as across a wide screen so it's unreadable. Odd the right margin movable carrot doesn't seem to do anything.
Diane Poremsky says
Ok - if the problem is the big window in this screenshot, the solution is the small window - click the restore button and adjust the width to a comfortable size.
https://screencast.com/t/vnlHndfPHF4
Len Raphael says
Outlook 2013 seems to be different again from prior version re setting and applying margins. Just spent a half hour with tech support and got nowhere. Can view the ruler fine and move the right hand triangle tab. but the text still wraps across the wide screen.
Don't see any wrap settings in file options email.
Len Raphael
Diane Poremsky says
This part of it works the same as in older versions. Is it wrapping on screen but the window is so wide it's hard to read or is it not wrapping on the screen?
When you are composing, if you want it to wrap into a nice column on a wide screen monitor, you can't work at full screen and need to adjust the width of the window yourself. If you set a margin so its easier to read on your screen, it can mess it up for the recipient.
Matt says
Outlook 2010
Tx's
BTW is there anyway to set the "increase indent" to a new default setting (in either Word or Outlook, I prepare/edit a lot of SOP's), as in the 1st line indent at 2.5 and the hanging and left indent at 5.0?
Diane Poremsky says
You are limited to the options on the Indents and spacing dialog - Special: handles the first line indent. Word's settings are separate from Outlook's.
Matt says
Oh, I so want it to look that way. I followed your instructions, (actually I already had mine set at 0.00") closed the program, re-opened it and got the same sad margin slider-less display.
I had tinkered with this setting earlier, leaving it at 0.02" but sometimes with replies there is a difference in the left margins that leaves it looking a bit odd at times. Hence the desire for 0.00". BTW, if you set it at 0.01", the margin sliders initally appear, but then disapear on new emails.
Diane Poremsky says
What version of Outlook? I'll see if i can repro it here.
Matt says
Mike has the same problem I do, with 2010 the default position of the left indent markers are not visible. Even if one brings up the ruler, they still aren't visible. One trick is to click on the "increase indent" button to display the markers. But on a personal note I don't like the default settings for increase indent and have to manually adjust the indent markers. With the older version of outlook this was easier as the left indent markers (even in the default position of far left) were visible.
So I think what Mike and I are asking, is there some way when the ruler is displayed to see the left indent markers?
Diane Poremsky says
This is what the ruler is supposed to look like - if you don't have the margin sliders, with the cursor in the body field, switch to the Format Text tab and click on the Expand in Paragraph. The left indentation is negative. It should be 0 for email. Change it then click set as default and choose All docs based on template.

Full Size image: https://screencast.com/t/PxWo7VN5WnWh
Mike Barbee says
Dianne,
I guess what I'm trying to do is set indents. In Word, on the bottom edge of the ruler, there is a square button with a triangle on top of it, and in the version of Outlook I have at work, the same thing. In fact, I see that combination in your email reply. Do I not have the right version of Outlook?
Diane Poremsky says
As long as you have 2010, you should have a ruler at the top; 2013 doesn't show the ruler by default and the margins are disabled on it.
On the right above the scroll bar, are two buttons - a hand and a rectangle-ish thing. Click the rectangle.
Mike Barbee says
I'm trying to set margins in emails I'm composing, but don't see the indicator in the ruler. I have Outlook 2010, Version 14.0.7128.5000 (32-bit). I added a tab and named it PAGE SETUP, then added the PAGE SETUP button to it. I get nothing when I click that button.
Am I missing something?
Thanks, Mike
Diane Poremsky says
page setup is used when printing. You should be able to double click on the square at the right end of the ruler to open the dialog where you set the margins.
I really don't recommend using margins - it ends up being nn inches in from right, not nn inches from left, which can result in very narrow messages. You could use a table, or html stationery with the paragraph width set.
Ken D says
Don't know if this is still active but here goes. Surely the way around the previously discussed issue, when COMPOSING and email with a 24" monitor, is to use the Print Preview under the VIEW tab (Outlook 2003). The only issue is--how can one set this to the default when one opens to compose and e-mail?
Diane Poremsky says
You can't edit in Print Preview. Sorry. Rather than working at full screen, set the compose form to be 1/3 of the screen width so it is more readable.
. says
very helpful thank you, but could you give examples
Cindy Lewis says
It doesn't recognize the change to the indentation.