This form shows that it is possible to display a person's current age on the calendar. Sample Age on Birthday form
The idea (and basic instructions) for this method came from ghumdinger in his (her?) post in our Outlook Forums: Displaying value of task subject field as values from two custom fields
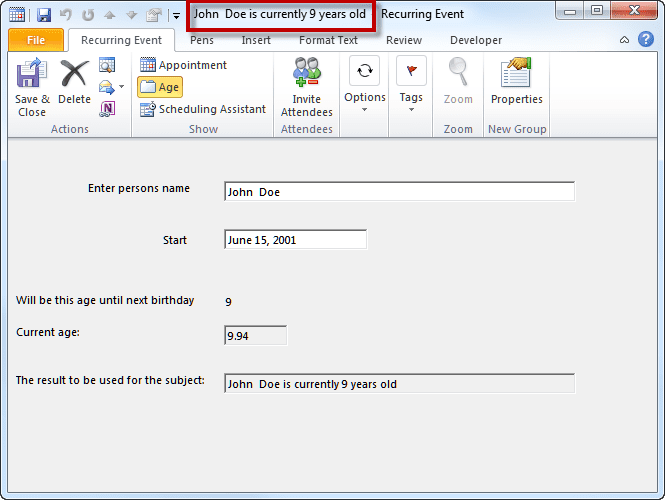
A frequent request is the ability to display a person's age on their birthday event in Outlook's calendar. The typical response is "you can't". We've already demonstrated that you can add the age to a contact form and told users this was the best we could do.
Wrong. Using the instructions posted in our forum, we created birthday events that display a persons *current* age on the calendar. Note that for this to work you need to create the birthday events yourself - when Outlook creates them it uses the standard appointment form. But hey, if you really want to see a person's age on the birthday, that is a small price to pay.
If you want to display the person's age on as of a specific birthday, ie, 20 in 2010, 21 in 2011, 22 in 2012 - this is still impossible in recurring appointments. You could create the birthday events in Excel and import them as single events. See Create Countdown Calendar in Microsoft Outlook for instructions if you want to use this method.
These are the basic instructions and assume knowledge of custom forms design. As time permits, I'll update the instructions so almost anyone can do it.
Gotchas:
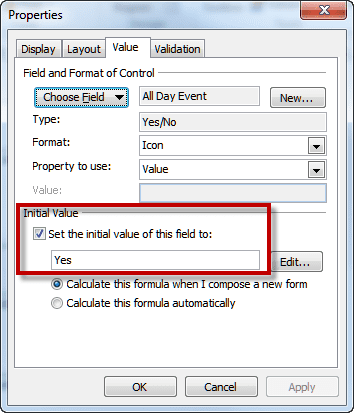
Setting the event as an all day recurring is not as simple as setting the all day flag. After entering the birth date, click in the All Day field and verify the time is set for 12 AM. If the box is already checked and the time is not set for 12 AM, double click to change the time to 12 AM. I have these fields on the Age tab to make it easier.
After the form is saved, if you need to change the birth date, you will need to change the Start date in the recurrence dialog.
Always open recurring events as a series; and if you forget, don't save changes when you close it! The subject for that event is recalculated as if the birth date is that date, resetting their age on that event to 0. Viewing future (or past) events will show the current age.
For the Subject/Age to update, you need to edit the subject field - removing the last number or clicking in the field and pressing space is enough to trigger the update. You must open the appointment series or use a list view (to use in-cell editing) - you can't edit it in the calendar view.
Designing the custom form
To design this form, you need to open an appointment form in design mode and add 5 fields to a custom form (numbered to match the numbers on the screenshot):
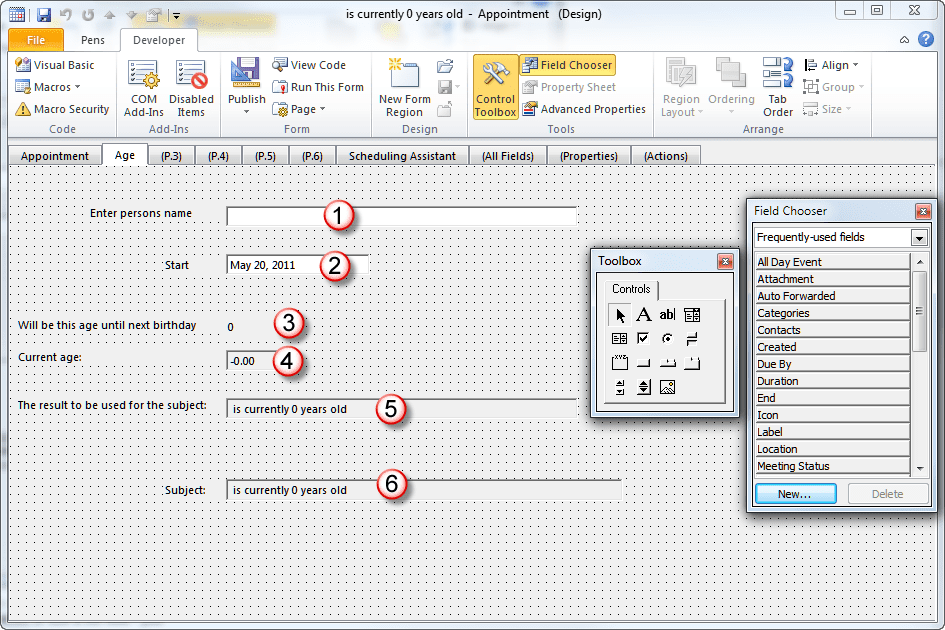
- A Textbox for the person's name
- The Start field - you'll enter the person's birth date in the finished form. You could use the Start field on the Appointment page, but since you need to enter the person's name on the a different page, it made sense to add the Start field to the same page - its the same field after all, just repeated on the form. (It would also make sense to add the All Day checkbox to this page, so you can easily enable it.)
- You need the field that calculated the Age - there are two formulas, a long formula (3) that shows the age in whole years that does not change until the person's birthday and a short formula (4) which gives the exact age (down to 10 decimal points). The short formula can be less confusing if you look ahead - its pretty obvious when the age is 22.7657897654 that they will be 23 on the next birth date, while the long formula will display the current age, not the age they will turn on the next birthday. (You could add +1 to the formula, or reduce the calculation by, say 14 days, so the age can update before the birthday, but that can also add some confusion.)
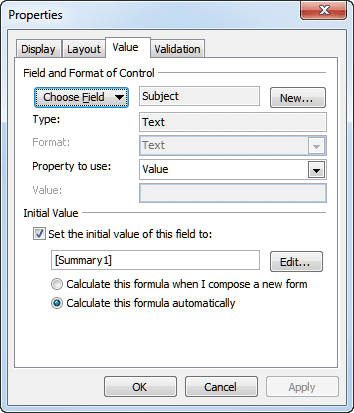
My sample form shows both of these fields. We use the short formula in the subject field in the sample. - A combination field that takes the person's name and age and makes a phrase. We're calling it the Summary field.
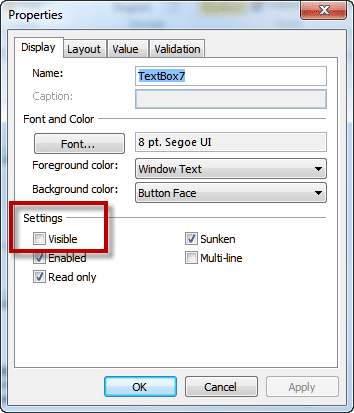
- The final field is the actual subject field. It reads the Summary field and uses it as the Subject. Why can't we just put the person's name and age fields in the Subject field? Because it only accepts Text and we needed to use a combination field. We set this field to be hidden when the form is used.
Tip: the only field that needs a text box is the name field. If you use labels for the other fields tabbing will skip them. To set the tab order so it makes sense, use the Tab order button in the Arrange chunk. (My screenshots may show text boxes, but I replaced them with labels in the final form.)
In addition to adding those fields to a new page, you need to look at the Properties tab. You should enter a version number (if you edit the form and republish it, you need to update the version number before publishing) and can select Large and Small icons to use with the form. The default form icons are in the Office directory: C:\Program Files\Microsoft Office\Office14\FORMS\[4-digit language ID]\. If you don't select icons, Outlook will use the Post icon (yellow page with a push pin).
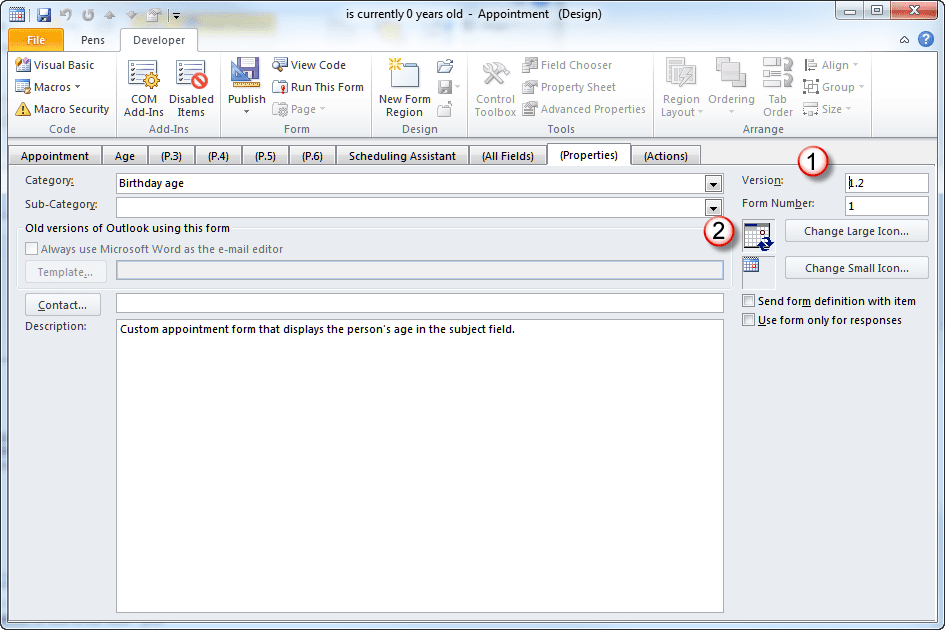
You can add a Category name, assign a Contact and enter a Description, if desired. It's not necessary - it's more important that you update the version number if you edit and republish the form.
The Custom Form Fields
Begin by opening an appointment form in design mode.
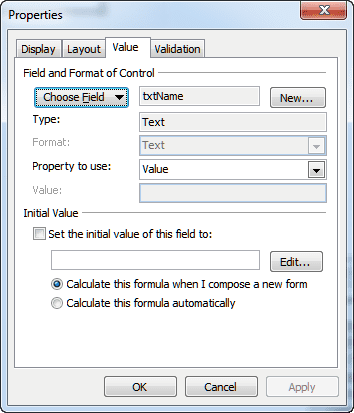
1. Person's Name field
Add a label for "enter person's name". Beside it, add a textbox for their name. On the Value tab, select New, leave text type in the two boxes.
2. Birth date field
Drag the Start field from the Field Chooser. Rename the label and format the date value so it displays only the date (not the time). Choose Calculate automatically. This is the same Start date as on the Appointments tab - it just makes it easier to fill out the form if its here.
I added the All Day Event check box and start date fields to the form so its easier to set the all day event before setting the recurrence. Drag these fields from the Field Chooser. Setting the event to All Day by default doesn't work as expected, so you'll need to check this when you create the event.
3. Calculate Age field
Next you'll add the field that calculates the current age based on the current date and the start date. Create a new label field of the Formula type. Enter the age calculation formula.
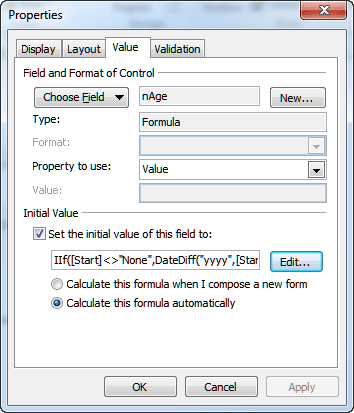
The long formula (#3) uses the exact age (in whole numbers) so the day before a birthday it shows the age from last year, updating only on the birthday. (This formula is used to calculate the age until the next birthday field in the custom form screenshot. I used the short formula in the sample template.)
IIf([Birthday]<>"None", Int(DateDiff("d", DateSerial(Year([Birthday]), Month([Birthday]), Day([Birthday])), DateSerial(Year(Now()), Month(Now()), Day(now())))/365.25),"")
The short formula rounds the age to the nearest whole year - so a week (or up to 6 months) before their birthday it shows the upcoming age. For the first 6 months following the birthday, the age will be the current age, after that it will be the upcoming age. (This might be more useful.) You can use number formatting to display the number in decimals. To get this into 2 digits for the subject, you need to use a second field to set it to 2 digits. I used this method on my form and set one of these fields to be hidden.
(Now() - [Start] ) /365
Format([roundage],'###.00')
4. Create the text to insert into the Subject
In this Combination field, we take the person's name field and their age field and put them together as the summary. This field should be set to read-only. It can also be hidden.
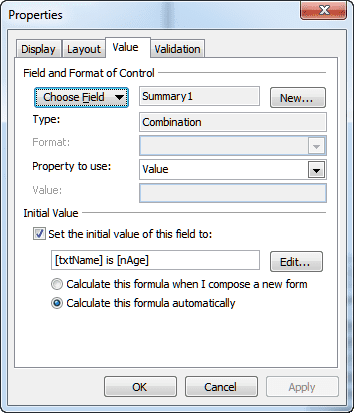
5. Create the subject field
Use the summary value field here to fill in the subject field. It's set to hidden so it doesn't display on the form. You could set any of the other fields, except the name field, to hidden, however I left them visible in the sample form.
When you are finished, publish the form.
Using the form
First you need to publish it or open it using the Choose Form dialog (Outlook 2007 and 2010). If the form is published to the Calendar folder you can access it from the Actions menu (Outlook 2007 and older) or from the New Items, Custom forms command in Outlook 2010 while viewing the calendar.
When you open the form, switch to the Age tab and enter the person's name and birth date. Click to enable it as an all day event and then set the recurrence. If the all day event box is already selected, verify the time is 12 AM, if not, double click to change it to 12 AM before setting the recurrence.
This form was tested in Outlook 2003, 2007, and 2010 but should work in newer versions of Outlook as well..
Installing and using Custom forms
Because this custom form has a custom field, it either needs to be published or opened using the Choose Form dialog in Outlook 2010 and 2007. (It will work as expected in older versions.)
Note that this form can't be applied to current appointment items, because the value for the subject field comes from other fields. If you apply it to all birthdays, the name field would be empty and you would only see their age. You would need to edit each form and enter the person's name in a custom field. If you have few birthdays in your calendar, this might be do-able, as it would not be too difficult to figure out whose birthday it is.
To apply a custom form to existing appointments, you need to change the message class. You can do this with DocMessageClass, a free utility used to change forms used on Outlook items. In order to do this for this form, first move the birthdays to a new folder, change the form, then move the birthdays back. Outlook is likely to automatically create a new birthday event for the person though.
More Information
Displaying value of task subject field as values from two custom fields
To calculate the age of a Microsoft Outlook contact
Sample Age on Birthday form download a ready to use custom form
Designing Microsoft Outlook Forms


