Previous versions of Outlook each offered an Organize pane which allowed users to quickly apply colors to messages from specific users.
This is Outlook 2007's Organize pane:
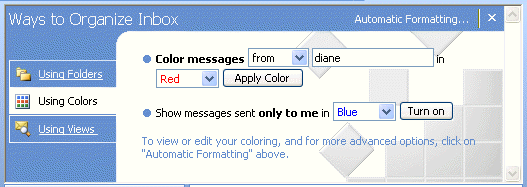
The Organize pane was removed from Outlook 2010 (and newer). Instead, users will need to create Conditional formatting rules in View Settings. While this is more work, especially for simple rules, I believe it will reduce confusion - many users had no idea that Organizer created Automatic formatting rules in the current view. When they changed views or moved items to other folders, the coloring was lost and they had no idea why. (Using the /Cleanviews switch will erase all custom views, including those created using Organize or Conditional formatting. )
Automatic formatting was renamed Conditional formatting in Outlook 2010 to better reflect what the feature does.
Create Conditional Formatting Rules in a View
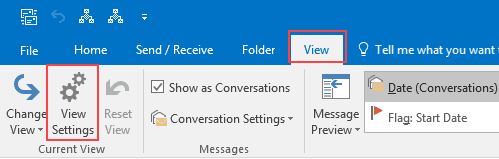
To create Conditional formatting rules, you need to open the Advanced View Settings dialog. There are several ways to get to this dialog in Outlook 2010 and above, the easiest is to switch to the View tab, then click the View Settings button.
Now click the Conditional Formatting button, then click Add to create a formatting rule.

Click Font to select a font and color then click Condition to set up the rule.

Video Tutorial
Conditional Formatting Tips
To format all messages from a domain, add the domain name to the From field on the General tab. When you use the From field on the Advanced tab, Outlook looks at the Display name field, not the email address field.
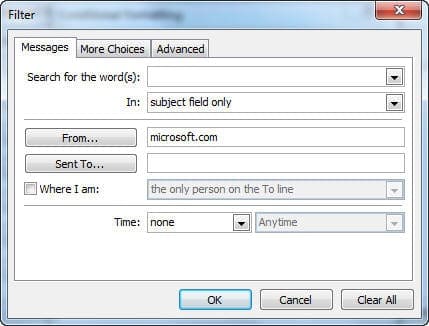
Rules are tied together using the AND operator. A single rule such as From Mary OR To Mark is not possible unless you enable the QueryBuilder.
Albert says
how do you do this for outlook 2016?
Diane Poremsky says
It done the same way as Outlook 2010 - look on the View ribbon for View Settings, then conditional formatting.
Tommy Wendel says
I'm working since years with conditional formatting in my outlook calendar.
I told it to my collegues and they all realized it in their outlook.
AND NOW my boss want us to use it all (over 500 outlook users), with the settings that all meetings in all calendars are coloured in different colours for our different buildings: Meetings in building are green, in building two are blue and in building three are red.
Is there a possibility to distribute the settings to ALL installations in our enterprise?
btw: We work with Outlook 2010 and Exchange 2010.
Jeffrey Friedman says
Very helpful solution BUT when I tried to add a new Conditioning Format the "Add" Button in Outlook 2010 was greyed out. Could this be because I had maxed out the number of colors applied when I was using the same mail box via Outlook 2007?
How can I reactivate the Add button so that I can apply color via rules in Outlook 2010?
Is there a limit in 2010 to the number of conditional formats you can have?
Diane Poremsky says
you could be at the max - do you have 27? That was the limit the last I knew. There should be an error messages that says you are at the max.
https://www.outlook-tips.net/tips/tip-877-maximum-number-of-automatic-formatting-rules/
Jeanne Peacock says
I'm trying to color code some emails and trying to follow the instructions but when I get to Conditional Formatting it’s greyed out I can’t click on it. What can I do, not sure why it’s like that.
Diane Poremsky says
Which version of Outlook and which view are you using? It should be available with any "list" or table style view, which is any view typically used for email. It's not available with some of the other formats (like icon, which is typically used for Notes, or timeline, which was used with the Journal.)
Ashraf Khundukji says
great tip and guide .. thanks
Joan Tedeschi says
WOW...what a pain just to color code an individual name. 2007 was soooo easy.
Michele Swidowski says
Will the color coding of the email name change for previous emails or just after the conditional formatting is set.
Diane Poremsky says
Conditional formatting is a view, so it applies to all messages in the folder. If you change views, the formatting is lost, if you look in other folders, the formatting is lost unless you apply the view to that folder.
Donna Gregory says
Thank you Diane! Your video was great! Task accomplished! :)
Keith says
I wanted to know who is the "organiser" of appointments taht mysteriously appear in my outlook calendar. As usual, help is useless unless you know the jargon the programmer is talking in.
All I want to be able to do today is stop people putting items in my calendar without talking to me about them.
Diane Poremsky says
That's a different organizer. :) Are they inviting you to meetings or opening your calendar and adding appointments? You can remove 'create' permissions from the people who abuse the feature.
To see the person who created the appointments, you can use custom views. Use a list view and add the Organizer field (or From field) to the view.
The basics of creating a custom view is here: Custom view tutorial. Actually, I forgot about this page: View the organizer.MIchelle says
WHy doesn't microsoft just reinstate the organizer?????????
Tia says
All I would like to do is color code the names of incoming emails, for example all the emails from my teammates are in red, the ones from my principal are in purple, etc. How do i do that ?
Diane Poremsky says
You need to create a custom view with conditional formatting. Getting the teammates will be more difficult than single addresses - it might be easier to use rules to set a category ("Teammates") then apply formatting to mail in the Teammates category.