I have two email accounts in my profile. I send and receive using Account A but only need to receive email using Account B. How do I configure this?
You have a few options available to you. You can set up the account with a fake SMTP server name and configure the Send/Receive Group to not send mail from this account. Or you can use a different, valid account for the Outgoing server, just in case you accidentally use the wrong account when you compose a message.
If the account is delivered to the data file the first account uses, the first account will be the default email account, and only replies or forwards will use the receive-only account.
How to create a send-only POP3 account
Use a Fake SMTP server
First, create the account in Outlook.
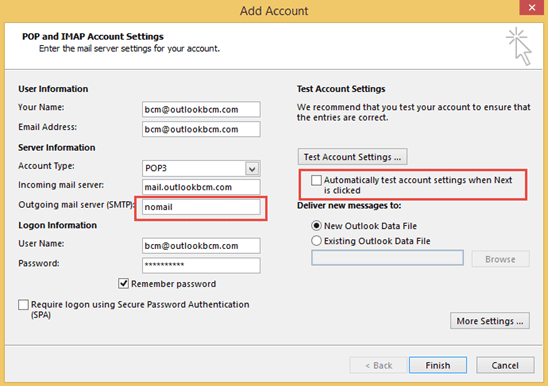
- Fill in the name and address fields with the desired information. Select POP3 account type and enter the incoming server name.
- In the Outgoing server field, type nomail.
- Enter the correct username and password for the incoming mail account.
- If you want to verify the incoming server is correctly configured, click Test Account Settings then close the dialog after the incoming server is verified.
- Deselect the option to Automatically test account settings when Next is clicked.
- Click Finish to return to Outlook.
Tip: You can use Auto Account Setup, then select the manual configure option on the lower left of the screen, shown after auto account setup completes.
Because Outlook will error on every manual send and receive when it can’t find the outgoing server error, you need to change the Send and Receive Settings for this account.
- Press Ctrl+Alt+A to open the Send/Receive Settings dialog. (If you prefer using a mouse, go to Send/Receive tab, Send/Receive Groups and select Define Send/Receive Groups.
- Click the Edit button.
- Select the receive-only account then deselect Send mail items
- Click Ok then Close to return to Outlook.

If Send Immediately is enabled (in File, Options, Advanced dialog) and you accidentally send from this account, the Send/Receive error dialog will come up. If a message is in the outbox, Outlook will attempt to send it when you click the Send and Receive button (F9), but won't try to send it during scheduled Send and Receives.
Use a different Outgoing Server
To keep Send Immediately enabled, configure the second account to use the same SMTP account as the default email account.
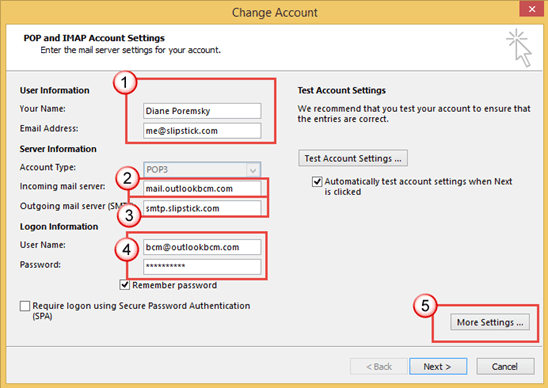
To do this, create an account in Outlook as you normally would, but use the same display name and email address as in your default email account.
- In the User Information section, enter the name and email address of the default email account. (1 in the screenshot)
- In the Incoming mail server field, enter the server name for the account whose mail you want to download. (2)
- In the Outgoing server field, enter the default email account’s SMTP address. (3)
- Under Logon Information, enter the username and password for the incoming mail server. (4)
- Click More Settings (5)
- On the Outgoing server tab in the More Settings dialog, enable My outgoing server requires authentication. Select Log on using and enter the default email account’s username and password. (6)

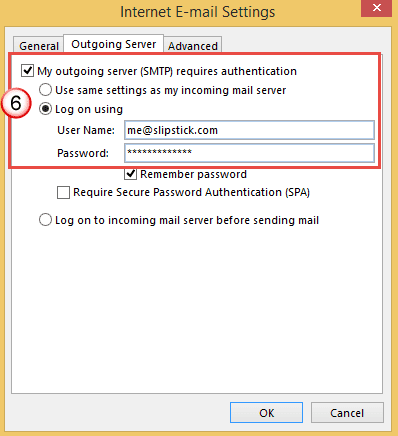
Now any messages sent using this account will be sent using the default email account.
More Information
The steps and screenshots are from Outlook 2013, and the identical to the steps in Outlook 2010. Although the screenshots are different in older Outlook versions, these methods work in all versions of Outlook.
Thank you so much - been trying to do this for ages. Really appreciate the clear, staged guidance.
Thank you for this. Exactly what I was looking for.