One of the great features in Microsoft Outlook is the ability to design custom forms.
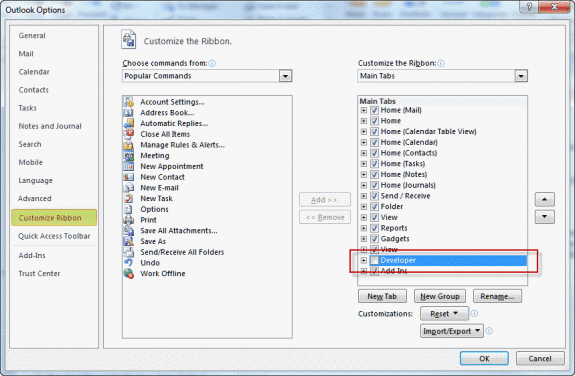
Before you can design forms in Microsoft Outlook 2010 and up, you need to enable the Developer ribbon. Go to File, Options, Customize Ribbon and add a check to Developer
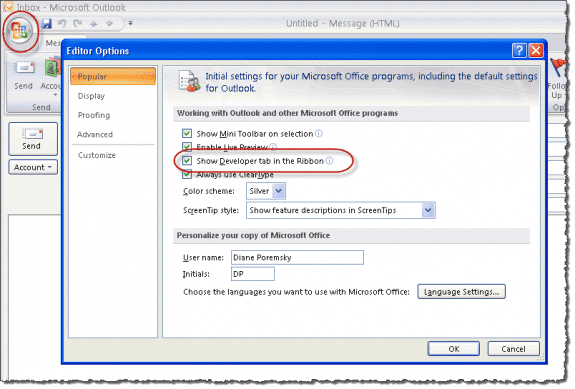
In Outlook 2007 you need to enable the Developer ribbon for Outlook items (mail, calendar, contact forms, etc) from the Office Icon, Editor options dialog. You can also open the Forms Designer as you would for all older versions: using Outlook's Tools, Forms menu.
Video Tutorial: Enable the Developer Ribbon
Open a form in the Forms Designer
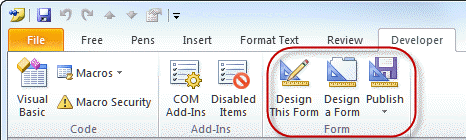
Once you have the Developer ribbon enabled, you can open a new Outlook item (of the type you want to design) then choose Developer ribbon, Design this form and the form opens in design mode. Any content already in the Outlook item will be carried over into the form.
If you prefer, you choose Design a Form and browse for the form type you want to design.
In Outlook 2007 and older, you can open forms from the Tools | Forms menu, choosing Design a Form when in the main Outlook window.
In Outlook 2003 and older, you can also use the Tools | Forms | Design this form command in an opened item.
Creating different read and compose pages
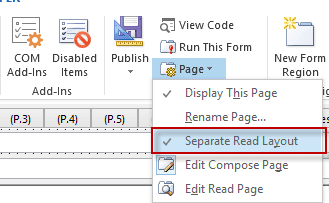
Outlook supports separate read and compose pages. Check the settings under the Page options and if you are using a separate read layout, you'll need to Edit the Read Page too.
Save as a template or publish the from?
When you are finished editing your form, Publish the form or save it in Windows file system as a template (*.oft).
If the form contains VB Script, you'll definitely need to publish it.
The screenshot below is of the Contacts form in design mode. Note that the Contact form looks like the old Outlook 2002 (and older) forms. As long as you don't edit the first page, it will retain the look of Microsoft Outlook 2003 Contact forms and up when published.

DPL says
I'm trying to create a customizable form using an excel sheet for my Outlook Calendar. When I try to create a form by copying and pasting the excel sheet, it turns into an Image and not a workable file anymore. How can I add a workable excel table as a form?
Diane Poremsky says
You need to embed. Either copy the cells, then right click in outlook and choose paste > link or use insert > object to insert an excel object.
If you are doing more customization, you need to insert excel before you go into design form. (looks like paste special > link won't work - you need to insert object. )
Sylvain says
I have created an email form in Outlook 365 with custom fields and published it to my personal library. The form will be used for our external salesmen to report a sale to inventory staff.
Something like
Customer_name
Customer_address
Customer_phone
.....
We don't have an onsite exchange server, our Office 365 is cloud supplied by a third party.
When I test send the form, the recipients only see a blank page.
From my reading, it could have something to do with publishing into organizational forms library, not sure how to go about that since we are not hosting the servers ?
I am surprised that nobody else is reporting such a problem, might be something else I am doing wrong
Any idea ?
Thanks
Robert Good says
I've created a Custom Contact Form. What is driving me nuts is it only applies to NEW CONTACTS. I've added fields already populated (spouse, children, hobby) but it will not show for existing contacts. This seems STUPID beyond belief. Is there any solution?
Jenn says
I'm sure you've moved on from this problem in the four years since it's posting (😜) but I'm thinking you could export all your contacts, delete them, and then import them all as new. The formatting should pick up correctly upon import.
Diane Poremsky says
You can't import into custom forms. You need to use a macro, or import into standard forms then change the message class (easy using PowerShell or a macro).
Tina says
Is there a way of allowing the form recipient to edit the basic text in a text box before they forward the email to the next recipient? What I'd like to do is for them to be able to highlight or strikethrough text to show that a task is complete and then forward the form to someone else to do the next task. The form is already in use and has been working fine for quite a while, but the usual Basic Text options in Outlook are greyed out.
Shauna says
Hi! I hope you can help. I have created a modified contact form which is working well. I have a field for Contract end date that I would like to have automatically create an appointment in the calendar similar to the birthday appointment. For the life of me I can't seem to find anything on doing this or see if this is even possible. Any help would be appreciated.
Chris W. says
Can you tell me if there is a dependency on the form being available in the organizational forms library for people to be able to view previously sent custom outlook forms? Basically we want to remove the ability to use the form for new items but do not want to render the existing emails with form data attached un-readable. IE keep the history of existing forms intact.
Ynez Dugan says
Hi Diane,
I have a custom form that works great the only issue /question that I have is there a way to make the form resize to the users screen size? I have 2 boxes that shrink and then is to small to enter info if they are using a laptop screen vs a monitor. Thank you in advance for your assistance.
Lynny Davis Moore says
Hello! I am designing a new contact form based on the standard contact form. However, once I change anything on the form and choose to run the form, the Business Card is missing. Put another way, when I design a new form based on a standard form, the Business Card is not on the design page. What am I missing?
Diane Poremsky says
When you design the front page, you lose the "eye candy". You can add the card back from the toolbox (right-click and choose the option for more tools) or you can add your custom fields to p2.
Charles Darwall says
Hi Diane,
I categorize all appointments received - Meeting to fix a problem, meeting for a new opportunity, meeting to meet a new person. I want a rule to attach a form template to all appointments received. I then run monthly reports with all that information
Love your instructions!
Marnie says
Hello! I created a form in Outlook Calendar to automatically appear when I open a meeting invitation. I now can't figure out how to remove it. Can you help?
Diane Poremsky says
I'm guessing it is a macro that runs when you open a meeting. Alt+F11 to open the VBA editor and look for it.
If not there, then it is a custom appointment form.
Charles Darwall says
Marne, what is the code for that form. Its exactly what I need.:)
Lisa Amante says
Hi Diane,
I've created a custom Contact form in Outlook 365. Everything's great except I can't figure out how to set the height and width of the actual form so that the scroll bars aren't necessary.
I've look at the advanced properties and tried making changes there but it didn't work.
Can you help?
Diane Poremsky says
I don't think you can set the overall size. Create the form using a small size so you can see if there will be scroll bar.
fabio says
Hi
I have extended the Outlook-appointment form with a new site. In this site I have inserted user-defined fields (checkboxes and textboxes). When I send the appointment the fields are correctly valued and the recipients see the value of the fields correctly. However, when I change the values of the fields and send the appointment again the recipients do not see the update and the value of the fields remains the value of the original appointment. Can you help me?
Diane Poremsky says
When you send a new copy of the form, the old values remain? Did you create it with default values in the fields? If so, the defaults may be sent.
John Mc Lean says
Hi Diane,
I am trying to create a calendar with an appointment function where users can input a status from a combobox, however I keep getting the same error message when I click Save & Close: "You cannot change this field item. the property does not exist. the field you want to modify is not valid for this type of item."
Any idea why??
Diane Poremsky says
what field are you trying to modify? Can you share the form?
Keri says
VERY HELPFUL resource/site and your training/tips are easily understandable. Question: I am using 2016 Outlook and have created a form with customized fields, published to Organizational Form Library, and emailed form. Users can open form, displays correctly and can email. Issue: the emailed form displays entirely different when receive. Note attachment.
Diane Poremsky says
When the form was created, it had content in the body. That is carried over to the new form. Always start with a new blank form.
James says
Diane, have you ever seen and is there a way to have program outlook forms to automatically count/track the time that they remain open and cumulatively sum this number in a custom field?
Diane Poremsky says
This is difficult to do because Outlook doesn't have a time function. The journal form as a timer but i have not tired using it on other forms - that would be my first step though. (Sorry I missed this earlier.)
C Dyson says
I am very familiar with using VBA in Word and creating user forms that once filled in I populate a Word document with info from the user form and even conditional text based on selections made on the user form. My question is, can I do that same process in Outlook? So present a user form, prefill the subject line, have some drop downs and/or radio buttons, validate like I would in Word with VBA then once a command button is clicked it would create an email with content based on the user form selections? That all seems very possible to me except for how to present the user form. Thanks so much for any direction you can provide.
Steve says
Hello - thanks so much for your help! I have a custom form that we will be using to route recruiting requests for approval. My organization does not allow use of public folders in exchange so I am deploying it as an .oft and it works great. However, when 'replying' to the message the form contents are not included in the reply. When 'Forwarding' the message, the form contents are included just fine. Is there a way to have the custom form and form contents be included with 'Replies'? I am using Office 2016.
Pete says
I have a developer form that i send to all staff in order for them to add certain events to their calendar. After making changes to the key after the sept update, it now allows me to generate & send that form. My problem is that it only seems to add the events for some individuals not everyone. I.T. can't seem to figure out the issue. any suggestions? Thank you.
Diane Poremsky says
Do they get any error messages? Was the key set on all computers?
This is a long shot based on your description of usage, but you can try it. In Trust Center, Email security, is scripts in shared and public folders enabled? if not, enable the options and test.
Pete says
Thank you.
So I enabled the 2 options & tested & it still didn't work.
I'm not getting any error messages, but I'm not getting the Operation Complete notification either.
I.T. said the key didn't have to be set on all computers because I'm the only one generating & sending the form. if that has to be done, then we're looking at 80+ computers that would have to be updated.
Diane Poremsky says
They are right.... If the form doesn't have an macros that run for the recipient (typically only works if the form is published to the organization library and would only work internally with your coworkers). If they receive it as a normal Ipm.note form, only you need the key set. The way I read your earlier query was that they needed to do something in it - which means they'd need the key set. (Will re-read it again.)
Erkan says
Pls i have no idea change default task form by using form design. If no option to add something default task form main page , please tell me how I can add calender option to new combo box at p2
Diane Poremsky says
You will need to add it to the P.2... if you want a calendar control, you need to add it from the toolbox - right click on the tool box dialog for the option to add more controls to the toolbox.
To set the for as the default, set it on the properties page of the folder. https://www.slipstick.com/developer/how-to-apply-a-new-default-form-to-an-outlook-folder/
Patricia says
I'm having an issue with my custom template. When I publish it, it's hidden and then I can't locate it to use the template. Am I publishing it incorrectly? Thanks!
Diane Poremsky says
it's hard to say, but it's also hard to do it wrong, so i don't think so. Do you select a location to publish it? What folder was open in Outlook when you published it? If you publish it in 'Outlook folder', which is usually the default when you click Publish, its in the current folder and should be on the New items > Custom forms menu when you are in that folder. if elsewhere, you need New items > More Items > Choose forms and will probably need to browse the different locations for it.
Jia Robinson says
Hi Ms. Diane,
Your forum has provided me so much information that it has allowed me to create an Outlook form myself. I am running into an issue and would like assistance. I created a message template to collect some information. I created the read page as well. I published the form and I am able to test it by sending an email to myself; however, when I send a message using the form to someone else, they are unable to see the information...really nothing and I don't understand why. In addition, I would like to know if there is a way where I can send the file of this form to someone else so they can use it to collect the same information. And one more question, is there a way that I can use the form to collect this information, send it to someone else but the information is delivered as simple text not the actual form? Any assistance you can provide would be very much appreciated. Thank you.
Jia
Diane Poremsky says
>> however, when I send a message using the form to someone else,
If you are sending it to internet addresses (rather than co-workers on the same Exchange server), you need to include the form definition. They need to be using Outlook and the TNEF data needs to be intact (some antivirus scanners remove it). It's actually better to use a link to a webform (like survey monkey etc) - its a better experience and works with all clients.
>> In addition, I would like to know if there is a way where I can send the file of this form to someone else so they can use it to collect the same information.
Save it as an oft or as fdm (from the manage forms dialog) and send that to the others.
>> And one more question, is there a way that I can use the form to collect this information, send it to someone else but the information is delivered as simple text not the actual form?
The results in plain text format? That is possible.
Andy says
Ms. Diane,
I am building a custom task form and am having trouble moving the objects around with my keyboard arrows. What am I doing wrong?
Thanks!
Diane Poremsky says
I drag with the mouse :) You need to see the 'handles' then should be able to use the ctrl + arrow keys to move... or it's broken (i just tried it - arrow behaves like tab, ctrl+arrow does nothing).
Andy says
That was my experience too. Thank you.
Pallavi Soman says
I have a custom form developed which works fine in Developer option. Bu after i publish the form people ate able to see the form and open it, but the script behind it does not execute, I have tried all email , trust center security settings but in vain
gone through many forums for slipstick & outlookcode. We had this form working fine till now, but the moment we published some fixes newly , it has stopped executing
Diane Poremsky says
It's the June 13 2017 update. The security update from last week affected it (it was supposed to block scripts in templates, not published forms). I don't have an ETA on a fix - so for now, the fix is to uninstall it.
Which version are you using? https://www.slipstick.com/outlook/updates/outlooks-june-13-2017-security-update/
mahi says
Hi, My form runs when I am in developer run form but not when I am creating a new from by selecting it from ribbon.
Diane Poremsky says
This is when you click the New [item] button? Did you set it as the default form for the folder?
Birdy says
Hi, i would like to ask why my editor script is not working when running outlook form?
Diane Poremsky says
What exactly happens? Where is the form published - if in shared or public folders, do you have scripts enabled in File, options, Trust Center, email security?
John Ley says
When creating custom fields using the "Button" type... what's the difference
between "on/off", "yes/no", and "true/false". I've experimented a little bit but
they all appear the same. What's the difference? Thanks!
Diane Poremsky says
they are the same, just different text - the underlying response is always a 0 or 1. This is so thee response is logical to the situation. (Answering "On" to 'do you want to send this?' is confusing.)
John Ley says
I have some custom fields I've added to a custom contact form in
Outlook that I no longer need. I've found information on deleting
the field from each form but I want to delete it from the entire system.
In the Field Chooser the "delete" button is grayed out. How can I delete
them?
Diane Poremsky says
Delete the fields from the form then you should be able to delete them from the folder.
John Ley says
I've created a new Contact form. I have added several new fields to
the Outlook Contact Form. I bought ContactGenie QuickPort to be able
to export and import the data. Sometimes to manipulate it and others
times to share with someone else.
I have been receiving the error now with 14 of my fields. I found the
definition today that the table is too big.
I'm assuming I've put to many fields in there for Outlook to handle.
Is this correct? Is there a way to work around this?
Thank you!
Diane Poremsky says
How many fields do you have? You shouldn't hit that error until you have a lot of fields - using invalid property types can also cause it.
James says
Hello Diane,
I am trying to create an outlook template that will populate things such as To:CC, and other selectable subject information based on an initial selection from a dropdown. Is this possible?
Diane Poremsky says
it is possible - you'll need to use code behind the form to make it work. I don't think i have any samples that do that but will check.
James says
thank you. I have searched and searched but cannot come up with anything.
Diane Poremsky says
I don't have any samples here either - you'll need to design it yourself.
Lisa A. says
Hi Diane, I am using Outlook 2010 for a busy medical practice. Specifically I am using the scheduling Calendars for internal medicine and our surgeons. Many people have access to these calendars and they have various technical skills and abilities. We have tried using the "Recurring/ Series" appointment feature but keep running into problems when someone accidentally edits the series instead of the occurrence. When the series gets edited we lose patient data and appointment info for huge swaths of time. It is unacceptable.
What I need is something like Cascading style sheets for appointments, or something like InDESIGN's Master Pages. I am looking for functionality that allows me to basically create a Master template that is linked to it's subordinate appointments so that when I make changes to the master they cascade down. I still want other Client Service Reps to make individual appointment edits but not accidentally edit over multiple appointments. Do you know if there is a way to use Outlooks appointment templates in this capacity?
Diane Poremsky says
I'm not aware of any thing that will do that in outlook - it would require a lot of coding to make it work.
darren says
Hi Diane - I have a question regarding multiple survey questions and/or quizzes. I would like to email a quiz to my employees to see the effectiveness of training and then review it. I would suspect that a quiz would be very similar to a multi-question survey. Is this possible in Outlook 2010, and if so, how do I go about setting it up?
Diane Poremsky says
Within an Exchange system, you might be able to make it work using published custom form, but it would only work in Outlook windows desktop. It's much better (and easier, with fewer issues) to use a web survey form - easier for you and the end users. If you only have one question, voting might work, again only within outlook on windows and only within your exchange org (it requires TNEF data, which is often removed on messages to the internet).
Diane Luter says
Hi Diane,
Hoping you can help. I have a custom form (a survey) that is attached to the reply of a message. So when this message is sent and the user hits the reply button they see the survey, fill it out and click on Send and the form goes back to the original sender. This works in Outlook 2010, 2013 but when using Outlook 2016 and clicking on the Send button on the form Outlook stops responding and shuts down. Any ideas why this is happening? (both the message and form are in the organizational library)
Thanks!
Diane Poremsky says
What build of outlook 2016 are you using? There were some issues with public forms - AFAIK, all were fixed in updates. If your company using the MSI version, it's still back on an older build and it's possible the updates haven't made it out yet, or have not been released by your company yet.
If you are using code in the form, check the security settings in the trust center - macro and email security pages specifically - are the settings the same in 2013 and 2016?
Cedric Habis says
Hi Diane.
Would you happen to know why when I use a custom form to publish or reply to an inbox email, it does not automatically fill the Conversation (Object, To ...) field of the inbox email in the Custom Form?
Diane Poremsky says
unless it's set as the default item for replies, it's a new item, not a real reply, and you'd need to use vbscript to grab the fields to copy over. it might be better to use a reply macro instead, but you might lose some features in the form.
Renee says
We have an in-house cafeteria where employees order their lunches by phone. The calls interrupt kitchen staff who are busy cooking and packing lunches. I created a form using Outlook 2016 so employees can simply fill out the form and email it to the kitchen. Basically it contains labels and text fields. I published the form to a Public folder. Everything looks and works perfect except when I receive the emailed form. The text fields are all blank, even though I put my data in there. Where is the data going and why are the fields blank when I receive the message? I would greatly appreciate your help because this method will save us so much time.
Diane Poremsky says
did you create a separate read page for the form? if not, you'll need to use vbscript to move the content to the message body.
nadeem says
can you send me your form template at nadeemnote.ii@gmail.com. i am in process to make one based on same concept for my vendors.
thx
Diane Poremsky says
If you want to share it, you can send it to me and I'll post it.
Brian says
Hello Diane, always appreciate your deep knowledge.
Two questions:
1. In BCM for user definable fields, there was a "drop-down list" data type. I don't seen this in Outlook 2016. Is it eliminated or done another way?
2. In BCM, there was a "Customize Form" button in the Options category in the ribbon. Also don't see in in Outlook 2016. Is it eliminated or done another way?
Thanks
Diane Poremsky says
BCM doesn't work in Outlook 2016. You can customize the default outlook forms but that has nothing to do with BCM.
Brian says
Hello Diane, thank you.
Yes, so using just the developer capabilities in Outlook 2016 there is a drop down box, but values are entered in a long text string while in the developer mode. By contrast, in BCM the combo/drop-down box could add values in a column and the user was presented with the option to add a new value. Is that style combo/drop-down box available in Outlook 2016? Or, could that design element be added from some Microsoft library somewhere?
Diane Poremsky says
There is a dropdown box control on the forms designer - you can create a custom form and use it.
Don Crumrine says
I have been using a Real Estate specific contact form using Outlook 2010 on Win7 from a company that is now out of business plus I have updated to a new laptop (Win10, Outlook 2016) and my contact form doesn't work. Can you help me with this?
Diane Poremsky says
What happens when you try to use it? Do you get any error messages? Do you know if it uses a macro or script to do something? If you you need to change macro security settings in option, trust center.
Don Crumrine says
I get a Microsoft Forms error saying Could not load an object because it is not available on this machine.
Diane Poremsky says
I'm way behind in answering messages (and we solved this already) but for the benefit of others, that error error means the custom form object that was added to the form is not installed. Installing the software will fix the problem.
Robert Sernowski says
Hi Diane
I have created a simple Vacation request for Outlook 2013. Couple things I would like to do. '
Have the Manager clcik on the approve button , this sends an email back to user and HR. Also is it possible that when the vacation request is approved the receipt gets back a calendar entry
thanks
Diane Poremsky says
You can do that, but i don't have any samples that do it. You'll need to use vbscript to create the reply and calendar entry after it is approved.
Preyash says
hi Robert can you please send me you form template as I am also looking to create one. please send me on preyashparekh@yahoo.com
BruceL says
Hi,
Great info!
I've created a very simple email form with 4 yes/no buttons, a comment box and the regular message box. I can publish the form and send it but when i receive the email, none of the custom fields (the yes/no and comment box) are visible.
I realize this may not be enough to go on, but if you have any thoughts, they'd be greatly appreciated.
Thanks
Diane Poremsky says
Did you create a read page for the form?
Jarrad says
Hi Diane,
I'm thinking about using a custom form to track and action follow up queries for Customers.
Is it possible to build a form which has a 'section' which allows an outbound email, and another which only does inbound emails?
I do not have a development background, I am in the early exploration stage for a new business venture and hesitant to shell out $ on a CRM if one can be built with some professional help? I just dont know if what I'm trying to do is even possible.
Thank you
Jarrad
Diane Poremsky says
it would be possible, but it would also be complicated and require vbscript. The cost of developing this (even if it was just your time) would depend on how complicated you wanted it. Most CRMs are expensive because they took a lot of time to create.
Lynn says
I have created a custom form in Outlook 2016 and published it to the Organizational Forms Library. I have assigned it to the Standard category in the hopes that when users click the drop down arrow on New Items, they will see the custom form listed along with Appointment, Meeting, Contact, Task, etc. It is not shown there but we can get to it by clicking on More Items and Other Forms. I am afraid this is such an "unobvious" path, most users will not remember this path since the form is accessed infrequently. I did try adding to the Ribbon but as far as I can tell that only adds the Custom Forms link, not the individual form in question. Thanks for any help.
Diane Poremsky says
Once they select the form, it should show in the dropdown under more items, at the top of the list. (Still one step too many though.) A faster way is to publish it to the folder then they will show on Custom forms flyout (visible under the default forms when it has forms to show), but that is mostly unworkable for more than one person (because it needs published to the folder in each persons mailbox)
You'd need to use a macro to open the form from a buttom on the ribbon - there is a sample at https://www.slipstick.com/outlook/hyperlink-templates/ (about halfway down).
Bernard Ilagan says
Hi Diane,
Using excel vba How to open outlook custom form and create button from excel to auto populate data from excel to textboxes on custom form please help
Diane Poremsky says
Sorry I missed this before. You'll need to use vba obviously... This macro shows how to pass values in an excel worksheet to outlook. https://www.slipstick.com/developer/create-appointments-spreadsheet-data/
This page has a macro to open custom forms near the end of the article - https://www.slipstick.com/outlook/hyperlink-templates/ You'll use something like this to set the form.
Corinne says
Hi Diane,
I hope you can help me here.
I created a form and added VBA code in it to populate certain fields. The code is working and when an employee ID is entered and validated in fills in all other fields with the rest of their information. The fields are also greyed out so nothing can be edited.
When sending the form, the only field that is filled out is the employee ID that was manually entered. None of the other populated information is displayed.
Can you help?
Diane Poremsky says
You need to use write the values to a field - i use a second field then display that value in the field on the form.
Gabrielle the Newbie says
Hello Diane, I have 2 problems with MS-Outlook 2010. I created an email form to insert in my personnal library (waiting the final product to insert in my organization library) 1. When I sent the email for practicing, the receiver got a white page with nothing on it, what a deception I had. 2. Also, my form does not support an attachment to join (the paper clip icon is greyout) I read something about "message body" but I don't understand clearly the meaning, or how to do. When I created the form, I deleted the white body and worked in a grey page where I could add the boxes. I saw a response below where you talked about "form definition" in the properties tab. Euh... which word mean form definition in the properties tab ? (I see BackColor, BorderColor, etc...) Thank you Diane, to read and help !
Diane Poremsky says
Did you customize the read page too? If the form is not available to the recipient (and it won't be if not in the org forms library), they will not see any of your customizations. You'd need to send the form definition - its on the properties tab of the editor.
To add attachments, you need to add the attachment object.
Wael Kassab says
I have designed a form and i need the fields inside of it such as Name and last name to enable autocomplete so that when i type first letters it show me a list to save time rather than re typing words i have inputted before . Is this possible?
Diane Poremsky says
Outlook's auto complete won't work. You could load the names into the controls and choose from a list, but this may not be workable if the list is long.
Efthimios says
Hi Diane!
I have several contact forms (as upgrades were necessary) and I need to clean everything up by creating a new one. Is it possible to delete all custom fields created for the forms and how?
Diane Poremsky says
sorry I missed this earlier. Yes, you can delete them - in File, options, Advanced, Custom forms, Manage Forms. Select & delete the forms.
Efthimios says
Hi Diane!
Is it possible to add a fully working spreasheet inside the Notes area of a contact form?
Diane Poremsky says
You can insert the file as an attachment, as an object (Insert tab > object), or paste cells as a linked object - update the linked sheet by right clicking on it and choosing update link (one way - worksheet to contact)
Nitin says
Hi Diane,
I have a outlook form that I have published to my Calendar. I sent meeting invite to a recipient through it.
The Form has some pre-population done for few elements which I am able to view in my m/c while sending and post sending the invite.
But when the recipient open the invite and the form , he is unable to see those element values
Could you please help?
Do we need to publish the form across Org library to have the value available to be read for everyone concerned?
Diane Poremsky says
Yes, it needs to be published in the org library for people within your organization to see the elements. If you are sending it to internet addresses, you need to send the form definition with it - however it's sent with a TNEF wrapper and it's something lost or corrupted.
Jeff says
I have a custom form in Outlook 2010. One of the fields is called "Created" and automatically populates the current Date and Time when you Save and Close the form. This is a read-only field. Is there a way to manually enter a different time-stamp to that field after it has been saved? Does it take special permissions?
Thank you.
Diane Poremsky says
I'm not aware of any way to change it using VBA - it *might* be possible to change it using redemption. (I haven't looked into it, but redemption hooks into Extended MAPI and can write to some read-only fields.)
Simon says
Hi Diane, having read all your information about modifying the default Outlook contact card, i am still stumped with the issue i am having. I added radio buttons and check boxes (as well as a re-arrange of the standard fields), but, when i populate my new published form, the data entered is not displayed when i open the form after doing a 'save and close'. Do i need to include code to save this data somewhere? I am a bit stumped.... Any help would be gratefully received.
Diane Poremsky says
if the values were saved to a field, they should repopulate... but if not, you can use code behind the form to do it. I'm using this in a form because the textbox color won't save. When i open the form, the box is checked.
Sub Item_Open()
If Item.FullName <> "" Then
Set ColorCheck = FormPage.Controls("CheckBox1")
If ColorCheck = True Then
Set TextBox1 = MultiPage1.Pages(0).Controls("TextBox1")
TextBox1.BackColor = RGB(255, 255, 178)
End If
Item.save
End Sub
Ari Chandler says
In Outlook 2013, is it possible to design a form with a drop down selection box that will trigger other form elements to be enabled depending upon what is selected?
Diane Poremsky says
Ys, you ned to use vbscript behind it to do it though.
jerrod says
I am trying to setup a form for meeting requests that defaults with responses off. I can get it to work on the main users calendar, but cannot get it to work on a delegates calendar (the main user has full rights to the calendar). When setting up a new meeting for the delegate, the button shows my custom form name, but it does not apply the VBA script that works just fine when adding meetings to the main users calendar. any ideas?
Diane Poremsky says
Do you have scripts enabled on shared folders? Look in file, options, trust center. I think it's under Email security section.
Mary says
I am using outlook 7 and i have created a custom form. I noticed that when i make new contacts they show up with an icon for "Post (IPM.Post) form" instead of the contact icon. The massage class is not IPM.Contact.Sales outlook 754 instead of IPM.Contact. Does this matter. Will this inconsistancy affect anything?
Diane Poremsky says
That is normal for custom forms and won't affect anything. if you want to use a contact icon, go to the properties tab while in forms designer and change it. The default icons are in the FORMS folder in the Office folder path. In Outlook 2016 32-bit Click to run, it's at C:\Program Files (x86)\Microsoft Office\root\Office16\FORMS\CONTACTS.ICO
Kim says
I am trying to make it so that whenever someone adds a new meeting to a shared calendar, they have to include certain information within the body of the appointment. So, if someone were to add a new event, and click on new appointment, they would see the regular appointment window, but in the body of it (where you can type notes), there would be a list of things that would need information that they could then type in, a sort of prompt for information about the event:
Contact:
Audience:
Things like that. Is this possible?
Diane Poremsky says
You'd definitely need to use a custom form or a macro.
Deepesh says
Hi i have a small query. I am using a billing software which sends out emails using outlook with the attachment i require directly from the software without having to open the new mail tab etc.
I want the email to go with a default text along with the email for example now the Email text says Purchase Order Attached as the default text. Where as i want some default text to go along with the mail.
Any help would be really appreciated.
Diane Poremsky says
Can you set a specific template to use in the billing software? (Or configure the billing software to add the text.) If not, it's probably not possible as most automation like this connects to outlook in such a way as to bypass macros.
Scott says
Sorry if duplicate - but I refreshed this today looking for an update and my post yesterday was gone - re-posting.
Here's my scenario. I have 5 conference lines I share across my small business. Those 5 conference lines are setup as resources (or they can be rooms) in outlook. When a user schedules one of those conference lines (resource or room), I want a specific template applied to the meeting invite. The template will include the conference information (which is different for all 5 of the conference lines). I know how to design forms and I can apply the designed form to my personal calendar. But, how do I assign a custom form to the 5 conference lines (resources or rooms) ?
Diane Poremsky says
I keep comments in moderation queue until I have time to reply because its easier to find them. Unfortunately, I was swamped with work yesterday and didn't get many posts answered.
There are two ways - user selects the correct template for the room before creating the meeting or the form is published to the room calendar folder and you create the meeting by select the calendar in Outlook and hit New meeting. Direct booking isn't recommended though, so opening the correct template would be prefered.
Scott says
Thank you - Do I need to create the 5 specific templates and put them in a specific folder for outlook so that anyone within my company can access those templates? Or - do I send the templates to them to have on their local laptops?
Diane Poremsky says
If everyone is sharing a mailbox, you can put the templates in a folder in outlook (create a folder called Templates in the mailbox) and anyone using the mailbox can access them. Or send them to the people who need them and they can put them in a folder in outlook or in the templates folder on their hard drive. (If the form has certain controls, they need to be loaded from the templates fodler on the hard drive.)
Scott says
The only problem with selecting the correct template is the user doesn't know the room is available yet. In other words, they have to start a meeting and select the room (which is a conference room) to determine if the room is available. At this point, there is no way to assign/select the correct template as the meeting invite has already started. Correct?
Diane Poremsky says
Shoulda read this before answering the other question....
Correct, there is no way to assign the template/form after the room is selected. If the form just adds notes to the body (like boilerplate text) it might be possible using a macro but the organizer would need to run the macro.
Scott says
Here's an option - just not sure how to do it...
I can create 5 specific signatures and once the user confirms the date is available, they select a signature specific to that conference room/number.
they question I have - can I somehow "send" 5 standard signatures to EVERYONE to apply to their local system so they are selectable OR is there some shared folder for outlook they can choose from??
Khalid says
I would like to make a request form. Working as a HelpDesk Analyst and we have to share a lot of forms including access and approvals. What will be your suggestion weather we can use outlook templates is a good idea?
Diane Poremsky says
Templates or published forms should work fine for this, depending on what information you need to capture. If you are using Exchange server, i recommend publishing the form to the organizational forms library - it makes it easier for anyone to use them.
eleanor says
I have created a form and published it to the personal forms library. The sender, [myself as a check}, does not see the form. I followed comments and this problem and turned on " send form definition with item". I have also turned on send scripts in the trust center properties. Alas I have yet to enjoy success.
Diane Poremsky says
I'm guessing the TNEF blob is being removed because outlook is not sending RTF formatted messages to internet addresses. Set your address to always use RTF.
https://www.slipstick.com/problems/outlook-is-sending-winmail-dat-attachments/ - that tells how to avoid them, you want to do the opposite. :)
Dave S says
I have a custom form that was built in Outlook 2007. The form works in part in Outlook 2013 and 2016 but there are parts of it that do not work. In Outlook 2016, if I attempt to design the form, it will not load however I can still open and modify the form using an Outlook 2007 client.
What is the best method of troubleshooting the current form, making it compatible with 2016?
Thanks,
Diane Poremsky says
What parts work? Any error messages? What type of customizations are you using?
Lisa Granata says
Hi Diane, I designed an Outlook Contact form, including a control box for a person's picture. The Contact folder is an address book.
1. How do I add each contact's person's picture to show on their contact?
2. How do I make this form the default whenever I click to create a new contact?
Thank you so much!
Diane Poremsky says
1. You need to add the photo or use a macro, if the photos are in a specific folder and named to match the person's name or email address.
2. Right click on the contacts folder, choose properties. Select the default folder on the general tab.
Adrienne Counter says
Hello
I have created a form in outlook for my company and it had been published in the org folder. When I receive the form it is blank even though the user has filled it out. Do you know why that would happen?
Diane Poremsky says
It's possible the TNEF data is lost. Are you using a separate read page? Is the message coming from an internal user?
Carol Chisholm says
How does this work in Office 16?
Diane Poremsky says
It works the same in Outlook 2016 as it does in older versions - show the developer ribbon in File, options, customize ribbon. The open a form and click design this form.
Newbie says
The receiver (using outlook) can't see the customized form I made.
What should I set/check in order for them to view/see it?
Diane Poremsky says
You need to send the form definition if you both aren't using Exchange and have the form published in the org library. It's on the properties tab in the form designer.
Mike O says
Looking to create a form for managing recurring power outage notifications with a distribution list and calendar entry. I have a Word doc created that basically functions as my form today. Can a word doc be converted to a form in Outlook?
Melissa says
I am looking to create a macro in outlook with the simple command of finding < and deleting it. need help with this. able to do it in word but keep getting runtime error in outlook.
Diane Poremsky says
Outlook supports replace function, so you just need to assign the message to an object and call replace. The second macro at https://www.slipstick.com/developer/code-samples/working-items-folder-selected-items/ will work with one or more selected messages. Where it says 'do whatever, you'll add the replace code
.body = replace(.body, "<","")
stephan says
I made a custom form in outlook 2007 with some checkboxes and textboxes which need to be filled in. When I use this form interally our organisation the receiver sees the form with all boxes as well. But when I send this form to an external email adress (outside company) only the message field (body) is shown and all checkboxes etc are missing.
(Other side uses outlook 2007 as well)
what to do?
Diane Poremsky says
Custom forms work best internally, especially when you can publish it in the org forms library. Otherwise, you need to send the forms definition with the form and there is a risk it will be deleted since it uses TNEF and many Exchange servers delete TNEF data to the internet.
Lucia says
Do I have to enable a property to allow the form user to attach a document before sending?
Diane Poremsky says
You need to have the attachment field on the form.
Adam Bellinger says
Hi Diane
i have created a custom form but when searching for items within the form, outlook can not find them, it only finds data that has been put in the subject field,
thankyou
Diane Poremsky says
Are the fields in the view? That usually makes them searchable.
Bill says
I can't get this code to run after using the voting buttons. I have created a new message and added this code to test but it never runs the Item_CustomAction at all.
Any ideas?
Function Item_CustomAction(ByVal Action, ByVal NewItem)
msgbox "Custom Action Started"
Select Case Action.name
Case "Approve"
msgbox "It was approved"
Case "Disapproved"
msgbox "Nope"
End Select
End Function
Diane Poremsky says
I don't have any ideas, but maybe someone else will.
Brian says
Hi Diane,
Do you know how to display the "Last Modified By" data for contacts on a custom form? It's a visible field on the default contact form, but it's not displayed once I start creating a custom form.
It's easy to get the "Last Modified Time" but I haven't been able to find a way to display the user's name. I've read through all of the field names and searched online without success.
Thanks in advance,
Brian
Brian says
Based on advice you've given others, I figured out how to access the Last Modifier Name using OutlookSpy, but I still haven't solved my problem completely.
I can create a message box for any contact I have open, but there are 2 problems with that: it requires user interaction and displays the data outside of the form. I simply want the name to appear on the custom form. Do I need to place my code somewhere else in the VBA project? How do I actually call LastModifiedByName to be displayed on the form?
Here is the code I'm using:
Sub GetLastModifiedBy()
Dim PropName As String
Dim LastModifiedByName As String
Dim oItem As Object
Dim oPA As Outlook.PropertyAccessor
'Get current item
Set oItem = Application.ActiveExplorer.Selection.Item(1)
'pr_last_modifier_name_w
PropName = "https://schemas.microsoft.com/mapi/proptag/0x3FFA001F"
'Obtain an instance of PropertyAccessor class
Set oPA = oItem.PropertyAccessor
'Call GetProperty
LastModifiedByName = oPA.GetProperty(PropName)
MsgBox "Last Modified by: " & LastModifiedByName
End Sub
Diane Poremsky says
It's the changed by field and i don't see it in any of the lists of fields. If you want it in a view, you can use a CFG to expose it. Instructions are at https://www.slipstick.com/exchange/adding-extended-mapi-fields-to-outlook/
CFG is here: Changed By CFG
If you want it as a field on the form, I'll get the instructions. I'm not sure if we can grab it directly or will need to use VB Script (or VBA).
Diane Poremsky says
BTW, once you add the cfg form to the folder, you can use the field in custom forms.
Diane Poremsky says
Try the From or Organizer field from the All Mail or All Appointments field list.
(Never mind - just checked and it is the creators name)
Brian says
Amazing! Thank you for your help. I have one final issue remaining...
Here's what worked:
I'll detail what I did just in case anyone else needs the instructions in the future. I saved and installed your ChangedBy CFG file in Outlook. That allowed me to expose that field in the contact list view using the Field Chooser > Forms. Then I opened my custom form and added a new TextBox. In the Properties Sheet, I selected Choose Field > Forms > Created By [Add->]. I closed that and found my new Changed By field in two places, All Mail Fields and a new folder name Changed By.
Here's where I'm stuck:
I figured I'd go ahead and make a CreatedBy CFG file based on the instructions you provided. I changed all references to Changed to Created, and I changed CLSID to {00020329-0000-0000-C000-000000000046} and NmidInteger to 0x3FF8. It seems to work in the contact list view, but, when I try to use that field in my custom form I get the error "The property does not exist. The field you want to modify is not valid for this type of item." Do you know where I might have made a mistake, or can you perhaps make a new CreatedBy CFG file for me?
Brian says
Also, I did already try using the From and Organizer fields in order to get the creators name, but that didn't actually work in all instances. Many of my contacts show no creator. I've looked around for other comparable fields with no luck, so still hoping I can display Created By using a CFG file...
Diane Poremsky says
The From or Organizer field (same field, different name depending on the type of form) should have the creator, but like Changed by, will be empty until saved.
I'll see if i can get a created by cfg working.
John R. Morency says
Hello Diane,
I opened the Control Toolbox. I got a small panel labled "Toolbox", but none of the 15 icons in the panel say anything about Custom Controls. Where should I be right clicking?
Diane Poremsky says
right click on an empty area

John R. Morency says
Hello Diane,
Where can I find the Control Toolbox? I don't remember ever seeing it. Please give me step-by-step directions, as if I were a novice (I am.)
Diane Poremsky says
In Design this form, when you are on an editable page, there is a button for Control Toolbox in the ribbon or on the toolbar in older versions of Outlook.

Kamalika says
Hi, I am facing issues using a custom template if I want to set up a Lync Meeting. It just takes me to the appointment page by default.
Is there a way around for this?
Diane Poremsky says
Because of the way addins call up the appointment form, it will use the default form, not a custom form. It's the same with Gotomeeting and other addins.
Mikayla says
Hello Diane, I am wondering if it is possible to autofill the subject line when sending my form to info that is selected in a dropdown box in the message?
Diane Poremsky says
If i understand you correctly, this sample should do what you want: https://www.slipstick.com/developer/select-list-subjects-sending-message/
John R. Morency says
I have created a custom task form with some date fields. How can I get a pop-up calendar so I can select a date by clicking on a date on the calendar?
Diane Poremsky says
Open the control toolbox, right click and choose custom controls. Find the outlook date control.
Sarah says
Hi Diane. Wow, you're amazing. Thank you for all you do for us less knowledgeable! I have an Outlook VBA that opens an HTML email template after filling out a form. For some reason, it opens the email in RTF and all my formatting is lost. I have checked the .oft format, and it is saved as HTML. I'm working with Microsoft Office Professional Plus 2010. My code looks like this: Set stkTemplate = Application.CreateItemFromTemplate("P:\Dept_Access\Office\Account Coordinators\VBA\enroll_mat_template.oft")
Please help.
Ahmed says
Hi,
I need to use the "Dcount" function on a form to count the numbers of a certain subject in a specific folder. How can I do this?
Diane Poremsky says
To the best of my knowledge, that is not supported in Outlook.
it's me says
Hi,
Could you please let me know if outlook form desgin can be used to extract calander appointments and store in a file?
I need to create a file (any format .xls/.pdf) which shows the daywise selective appointments. And these selective appointments will be from 10-15 different users.
I need to create a chart monthwise to show these appointments falling under different dates.
Do you think it's possible via outlook? If not what do you suggest.
Any help will be highly appreciated.
Regards
Diane Poremsky says
You wouldn't use forms, but you can export to xls or csv format and work with the data in Excel. You could use VBA to automate the export - and this macro could make it easier: https://www.slipstick.com/outlook/combine-outlook-calendars-print-one/
TD says
Hi Diane,
Is there a way to use the form I published in Outlook 2013 on my Outlook 2011?
Diane Poremsky says
No, not at this time. They are working on making the Windows and Mac versions more alike, but still have a ways to go.
Kaara says
Hi
I create templates all the time for a business, but I want to know if there is a way to password protect an office template, like you can in excel. I only want employees to be able to fill out the areas that need filling out but not be able to change anything else in the template??
Russ B. says
Diane,
Thanks largely to you I have become a VBA nut. I have a custom form that I created with custom fields. Once a user is done filling in the form I have a check box they hit and on close it will create an appointment. I am able to do that and capture all my custom fields etc. However, using a custom command button control the user selects a contact from contacts and it places that contact in a text box to the right of the command button. When we double click that name it opens the contact. I need to grab the address and phone from this contact as part of the appt creation process. I can't figure out how to grab that referenced contact's info. I do not seem to be able to read the content of that box. Any ideas? I thought if I could then I could have the script look up that contact in the contact folder and get the information that way... It is bound as a 'recipient' when I look at the value tab. Any help would be greatly appreciated.
Thanks,
Russ
Diane Poremsky says
If the contact is clickable, you should be able to assign a value to the object and get the info. Or grab it from the reference initially. Otherwise, search on the value.
lauracarpenter2014 says
Yes...everyone has access. It's published on our Exchange Server in the "Organizational Forms Library" for everyone's access.
Laura says
I am using Outlook 2010 to edit a message template to create a custom form and am having a frusterating issue...I've edited a email message to INCLUDE the following fields AFTER the subject:
From: Doe, John
Sent: Tuesday, March 26, 2013 1:47 PM
To: Smith, Jane
Subject: asdf
Supplier: Yeager
Job No.: 9606
P.O. No.: 9606-123456
Req. No.: 123456
I completed both the "Edit Compose Page" as well as the "Edit Read Page" and they both match and look the way I want. I can SEND it and FORWARD it and see them in the forward, HOWEVER, I can't see the new fields in the REPLY.I have NO clue how to do code. Is there an easy fix?
Diane Poremsky says
The reply uses the default form - you'd need to set a form for reply. in forms designer, look on the Actions tab - select the Reply line then click properties at the lower left and select the form to use for replies.
lauracarpenter2014 says
Thank you so much for getting back to me Diane! So I followed your instructions and went to the actions tab and there were NO actions listed!! So I CREATED one action for EACH Reply, Reply to All, Forward, and Reply to Folder. I mirrored the options in a regular message, except made sure to chool my new Form instead of the "Message" option in Form Name. This STILL didn't do it. However, I'm curious how I was able to forward this and see the fields, even though there was NO actions listed in the template? This one is really kicking my butt! Thanks for your help!
Diane Poremsky says
I'm not sure what is going on - the Actions should be there.
lauracarpenter2014 says
This form IS selectee for the reply and still not working? I've posted specifics on https://answers.microsoft.com/en-us/office/forum/office_2010-outlook/need-help-getting-a-microsoft-outlook-templateform/41649eb2-afee-4754-8a46-733bbb490adf?tm=1414523280847 hoping for some answers....
Diane Poremsky says
Where is the form published? Do all persons who are replying have access to it?
Muthu Rajesh says
Hi,
We have customized the outlook appointment with 2007 Form Region. Everything is working as expected, but not the All day event.
On selecting All day event check box, the end date is being set to the following day, which is not the case with standard appointment form.
How to have same start and end date for All day event in 2007 Form Region?
Any help would be really appreciated.
Diane Poremsky says
I think it's "normal" for custom appt but will double check - but the appt should be just 24 hours long, from midnight day1 to midnight day2.
chantall says
Hi,
I'm using Outlook 2010 and when I sent the form to myself for testing all the fieids are empty (except the check box fields). I have un-checked the box ''send form definition wirth element'' in the properties folder because then the email received contained only my signature.
How do I proceed to receive fhe form email filled out properly when received ?
Any help would be greatly appreciated.
zimaraJessica says
I was mistaken about something in my previous message--I just got word from my "test subject" & she said that she can see the form when I send the email. But the check boxes in the email aren't working. I checked them to send my test message, & while they are displayed in the form, they aren't showing as checked. So I'm a little closer, and that changes my questions...
Given the info above, do you have any ideas about why the checks are not displaying in the check boxes themselves?
Thanks again!
zimaraJessica says
Hello,
Thanks for this helpful tutorial. I've read through all of the comments, and I too am having trouble with making the form visible when sent as an email. Working with Outlook 2010, & I don't know if it's a Microsoft Exchange Server I am working with, but I believe so--when you set up your mailbox, that's the option you select to create your Outlook profile. Here is what I have tried from your replies to others above--maybe I am missing something?
1. I started by creating a new email, then saved it as a template.
2. I selected Design a Form from the Developer tab and selected my template from the User Templates in File System.
3. Designed my form. I didn't add any code to it; just a few check boxes from the Field Chooser.
4. I saved the template again (.oft) in the User Templates in File System. The form did not display when sent to others.
5. I reopened the template, and the form is still there. I verified that Separate Read Layout is not selected. I went to the properties tab and enabled sending the form definition. Still no form displayed.
6. Next I published the form to Personal Forms Library. No go.
7. I tried to publish the form to the Organizational Forms Library, that wanted me to disable sending the form definitions. I tried to publish both with and without sending the definitions; both times I get this error: "The form cannot be installed because you do not have owner permissions." I wasn't sure if this was owner permissions for the form or the library. So I went into the File tab of the form and clicked on Set Permissions. It is set to "no restrictions," and if I click on Manage Credentials, it wants me to sign up for the Information Rights Management Service.
Based on your responses to others, I'm guessing that my problem is not having the form published to the Organizational Forms Library (even though I can't see the form even when I send it to myself), but I'm not sure. So my questions would be:
1. If the issue is the Organizational library, do I need to have our IT department publish the form there? Because I'm thinking I don't have permissions just in the same way I don't have permission to download and install software, for example.
2. If I were able to get the form published to the Organizational library, & that doesn't work, could there be anything else causing this problem based on what I've described above? I've created a macro to open the template which creates the form, and added that action to the ribbon so I have one-click access to open the email. The form displays, works correctly--just disappears when I hit send. Am I misunderstanding something about using forms and templates together, and the difference between using a template versus a form, or saving versus publishing?
Sorry this is so long, I've just run out of options on things to try on my own, so wanted to give you as much info as possible. If you would be willing to take a stab at my questions that would be amazing. Thanks so much, I appreciate your time & help.
Ann Pollin says
Hi Diane - I tried to customize the contact form in Outlook 2007 and the customization went okay, but then I realized that the custom design form itself was nothing like the actual (real) contact form that shows up in Outlook. Thinking that the problem was because I was using Outlook 2007, I upgraded to 2010, only to find the same problem. The design form that is "customizable" is an ancient minimal version of the real/current contact form that actually appears in Outlook. There is no point in customizing it, because I would lose all of the other features found in the real/current contact form. Looking online, it appears that this is a known flaw in all of the Outlook versions? The contact forms are "customizable" but only if you are willing to use an ancient minimalist version of the contact form? I am not a developer, and I can't code or work with the region workarounds. Can't Microsoft provide the actual/real forms for customization? What gives?
Diane Poremsky says
You can't customize the first page - if you do, you lose the eye candy. They use a form region, so you really can't avoid messing it up. You can use P.2 for your customizations. You can replicate most of the features and even use a color besides gray, but you'll have the ugly icons and labels. It's easier to use P.2
NC says
Hi Diane,
Thank you so much for this resource. I have created a custom appointment form and written VBA code to export the new fields to excel. It all works as it should on my calendar. I received permission to publish the form in the Organizational Forms Library and I can get the custom form to display on the shared calendar from another user's pc. However, the VBA code does not carry through. Is this a permissions thing? Or did I set something up incorrectly? Thank you!
Diane Poremsky says
It's probably security - in Outlook, go to File, Options, Trust Center, Email Security. There are two boxes for running code - the shared folder should be enabled. It could also be tight macro security settings on the Macros tab.
Max says
I have designed a custom form (Outlook 2013) for my organization. I have sent it as a test and it appears for the recipient. So far so good. However I have 2 issues / questions:
1. Is there any way for the recipient to see the form in the actual message as opposed to having to click the form name by the folder icon in the top ribbon? i.e. Can I embed the form in the actual initial displayed message (I have ensured the Separate read pages are not checked)?
2. Basically the final outcome we are looking for is that the recipient of the form needs to reply back to the original sender approving the details of the form. The sender would then need to save the approval reply and attach it to their expense claim (as .PDF or .TXT where PDF not possible). The issue is that when the recipient of the form replies back to the sender the form disappears. Is there anyway of making it visible?
I hope this makes sense and that you can help!
Diane Poremsky says
1. No, not that I am aware of, not using Outlook's form design.
2. Do you have InfoPath? An InfoPath approval form might be a better solution and it can work within Outlook.
Distressed Admin Asst says
I am trying to edit a "Meeting Request" form. I want to copy some of the pre-existing fields (Start time, End time, All day event) and put them into a custom form I am designing. The fields have options I can not find anywhere else (drop down menus to select a date off a calendar, etc.). Also, the "All day event" check-box voids out the time fields if checked.
How can I copy or recreate this? How do I edit an existing form- not just add to it, but delete and rearrange things?
My "Tools" group in the Developer ribbon is grayed out-I can't select "Field Chooser". If I move to an empty page I can edit, but not on the "Appointment" page (where the things I want to edit are!)
Please help!
Diane Poremsky says
You need to create a new page and hide page 1. Select (P.2) and the toolbox will come alive.
Distressed Admin Asst says
That is good to know, but didn't really answer my questions. How do I edit things on page 1, not just hide it completely?
Diane Poremsky says
Unfortunately, you can't edit page 1.
Distressed Admin Asst says
While continue to look for answers, I came upon another forum (https://www.pcreview.co.uk/forums/creating-dropdown-calendar-outlook-form-t2493011.html) where I discovered Sue Mosher, whose website actually directed me back to you! Additionally, Sue Mosher has other helpful websites, for those you you still searching for answers.
Diane Poremsky says
Sue retired a few years ago and sold her sites. It's still very useful but not updated.
Jeff C says
I need to create a new e-mail message and format it (populate the "to" field, subject and body). Templates won't work because the data varies from week to week, and I'd prefer not having to overlay/update the template data. Is a custom form what I need? If so then can you direct me to tutorial that explains the basics (setting up the form controls, populating the message fields, invoking and submitting the form)?
Thanks.
Diane Poremsky says
A template would be the same as a custom form, its just in a different format. What changes week to week? A macro might work, but it would still need to be updated. https://www.slipstick.com/developer/create-a-new-message-using-vba/ for a sample.
Another option is to save a draft the send a copy of the draft or click Forward - this keeps the original draft so you can reuse it. This is easier to edit.
Raj says
How can I retain embedded object with voting button reply?
I have created an OFT template(Entry Form) with voting buttons . Whenever the user fills the entry form and sends it across to the Admin and the Admin approves/rejects the form and CC the response to his/her higher authorities at the same time . My question here is how to send the filled entry form along with response (as the admin approves/reject the form) or in other words How can I retain embedded object with voting button reply
Thanks in Advance
Diane Poremsky says
As far as I know, you can't. You'd need to use workflow and send out a new form with the buttons.
Kim says
I have come across another issue I can't seem to figure out. I have several check boxes on page 2. When I fill out the form and check several of the check boxes and then assign the task the person the task was assigned to cannot view the check marks in the boxes. Any suggestions on this issue?
Diane Poremsky says
Are you using separate read and compose forms?
Kim says
Thank you soooo much! All I did was check the send forms definition box and it works perfect.
Kim says
I created a custom task form that has page 2 but for some reason when the task is assigned to someone they cannot see page 2. I can open the task and see page 2 just fine. What do I need to do to make sure page 2 is visible for everyone?
Diane Poremsky says
Where is it published? If it's not in an Organizational Forms library, you need to send forms definition (on the properties tab, i think)
Haim Moshe says
Hi Diane
Your information is worth GOLD
I have reviewed most of the material on the outlook forms
i have created a Task Assignment form customized to my needs without VBA and did the following:
1. Marked the "send form properties"
2. same read and write page
3. published the form
4. Sent the fdm file to a different user
5. He then installed it in his private forms library
6. I then sent him a task assignment using the same form
Results:
1. He received the task in the inbox
2. Cannot open it
3. Cannot delete it and cannot even move it to the delete folder ("One or more parameters are not valid")
4. He can send me a task using the form but when i get it i also cannot open it and cannot delete it
I will more then appreciate your help through this
Haim
Diane Poremsky says
I'm not sure what is wrong - it sounds like a permissions issue, which is weird. It's not something I've seen before. Try is clearing the forms cache, either from Options, Manage forms or delete forms cache from your hard drive. It's at %localappdata%\Microsoft\FORMS
Christian says
I have seen a setting that locks down email to only the recipient and they in turn cannot save, reply all, or forward the email. (like a for your eyes only) At this time though I am unable to relocate that ability.
Diane Poremsky says
Rights management or signed & encrypted mail is the most foolproof way to do it, but changing the Sensitivity to private may work if the recipient uses Outlook.
Christian says
Hello Diane,
Hoping maybe you could help solve this mystery.
I created a form.
Under ThisOutlookSession I have: Public Sub LOCOwnership(itm As Outlook.MailItem)
Within that sub I have a frm.show vbModal
The form contains a combo box, and two buttons, OK and Cancel.
Now for the mystery...
When Outlook opens for the first time upon powering up the computer,
I go to Rules...
Manage Rules and Alerts...
select Run Rules Now...
I select the rule that will execute the macro LOCOwnership.
Ok... so the form displays! Great!
The combo box is populated, the OK and Cancel buttons work.
I can select "Run Now" repeatedly and the form works.
I can close the Run Rules Now widow, select "Run Rules Now" again and run the rule and the form works.
NOW... if I close the Run Rules Now window... then close the Rules and Alerts window...
Then try going back... and open the rules window and run now again... the form does not work. Meaning the combo box is not populated, the OK and Cancel buttons don't work when you click on them... This indicates the UserFrom_Initialize did not fire off.
So once I run this rule I can never run it again until I restart Outlook!
Do you have any idea what is happening to the form when I close the Rules and Alerts window that would cause the initialization of the form to not work?
Diane Poremsky says
Are you unloading the userform?
Godha says
Hi Diane,
I just learnt how disable reply all or forward and published a form in Outlook 2010, but what i am flummoxed about is that the recipient can change the email setting by redesigning the form back to reply all or forward working backwards in the same process.
Please tell me is there a way to disable that?
any early reply on this would be greatly appreciated.
Diane Poremsky says
No sorry, you can't control that. I forget if you can password protect forms design. (you can protect word and excel templates and documents).
Janna says
Hi Diane,
Thank you for this wonderful resource you have built for us. I need some help with a form in Outlook 2007. I made a form message, simple with some "labels" and text boxes to fill in. I made the subject line, the email "to" and "cc" (they will always be the same). I ran it and also published it. And, I saved it as an OFT in my private library. When I open the OFT from my library and fill in the text fields, then send, I get an error message: Operation Failed. The message won't send. I have looked all over the web for an answer, to no avail. Do you have any ideas?
Thank you,
Janna
Diane Poremsky says
i'd start with the To field - type on a new address and see if it works.
Christopher Klabunde says
Hi Diane,,
I am currently designing a custom form. I want the users to be able to add attachments to the form. I figured that I need to add the message field to my form. However, I don't want the message content to be displayed (already tried Visible = False) - > I only need the attachment option /possibilty. Is there any workaround for this ?
Diane Poremsky says
offhand, I can't think of any way around it. How about coloring it the same as the message frame? If it lets you change the color, use Transparent.
In my best Emily Litella voice "Never mind". The message field can't be customized in Properties.
jmkelley2 says
Thanks! that is a great idea, but I am having a problem using it. When a regular meeting request is sent to the conference room, it throws an error because the "oRequest.UserProperties(APPROVEME)" custom field does not exist on it. Is there a way I can exclude the regular meetings by making an "If exist" loop (if one exists) or by some other way?
Diane Poremsky says
You'll need an if statement -
if not oRequest.UserProperties("CustomFieldName") is nothing then
or something along those lines.
Or, use on error resume next or other error trap to exit the macro when the error is triggered.
sares says
Hi Diane, Thanks so much for your reply. From yourn experience is it possible to insert codes inorder to make this work?
Diane Poremsky says
No, to the best of my knowledge, the only way to do it is with a custom service.
sares says
HiDiane, do you know how to get values from my custom fields and custom forms posted to sharepoint list? Currently it is in-sync but only fields from the main form will get posted in the sharepoint list.
Diane Poremsky says
Only the default fields sync "out of the box". I don't know if any 3rd party SharePoint utilities sync custom fields.
Sares says
Hi Diane, i follwoed your instructions as above and managed to build a custom form sucessfully. However, im required to post the values from the custom form & custom fields that i have created to my Sharepoint list. Currently i am only able to post the values which are on the main fields of the task list shown in outlook. The values from my custom form and custom fields dont seem to get updated in the list at sharepoint. Do you know why or any tips on getting it posted successfully? Im using 2007 version of both outlook and sharepoint. Thanks!
Diane Poremsky says
SharePoint - Outlook link only supports the default fields. You'd need a custom solution to use custom fields in outlook.
jmkelley2 says
Hi DIane,
I posted a response to your answer about a week and a half ago. I was not sure if it went through successfully or not. I am having trouble with the "GetFolderPath()" line, an error pops up that says "Compile error: Sub or Function not defined" and this is highlighted in blue. I tried. I have the following line: GetFolderPath("CNF-Classroom\inbox").Items . The "CNF-Classroom" is the name of the mailbox. Any ideas? I tried putting the code in a "Class Module" and also just a "Module" to no avail.
Thanks!
Diane Poremsky says
It probably went through, but I'm so far behind on answering questions.... Do you have the getfolderpath function?
https://www.slipstick.com/developer/working-vba-nondefault-outlook-folders/
Cathy Desjarlais says
Hi Diane,
I am hoping you can help. I am in Outlook trying to create a custom form. I found one in the Organization Library that had the same type of fields I wanted to use so I took that one and I have edited it to have different field names, ect. It looks great! When I run the form, it still looks great. I fill in some of the fields and send it to myself to test it and when I get the email, all the fields are diverted back to the original names (with my info in the fields that I entered). Can you tell me how I can make it show my info with the new fields that i have created? This is so frustrating :( Thanks, Cathy
Diane Poremsky says
If its not published, you need to send the form definition. during testing you can publish it to your local folders - just make sure you change the version # so outlook knows to use the newest version. It's on the properties tab when designing the form.
Andrew says
Hi Dianne,
I created an Outlook Form and It has a number of text fields that the end user needs to complete. I am testing this on my profile before distributing but when I receive the email the contents of the text fields are blank. I have copied the compose page into the read page so the data is the same and I think the fields should be bound. I have also checked and tested with "Send form definition with item" is enabled and again with this option disabled.
Any ideas what could I have done wrong or not setup correctly?
Diane Poremsky says
It sounds like you did everything. Double check the fields and make sure they are bound. You will need Send definition enabled if you aren't using Exchange server and have it published to the org library.
jmkelley2 says
Hi Diane,
Thanks for the information! I have a couple of questions/issues concerning the implementation of the macro. I tried using the code below to listen for two mailboxes but I am getting an error message when Outlook opens. It throws a "Compile error: Sub or Function not defined" error, and the "GetFolderPath" in the code below is highlighted blue. Also, your original "autoaccept" macro (same code is used below) is fired by an Outlook rule. I have an invisible textbox on my custom form that has "sometext" in it. The rule looks for that textbox on the custom form and the value of the text. That is how is can tell the difference between the custom catering form and regular meeting requests. How does this work with the item_add macro? How do I get the macro to fire for each individual mailbox? Here is the code I have so far:
Private Sub Application_Startup()
Dim Ns As Outlook.NameSpace
Set Ns = Application.GetNamespace("MAPI")
Set Items1 = GetFolderPath("CNF-***1\Inbox").Items
Set Items2 = GetFolderPath("CNF-***2\Inbox").Items
End Sub
Private Sub Items1_ItemAdd(ByVal Item As Object)
If oRequest.MessageClass "IPM.Schedule.Meeting.Request" Then
Exit Sub
End If
Dim oAppt As AppointmentItem
Set oAppt = oRequest.GetAssociatedAppointment(True)
Dim myAcct As Outlook.Recipient
Dim myFB As String
Set myAcct = Session.CreateRecipient("cnf-***1@mydomain.org")
myFB = myAcct.FreeBusy(oAppt.Start, 5, False)
Dim oResponse
Dim i As Long
Dim test As String
i = (TimeValue(oAppt.Start) * 120)
test = Mid(myFB, i - 2, (oAppt.Duration / 5) + 2)
If InStr(1, test, "1") Then
Set oResponse = oAppt.Respond(olMeetingDeclined, True)
oResponse.Send
Else
Set oResponse = oAppt.Respond(olMeetingAccepted, True)
oResponse.Send
End If
End Sub
Private Sub Items2_ItemAdd(ByVal Item As Object)
If oRequest.MessageClass "IPM.Schedule.Meeting.Request" Then
Exit Sub
End If
Dim oAppt As AppointmentItem
Set oAppt = oRequest.GetAssociatedAppointment(True)
Dim myAcct As Outlook.Recipient
Dim myFB As String
Set myAcct = Session.CreateRecipient("cnf-***2@mydomain.org")
myFB = myAcct.FreeBusy(oAppt.Start, 5, False)
Dim oResponse
Dim i As Long
Dim test As String
i = (TimeValue(oAppt.Start) * 120)
test = Mid(myFB, i - 2, (oAppt.Duration / 5) + 2)
If InStr(1, test, "1") Then
Set oResponse = oAppt.Respond(olMeetingDeclined, True)
oResponse.Send
Else
Set oResponse = oAppt.Respond(olMeetingAccepted, True)
oResponse.Send
End If
End Sub
Thanks in advance for your help!
Diane Poremsky says
This line: If oRequest.MessageClass "IPM.Schedule.Meeting.Request" Then identifies the meeting request. If you want to fire on the custom form, use the custom form name instead.
Each mailbox needs a line in the startup macro:
Set Items1 = GetFolderPath("CNF-***1\Inbox").Items
Set Items2 = GetFolderPath("CNF-***2\Inbox").Items
and it's own sub:
Private Sub Items1_ItemAdd(ByVal Item As Object)
oh, and you all need to declare each object at the top of the code -
Private WithEvents Items1 As Outlook.Items
Private WithEvents Items2 As Outlook.Items
jmkelley2 says
Hello Diane,
I have one last question but I did get this to work! I put the "Private WithEvents Items1 As Outlook.Items" statement at the very top of the code in the "ThisOutlookSession" module. I used the "GetFolderPath" funtion that you have at this link: https://www.slipstick.com/developer/working-vba-nondefault-outlook-folders/ . Here is the Auto Accept Meeting code I used:
Private Sub Items1_ItemAdd(ByVal Item As Object)
Dim oRequest As MeetingItem
If TypeName(Item) = "MeetingItem" Then
Set oRequest = Item
If oRequest.MessageClass "IPM.Schedule.Meeting.Request" Then
Exit Sub
End If
Dim oAppt As AppointmentItem
Set oAppt = oRequest.GetAssociatedAppointment(True)
Dim oResponse
Set oResponse = oAppt.Respond(olMeetingAccepted, True)
oResponse.Send
End If
ProgramExit:
Exit Sub
ErrorHandler:
MsgBox Err.Number & " - " & Err.Description
Resume ProgramExit
End Sub
As you noticed above, the message class of my custom form is "IPM.Schedule.Meeting.Request". This means the code will fire for all meeting requests to this room. I would like to make this code fire only when the custom form comes across, but I will add the free/busy line to the auto accept code, which come pretty close to the regular auto-accept functionality of a conference room. The only thing missing is the "tentative" approval when a delegate is on the room. Is there something I can add to the first "If" statement to detect the hidden box I have on my custom form? The hidden text box has "Sometext" in it which fires an outlook rule I have for the main catering CR. I would like the if statement to detect this same box and text so that it will only fire when the custom form comes across. Thanks in advance for your help!
Diane Poremsky says
The field is a custom field? You'll refer to it as
if oRequest.UserProperties("CustomFieldName") = "Sometext" then
' trigger the acceptance
Kathy Genakos says
You can disregard my previous comment. Setting the subject line to read (or locked) whatever that property says, allows my code to auto-pop the value from Excel into the subject line while retaining the read-only feature so the user can't tamper with it! (Not sure exactly how this is possible...but it does work) THANKS for ALL of your help throughout my learning process. I've learned so much about VBA and custom Outlook emails from the past 0 to 30 days, thanks in large part to your willingness to share your expertise! Kathy
Kathy Genakos says
After executing this Excel 2010 VBA for Outlook 2010 custom email (IPM.Note.x) would you know the code to then make the custom email's Subject line read-only?
.Subject = Worksheets("Subject").Range("A1").Value
jmkelley2 says
That would be awesome if I was able to answer all 13 room mailboxes with one instance of outlook. I am very new to macro programming, so how would one use the itemadd macro to perform this function? I am what you call a gogrammer , one that searches for prexisting code with google and reverse-engineers it ;-)
Diane Poremsky says
You need to use an application startup macro to watch each mailbox.
Private Sub Application_Startup()
Dim Ns As Outlook.NameSpace
Set Ns = Application.GetNamespace("MAPI")
Set Items1 = GetFolderPath("mailbox\inbox").Items
Set Items2 = GetFolderPath("mailbox\inbox").Items
etc, etc
End Sub
Private Sub Items1_ItemAdd(ByVal Item As Object)
....
Kathy Genakos says
Hi, Diane: I'm still stuck on how to code VBA in Excel 2010 when the user has never accessed my custom email form in Outlook 2010. My custom email form is named: ipm.note.TEST - US HRBP ONLY - HR Mass Change Request
Apparently it is stored in a SYSTEM public folder under the folder called EFORMS REGISTRY. Then I believe there's another folder called ORGANIZATIONAL FORMS.
I'm hoping you might be able to help me find this filepath (maybe it's hidden??) and/or help me with the VBA to launch the custom email form "if" it has never been used before. (This should only need to be done once for a user)
Some good news though...after much searching and a bit of modifying I now have VBA code in Excel 2010 that looks to see if the user has Outlook 2010 open (displaying a msgbox in Excel either way). If Outlook is not open, when the user clicks the OK button in msgbox, Outlook automatically launches! Thought I'd share this code with you even though you probably already have it:
Sub check_is_running()
Dim ret As Long
Dim Process As Object
Dim proc_name As String
Dim bl As Boolean
proc_name = "Outlook.exe" '\change process name here
bl = False
For Each Process In GetObject("winmgmts:").ExecQuery("Select Name from Win32_Process Where Name = '" & proc_name & "'")
If UCase(Process.Name) = UCase(proc_name) Then
bl = True
Exit For
End If
Next Process
If bl = False Then
MsgBox "Outlook is not open"
Else
MsgBox "Outlook is open"
End If
On Error Resume Next
Set ObjOutlookApp = GetObject(, "Outlook.Application")
If Err.Number 0 Then
Set ObjOutlookApp = CreateObject("Outlook.Application")
Shell ObjOutlookApp.Application, vbMaximizedFocus
End If
On Error GoTo 0
End Sub
Diane Poremsky says
You don't need the file path to the org library. It should just work, but i need to figure out why its not and file a bug report with Microsoft if it doesn't work.
I haven't had a chance to test it yet, but one of the developer mvps suggested trying .CreateItemFromTemplate(ipm.note.form-name).
Thanks for sharing the code sample, I'm sure it will help others. (I don't think i have any code samples that checks for outlook - mine checks excel to see if its open).
Kathy Genakos says
Hi, Diane: I was surfing the Web to see if I could find out anything more re: Outlook IPM.Notes
Would the below URL have helpful info for trying to create VBA code that would initially launch my custom Outlook 20120 email (IPM.Note) form in Excel? If not, I'll have to instruct the users to access this custom email form manually (one time only).
https://msdn.microsoft.com/en-us/library/cc815825(v=office.14).aspx
Thx, Kathy
Kathy Genakos says
Hi, Diane: Not sure if you rec'd my post from yesterday. I changed the Set items statement with
Set items = Session.GetDefaultFolder(olFolderInbox).items
I rec'd an error msg that seemed to want
Dim Session As Object
...but still isn't working.
Can I use the path to the SYSTEM public folder for under the folder called EFORMS REGISTRY to the folder called ORGANIZATIONAL FORMS? If so, would you know what that VBA code would be in Excel?
Thx, Kathy
Diane Poremsky says
No on the path to system. Yes, i got the other message but I'm way behind in answering. :( Try application in place of session, but you may need to assign an object to the application since you are calling it from Excel. Session would work if you were using it in Outlook.
Kathy Genakos says
I tried replacing my Set Items with
Set items = Session.GetDefaultFolder(olFolderInbox).items
I got a "424" Object required err msg.
I tried Dim Session As Object
Then I got a "91" error msg Object variable not set
Sorry to be such a bother....we're sooooo close....
Kathy
Jason Kelley says
Hi Diane,
I created a custom meeting that has a "catering form". The purpose of it is to allow people to create a meeting request and then click the form to include catering for that meeting. The meetings can be in one of 13 exchange room mailbox calendars. I found out that Microsoft does not allow the "Auto approval" of forms that contain client-side vbscript. I have script in there to perform the printing and saving/copying functions. There is only one way (that I know of) around this. That is to have a macro (with the outlook rule) auto-approve the meetings. The only problem is that I need to keep Outlook open with the room mailbox as the primary account for it to work. And, I need to do this for 12 more rooms mailboxes ;-) So, I've been looking into using "ExtraOutlook.exe" to run multiple instances of Outlook with different profiles under the same windows login. Is there any way you know of around this, maybe a hack or some hotfix? I saw that IBM has a hotfix for this same problem available but it is for one of their products.
Diane Poremsky says
I would try 1 outlook, and an itemadd macro. It could get messy because you'd need to set 13 folders to watch, but if you are doing the same thing to each calendar, you can pass the room name as a variable to one macro.
otherwise, no there is no hotfix. do you have more information on the autoapproval not working for forms with client side script? I know there is setting in outlook to enable scripting but I'm not 100% sure it would fix this issue. (Trust Center, Email Security - at the bottom).
Kathy Genakos says
Diane: I will try to find the MsgBox example from msdn. Thanks for offering to research further.
However, I have a much more important issue that was just uncovered in unit testing:
My colleague used the Excel doc with the VBA (that includes launching the custom email form) but her company default email form launched instead. This defeats the whole purpose of writing the VBA!
Once I walked her through the steps of how to "open" the custom email form from Outlook's Organizational Forms Library, the Excel VBA auto-opened the custom email form and everything else worked as expected.
Below is my existing code for launching the custom mail portion of the VBA:
Set OutApp = CreateObject("Outlook.Application")
Set Items = OutApp.ActiveExplorer.CurrentFolder.Items
Set OutMail = Items.Add("ipm.note.TEST - US HRBP ONLY - HR Mass Change Request")
Is there more VBA I need to enter to "initially" place the custom email form from the Organizational Forms Library to the users' filepath:
C:\Users\\AppData\Local\Microsoft\FORMS\IPM.Note.
Thanks!
Kathy
Diane Poremsky says
i think the problem is here (but will double check on it)
Set Items = OutApp.ActiveExplorer.CurrentFolder.Items
Set OutMail = Items.Add("ipm.note.TEST - US HRBP ONLY - HR Mass Change Request")
it's looking in the folder and when it doesn't find it, it uses the default. Try setting that to the inbox and see if it works.
Set items = Session.GetDefaultFolder(olFolderInbox).items
Kathy Genakos says
Hi, Diane:
The GetObject/CreateObject code is not opening Outlook. My latest effort was to try and change the title in the MsgBox. I looked at an example on msdn.com but still can't reproduce. Ugh!
Diane Poremsky says
I'll try it in the morning. Do you have a link to the msdn article? I'll take a look at it.
Kathy Genakos says
still not working for me 8( I'm just going to have to instruct the users to be logged onto Outlook.
I'm going to try to add code to prompt the File/Save As function.
Kathy Genakos says
Hi, Diane:
So far the only statement that launched Outlook when Outlook was closed was:
Application.ActivateMicrosoftApp x1MicrosoftMail
but then my ActiveX button gets a run-time error msg and I don't know if the above statement would auto-launch a second instance of Outlook if the user is already logged on.
Is If Err "=" 0 Then?
Is that a zero one App in the Get and Create statements?
Also, do I need the comma at the beginning of the GetObject parenthesis?
Thx, Kathy
Thx, Kathy
Diane Poremsky says
oh, darn wordpress, i hate how it removes characters. The line says 'if err is not zero' using greater and less than symbols - if i don't mistype the html code, its err <> 0 :)
Kathy Genakos says
Hi, Diane: Thanks to your help, I am able to have the day/date/time added to the Excel form when the ActiveX button is clicked! I used:
Range("A35").Value = Format(Now, "dddd, mm/dd/yyyy at hh:mm AM/PM") which results in: Monday, 02/24/2014 at 10:43 AM
Since I'm emailing to Outlook from Excel, I noticed today if Outlook isn't already open, I get the following Microsoft Visual Basic window error msg: "Run-time error '91': Object variable or With block variable not set"
Would you know what I need to put into Excel's VBA to check if Outlook is open and if not, how to launch it for the user to logon?
Thanks, Kathy
Diane Poremsky says
Use something like this - using the correct object name for Outlook of course.
Set olApp = GetObject(, "Outlook.Application")
If Err <> 0 Then
Set olApp = CreateObject("Outlook.Application")
Mohammed Hashim says
Thanks for the help and now it is working fine one thing if i publish in outlook folder then sometimes its not working properly
Thank you
Diane Poremsky says
In what way doesn't it work? Some features are better supported in templates over published forms, others are better published.
Mohammed Hashim says
Hi, I just designed a form and unable to attachment is not working and also i deleted old forms i designed but in print preview is showing the old form and new form format is not available only the values. before i am sending the new form but sending the old one when i disable the separate layout its working with new form. please tell me how to solve these issue. i am beginer
Diane Poremsky says
Are you using Version numbers? You should increment the version when you make changes so Outlook uses the newest one. Anyway, it sounds like the cache is corrupt. You can clear the Forms Cache from the Manage forms dialog or by deleting the files from your hard drive. Instructions are at https://www.slipstick.com/developer/custom-form/clean-outlooks-forms-cache/
Kathy Genakos says
Hi Diane: My boss tested the Excel file with the VBA to launch the custom email. It went very well! She asked if it is possible to include a statement with the date and time the email was auto-sent in the worksheet containing the macro? Something like: "Thank you. Your email has been submitted. 2014-02-18 at 11:24am" I suppose adding EST time would be helpful but hopefully date & time would be enough. If you know of how I could do this that would be great! BTW I changed my submit button to an ActiveX Control. Now a single click launches the macro; the previous button first needed the user to click any other cell in worksheet THEN the submit button.
Diane Poremsky says
you can use VBA to insert the current time into a call. Do something like
Cell(A1).Value = Now()
Cell(A1).NumberFormat = "mm/dd/yy hh:mm"
Kathy Genakos says
Thanks for the tip. It's Sunday where I am. Supposed to be a day off but I get so excited to complete the task and learn more I've been at all day. Time to unplug! Hope you get a chance to rest & relax a bit too. Take Care, Kathy
Kathy Genakos says
It's working!! YEAH!!! This is exactly what my boss wanted!!
Funny when I looked at your code in my Outlook preview window I don't see the backslashes around the word Desktop. I copy/pasted it from my Outlook preview window into the bottom of my VB code; then cut/paste it the statements belonged.
Good thing I fully opened your email or I wouldn't have seen why my code didn't work initially.
I noticed I had to include the filename's full extension. In my test case that's .xlsx
We'll have to include in our instructions to the submitters to save their file to their Desktop and call it "MCSS.xlsx" otherwise the code won't auto-send it.
I prayed for a solution to this business problem and God sent me YOU! I will be forever grateful!
Let's see how my bosses test goes on Tuesday.
Diane Poremsky says
I love when people get excited over vba. :) If they are attaching the current workbook, try using ThisWorkbook.FullName for the file name. That way the only filename requirement would be for consistency.
Kathy Genakos says
THANKS, again and again...and AGAIN! I tested the .DeleteAfterSubmit = True statement and it appears to have worked (at least my custom email did not show up in my Sent Items Outlook folder. My boss will test on Tuesday. I'll try the code you recommend and read the link. I've come A VERY LONG WAY in 9 days for someone who knows NOTHING about VB or custom email forms!! Thanks to "YOU"!
Kathy Genakos says
First, I'll add the .DeleteAfterSubmit = True statement. (THANKS!) Second, I was going to have the submitters use the same filepath and filename by saving the file to their desktop. I was using the .Attachment.Add c:\filename.ext statement but was including backslashes and asteriks for wildcards where the filepath to the submitter's desktop would include their UserID and therefore be an unknown variable (I wouldn't know how to code for that.) Is it possible to include a filepath resulting in the filename? Perhaps replacing backslashes in the filepath with periods? Here's what I had tried that wasn't working:
.Attachment.Add ("C:\Users\*\Desktop\MCSS.xls*")
Diane Poremsky says
So you want it to find the user's desktop? See https://www.slipstick.com/developer/windows-environment-variables-outlook-macros/
You can't use wildcards but you can use environment variables. There are a few different ways to do it, this is the one I use.
Dim enviro As String
enviro = CStr(Environ("USERPROFILE"))
strFolderpath = enviro & "\Desktop\"
and the path would be
Attachment.Add (strFolderpath & "filename")
Kathy Genakos says
Oh...one more question...(if you had a dime for everytime you heard THAT phrase,huh? LOL)...Would you know what the VB code in Excel would be to auto attach an second file to the macro-generated out-going custom email message? If not, would you be able to recommend an Excel MVP who might know that code?
Diane Poremsky says
Is the second file name always going to be the same or how will you determine it? Basic code is .Attachment.Add c:\filename.ext but if you need to generate the name it's a little more complex, but doable.
Kathy Genakos says
Diane, Thank you sooooo much!!! I can now pull up my custom email form the Organizational Forms Library FOR THE FIRST TIME EVER!!! I've asked my boss to test if she can see the custom email form from the Excel macro as well. We're off on Monday, so that will have to wait 'til Tuesday. Would you know what the VB code would be to not allow the sender of the custom email to receive it in their Sent Items email folder? I don't want the sender to be able to open the custom form from their Sent Items folder and Reply, Reply All, Resend the Message, Edit Message...etc. No way I could have done any of this without you. A million (and one) THANKS!
Diane Poremsky says
To avoid saving the sent copy, you need to use .DeleteAfterSubmit = True in the macro right before .Send
Kathy Genakos says
I've removed all of my IPM.Note. test files from my Personal Forms Library. There is now only one IPM.Note. document posted to the Organizational Forms Library. When I try to launch the custom email form via my Excel macro (using the macro button I created) I keep getting the standard email form NOT my custom email form. Is that because I'm trying to send it to myself? Below is the macro within Excel. Any suggestions would be most appreciated!
Sub Mail_Workbook_1()
' Works in Excel 2000, Excel 2002, Excel 2003, Excel 2007, Excel 2010, Outlook 2000, Outlook 2002, Outlook 2003, Outlook 2007, Outlook 2010.
' This example sends the last saved version of the Activeworkbook object .
Dim OutApp As Object
Dim OutMail As Object
Set OutApp = CreateObject("Outlook.Application")
Set Items = OutApp.ActiveExplorer.CurrentFolder.Items
Set OutMail = Items.Add("IPM.Note.TEST - US HRBP ONLY - HR Mass Change Request")
On Error Resume Next
' Change the mail address and subject in the macro before you run it.
With OutMail
.To = "kathy.genakos@sanofi.com"
.CC = ""
.BCC = ""
.Subject = "HR_Mass_Change_Request"
.Body = ""
.Attachments.Add ActiveWorkbook.FullName
' You can add other files by uncommenting the following line.
'.Attachments.Add ("C:\test.txt")
' In place of the following statement, you can use ".Display" to
' display the mail.
'.Send
.Display
End With
On Error GoTo 0
Set OutMail = Nothing
Set OutApp = Nothing
End Sub
Diane Poremsky says
No, its not because you are sending to yourself, its because it can't find the form. Go to C:\Users\username\AppData\Local\Microsoft\FORMS and delete everything in it. Then try the macro again.
Kathy Genakos says
I put the macro in my active Excel workbook. That Excel workbook is currently saved to my C-drive. However, the custom email form is in my Personal Forms Library in Outlook so that's where the ipm.note.TEST ONLY - DO NOT USE - HR Mass Change Request folder is. Once I have access to our Organizational Forms Library, the ipm.note.TEST ONLY - DO NOT USE - HR Mass Change Request folder will be placed there.
Diane Poremsky says
I don't think the location of the form matters.
Kathy Genakos says
The macro with the modification you recommended IS working from my Personal Forms Library (opening the custom email form) when I have the folder path open to the ipm.note.TEST ONLY - DO NOT USE - HR Mass Change Request folder. So I "think" it should work once the custom email form is posted to the Organizational Forms Library. (I'd keep my fingers crossed but then I wouldn't be able to type!) Still wondering why I have to click somewhere on the saved Excel form/worksheet before I can click on the macro button to run the macro. Any suggestions?
Diane Poremsky says
Where is the macro saved? It runs from the active workbook.
Kathy Genakos says
Oops! Sorry on closer inspection the modified code did NOT launch my custom email form...but I think that's because the form is not available in the Organizational Forms Library...until my company grants me rights to that Library. Do you think that would that resolve my macro button issue?
Kathy Genakos says
Woo Hoo!! I got the custom email form thanks to your advice above! I'm still working in the Personal Forms Library pending access to the Organziational. Next issue...I enter stuff into the Excel form/worksheet, do a save as, rename the worksheet, click the button I created with the associated macro but it doesn't launch the macro on the first click. I first have to click anywhere else in the Saved As Excel & renamed worksheet THEN the macro button launches the custom email form with the Saved As Excel file attached. Thoughts?
Kathy Genakos says
Diane: I found VB code on the Internet that is working but launching the standard Outlook email message. Would you know how I would modify the code to have my custom email message launch?
Sub Mail_Workbook_1()
' Works in Excel 2000, Excel 2002, Excel 2003, Excel 2007, Excel 2010, Outlook 2000, Outlook 2002, Outlook 2003, Outlook 2007, Outlook 2010.
' This example sends the last saved version of the Activeworkbook object .
Dim OutApp As Object
Dim OutMail As Object
Set OutApp = CreateObject("Outlook.Application")
Set OutMail = OutApp.CreateItem(0)
On Error Resume Next
' Change the mail address and subject in the macro before you run it.
With OutMail
.To = "kathy.genakos@sanofi.com"
.CC = ""
.BCC = ""
.Subject = "HR_Mass_Change_Request"
.Body = "Hello World!"
.Attachments.Add ActiveWorkbook.FullName
' You can add other files by uncommenting the following line.
'.Attachments.Add ("C:\test.txt")
' In place of the following statement, you can use ".Display" to
' display the mail.
'.Send
.Display
End With
On Error GoTo 0
Set OutMail = Nothing
Set OutApp = Nothing
End Sub
Diane Poremsky says
Replace
Set OutMail = OutApp.CreateItem(0)
with something like this
Set Items = OutApp.ActiveExplorer.CurrentFolder.Items
Set OutMail = Items.Add("ipm.note.TEST ONLY - DO NOT USE - HR Mass Change Request")
Kathy Genakos says
The compile error is gone by modifying the code from the article with the code you provided. I made modifications where I thought they should go (I have zero experience with Custom Forms in Outlook and zero experience with Macros in Excel)
Private Sub OpenPublishedForm()
Dim myOlApp As Outlook.Application
Dim Items As Outlook.Items
Dim Item As Outlook.MailItem
Dim Item As Object
Set myOlApp = CreateObject("Outlook.Application")
Set Items = myOlApp.ActiveExplorer.CurrentFolder.Items
Set Item = Items.Add("ipm.note.TEST ONLY - DO NOT USE - HR Mass Change Request")
Item.Display
Set Item = Nothing
Set myOlApp = Nothing
End Sub
End Sub
Sub HRMCR()
End Sub
When I "run" the macro, nothing happens. What I'm hoping for is that my custom Outlook form will open.
You're so amazing! (No kidding) I'm sure you'll be able to explain how I can make that happen.
Diane Poremsky says
This works for me - I don't have the custom form, but it opens a form.
Private Sub OpenPublishedForm()
Dim myOlApp As Outlook.Application
Dim Items As Outlook.Items
Dim Item As Outlook.MailItem ' As Object
Set myOlApp = CreateObject("Outlook.Application")
Set Items = myOlApp.ActiveExplorer.CurrentFolder.Items
Set Item = Items.Add("ipm.note")
Item.Display
Set Item = Nothing
Set myOlApp = Nothing
End Sub
Kathy Genakos says
Just realized that Visual Basic has the ability to create forms in Excel. My Excel "form" is not a Visual Basic form. It's just a worksheet with drop-down values and enterable fields. It currently has a hyperlink that opens the standard Outlook email msg. The person completing the Excel worksheet saves the worksheet (whereever) and attaches it to the standard Outlook email msg. The only thing that's changing is we need for them to launch the custom email msg to attach their completed and saved Excel worksheet to.
Kathy Genakos says
I copy/pasted the macro from the recommended article but it's giving me a compile error:
(NOTE: I was prompted to create a macro name so I called it HRMCR. I opened the path on my C-drive to the IPM.Note.TEST ONLY - DO NOT USE - HR Mass Change Request folder as my currently active folder.)
Sub HRMCR()
Public Sub OpenPublishedForm()
Dim Items As Outlook.Items (It's saying compile error. User-defined type not defined.)
Dim Item As Object
Set Items = Application.ActiveExplorer.CurrentFolder.Items
Set Item = Items.Add("ipm.note.TEST ONLY - DO NOT USE - HR Mass Change Request")
Item.Display End Sub
End Sub
Diane Poremsky says
you are using it in Excel? You need to identify the outlook items as belonging to outlook.
In Excel VBA, from the Tools\References menu select Microsoft Outlook Object Library- if that doesn't fix the error, you'll need to set the app, then reference it. That is a few more lines of code.
Dim myOlApp As Outlook.Application
Dim Items As Outlook.Items
Dim Item As Outlook.MailItem
Set myOlApp = CreateObject("Outlook.Application")
Set Items = myOlApp .ActiveExplorer.CurrentFolder.Items
Set Item = Items.Add("ipm.note.TEST ONLY - DO NOT USE - HR Mass Change Request")
' do whatever
Set Item = Nothing
Set MyOlApp = Nothing
Kathy Genakos says
I've never created or used an Excel macro. I copy/pasted the code from the above mentioned article by clicking Excel's Macro icon in the workbook that has my Excel Form, giving the macro a name (i.e. HRMCR) and clicking the Create button. I got an err msg: the following features cannot be saved in macro-free workbooks: VB Project. To save a file with these features, click No, and then choose a macro-enabled file type in the file type list. To continue saving as a macro-free workbook, click Yes.
Diane Poremsky says
In the file type dropdown on the Save dialog, there is a listed for macro enabled workbook - the file extension ends in xlsm. (That macro will need tweaked to work from excel.)
Kathy Genakos says
If I save my custom form to the Organizational Forms Library, should it still have a .oft extension? If not, what extension would it be automatically set to?
Diane Poremsky says
if you publish to the orgs form library, it will be a published form - an IPM.Note.formname - not a template file (.oft).
Kathy Genakos says
Sorry about the double-post on my last reply. My screen hadn't refreshed so I couldn't be sure my first attempt worked. I have another question... In Outlook/Options/Advanced/Developers "Custom Forms" button which launches the Option Window, What does the checkbox to "Allow forms that bypass Outlook" enable? Still trying to figure out how to get my Excel hyperlink to launch my custom email form so I'm looking for anything that might get me to that end.
Diane Poremsky says
To open published forms, you need to use a macro - see https://www.slipstick.com/outlook/hyperlink-templates/ for details - the custom form macro is near the end of the article. You'd load the form using Set Item = Items.Add("ipm.note.formname") - calling it from excel means you need an excel macro, not a simple hyperlink. A Template (.oft) saved to the hard drive can be opened using a file path.
Kathy Genakos says
I'm wondering if you know what the underlying file path is when accessing the IPM.Note."display name" from Outlook/New Items/More Items/Choose Form/"Look in": Personal Forms Library/No Category Name/No Subcategory Name Also, is IPM.Note the correct message class for a custom email message? (I created my custom email message based on our company's standard email message).
Diane Poremsky says
IPM.Note is used for all email - custom forms would be IPM.note.thename.
Custom forms are published to the mailbox or sever, they are not accessible using a file path. The Personal Forms library is a hidden item in the root folder of your mailbox or default pst file. You need to use the Custom forms dialog or a macro to open them.
Kathy Genakos says
Thanks so much for your prompt response! I'll ask my company's IT people to look into why it it's saving to my C-drive as a .tmp vs. a .oft
Diane Poremsky says
you may have temp files saved since it uses Word as the base for the editor, but i'm shocked they open - it should error when you try to open them.
Kathy Genakos says
Diane, I have a hyperlink in Excel form setup to launch my custom form. I'm still developing the custom form so it's saved to my Personal Library. Everytime I make a change, a new .tmp file is saved which I then have to rename to .msg to associate the Outlook.exe and then update the hyperlink in the Excel form. THEN...I have to close Outlook in order for the hyperlink to open Outlook and auto-display my custom form. Any suggestions for eliminating all this manual effort?
Diane Poremsky says
Something doesn't sound right. You should be linking directly to the published form or template - updating the version # with each save. File format will be .oft if you are saving to the hard drive).
Kathy Genakos says
I'm trying to post a question for Diane. I have MS Office Professional Plus 2010 with Outlook v14. I am teaching myself how to create a custom message form in Outlook. It is currently saved to my Personal Forms Library (while developing). When I make a change and publish then save, a new .tmp file is created and the ending of the IPM.Note.xxx has numbers added (e.g. 000, 001). I have a hyperlink in an Excel form that launches the custom msg form because I chg the .tmp to .msg and associate the Outlook.exe file. I have to edit the hyperlink info in Excel after I save/publish a change to the custom mgs form. Is that only happening because I'm using my Personal Library? Also, because I'm associating the Outlook.exe file, the Excel hyperlink is launching Outlook and then automatically defaults to the custom msg form. Is ther some other way I should be able to open the custom msg form within an already open instance of Outlook? Finally, how can I have the "From" field auto-populated with each various sender's default email address?
Diane Poremsky says
What is the url to the temp file?
Tina Barker says
I have created a form in developer asigned it to my calendar, what i would like is the information on the form to be included in the at a glace calendar view is this possiable ?
Diane Poremsky says
Custom fields on the to-do bar calendar? No, that is not possible with the calendar. you can customize the Tasks section (or peek in 2013) - right click on the field names, choose View settings or Customize from the bottom of the menu.
Jeremy Diaz says
Hey Diane! Hope your holidays were good. I never heard back from you after I sent you our email template. At the same time, I'm not sure the template has anything to do with it though. Like I said in the email it could be a blank template and still do the same thing. I wonder if you polled your other exchange 2013 admins if they were seeing the same thing.
Diane Poremsky says
Sorry, this got list in a long list of comments. :( When i changed the form to HTML format (it was RTF) it stays as HTML when its published to the folder or saved as a template. I'm not sure why its not working "as expected" for you. Oh wait, i used Outlook 2013. I'll need to test it on Outlook 2007 to see if its something funky with Outlook 2007.
Nikolay says
I am trying to create a form in Outlook, which collects data from fields and is then inserted in the message body and To field.
For example
Name: Nikolay
Email: nikolay.test@test.com
Date of call: 11.01.14
Message body: Hello Nikolay, Thank you for contacting us on 11.01.14. We will get back to you as soon as possible.
Is there a specific way to capture the fields with VBA code and generate predefined message with the data?
Diane Poremsky says
If you use VBA, you need to use input boxes. You can use custom fields in the form. If you are trying to make a while you were out form, i have two you can build from - Outlook custom forms samples
rani says
Outlook 2010-I have a custom form for contacts with 5 'checkbox' fields. When viewing the contacts in a list view, all but one field display a box with a checkmark inside. But one displays 'On' in the column instead of the checkbox. I've double checked all of the properties for these fields but must be missing something. What an I doing wrong?
Diane Poremsky says
In the field that is linked to the control, what type of field formatting are you using? (Control's Properties dialog, Value tab.) I can't repro it and don't recall seeing that happen before.
Gurmeet says
hello. I have designed a form in "message" and published in personal Form Library. Now when I am sending the message even to myself, I am not able to see p2 (Pages designed) and the same problems are being faced by my colleagues, I have "checked" the "Display this page" and "separate read layout". Please help
Darren Baker says
Hi Diane
I have read all the posts above which has helped me a lot, i have one question
i have placed a message field in my custom form, that also picks up the users email signature, how do i get the form to reset when i publish, as at the moment i have several signatures in it, when i have been testing >
Jeremy Diaz says
I feel like it has something to do with Exchange 2013. I just found out one of our other offices has the same problem. Maybe there is a setting that we don't have correctly or maybe it's done like that for a reason.
Diane Poremsky says
Can you send me the form as an OFT and I'll take a look at it. diane at slipstick.
Jeremy Diaz says
I'm only using text. It's basically just an email template with blank spaces to fill in.
Diane Poremsky says
Text is one of the things that cause it. I'll check on a script that converts it to html upon opening.
Jeremy Diaz says
Sorry Diane, I didn't see it in the list. Okay, no worries. If I can provide any other details let me know. Have a nice day!
Diane Poremsky says
Not a problem. I'm sure others wonder the same thing. :)
Jeremy Diaz says
I'm wondering why my question wasn't approved. I noticed it was pending and not it's gone.
Diane Poremsky says
it's still here, i just haven't had time to reply to it yet. Comments that need replies are usually left pending until i reply, others are approved daily unless they are spam. i usually reply to the easy answers first and save the more complicated questions for when i have more time.
Jeremy Diaz says
Diane,
I am having a problem with forms defaulting to Rich Text even though I create them and publish them using an HTML outlook window. It says HTML on top top bar when I'm creating it, but after I publish it into the Organizational forms library and then open it from there it opens as rich text. Do you know how I can fix this? Running Outlook 2007 and Exchange 2013. Thanks for your help!
Diane Poremsky says
when forms are published and contain elements, they are converted to rtf. As far as I know, the only way to change it is with a script in the form to convert it back to html, unless you want to eliminate all TNEF data, but this can break other features, like voting and may affect meeting requests.
Jon Biddell says
Yes, all set appropriately.
Resolved the issue, but I don't know WHY, by renaming the user's network profile, adding the ForceFormReload key and THEN rebooting.
Waiting for the next one so I can do some more diagnostics...
Jon Biddell says
Weird Outlook forms issue - hoping some of the gurus present might know of a fix.
We run a mix of 2003/2007 (do NOT get me started !!) and on SOME machines Forms will not work. You select the form from Tools->Forms->Choose a Form, it gets copied to the FORMS folder locally, and then you get an error that it can't be opened.
Deleted the FORMS folder, etc - makes no difference.
Compared working and non-working machines for perms, etc - no difference.
Tearing out what little hair I have left.
Diane Poremsky says
Forms should work on either version unless they have some weird controls not supported by the other versions. Are scripts enabled in the folders - Tools, Trust Center, Email Security?
Jeroen says
I have the seem issue... Each bugfix results in 2 or more errors on other places in my code... :-(
Diane Poremsky says
That might qualify you to work for Microsoft. :)
Wendy says
Hi Diane,
I am creating an Outlook form to have anyone be able to fill out with in the email and send back. Version is 2013. I see the form then email it and it only shows my signature and not the form itself. I tried separate read layout and it does nothing. It is a fill in the blank and drop down menu type of form. Why is this so complicated? I tried even creating the drop down word and putting it with in the email but when you send it the ability to use the drop down goes away. Help! This would be a great tool to have and I want it. I am so close yet so far away.
Maria Michael says
Hi Diane. I've created a simple form in Outook 2007, unchecked the 'seperate read layout'box and it works if you've got 2007 installed but on 2003 none of the form displays. Could help please?
Deanna says
Hi, I'm having some issues with a custom meeting form (Outlook 2013) and am unsure if it is even the best solution. It has 4 checkboxes and 2 textboxes; 1 chkbox generates a msgbox to remind users of which conf rm to use and the other chkboxes add recipients to the meeting. These internal users need to see the chkbox values so that they know if they are to supply lunch to guests, etc. but external users do not need to see that info. I can only get code to run if chkbox are not bound to fields, which causes chkboxes to be blank for recipients. Recipients also get a msg that not all objects are loaded to prevent malicious code. I'm assuming this is a publishing issue and am unsure how to publish to entire org in 2013, but realize that I cannot publish this to external users who may be copied on mtg.
So my question is, what can be done to allow external users to not get that msgbox/only see standard meeting form? I know there are many issues listed, but at the most basic level just am curious if a custom form is best solution to this issue.
Kris says
Hello, I have created a large custom form, but it has so many fields, that I would like to break it up into two different task lists. Is there a way to have: Form 1 (with a ton of fields, say 1-200) and then to have two task lists that display those fields) Task List 1 (fields 1-100) and Task List 2 (fields 101-200) -- I really want all of my info on the one form, but want to track dates, etc on the Task Lists. Clear as mud? What a mess! Thank you for your help!!
Diane Poremsky says
You can have 2 views for the task list, each with different fields visible.
petee says
Yes, checkbox is used as control name. And because field names are used in validation formulas, also as field name.
Looks like I found workaround. I copied control from P.1 to P.2. Also field of this control was copied and value of this field changes on both pages at the same time.
What is good - right now I can refer to this field also in validation formula on P.2. So I broke some boundaries :-)
Finally I set control on P.2 as not visible and now my validation formula works as a charm.
Regards!
petee says
Hi,
I have a custom form with two pages. I would like to create validation formula for one of my controls. This control should depend on it's own state/value and on value of other control which is located on other page.
It seems that controls only from current page are available (or I don't know how to refer to control located on other page).
Example:
P.1 -> Control "text"
P2. -> Control "checkbox"
Validation formula for checkbox - text must be set to "male", then checkbox must be ticked:
[text][/text] = "male" AND [checkbox] = true
But there is an error: Error in validation formula for "checkbox" -- unknown field.
Is it possible to use controls from different pages for validation formula?
Regards!
Diane Poremsky says
is checkbox the name of the control? I know when you use VBA, you need to use the page name and control name. I'll have to check on validation.
Adam Mitchell says
Hi Diane,
I've been having a very similar issue as many who have been posting.
We are currently using Outlook 2007. All custom forms that I have designed appear blank (as in, none of the fields I defined are there) when I send them to anyone--including myself.
I have unchecked "Separate Read Layout" so I am only designing for one layout. I have checked "Send Form Definition with Item", and I get nothing.
I've made sure all my controls are linked to fields, so that should be ok. I've tried changing the format that the email sends in, and that doesn't seem to do anything either.
What I'm trying to do is create a trouble ticket form that has two combobox controls. One has a list of possible categories a user could be having, the other has a list of different degrees of impact with their issue. I've created the comboboxes fine and they actually look pretty nice :) but they don't appear when I send them to anyone.
Any thoughts?
Thank you very much,
Adam
Jaco says
Dear Diane,
We have an exchange 2010 environment and build a custom form for outlook invites in our functional mailbox. When you open a new invite, you can click on an icon in the Ribbon and fill in the extra fields.
When sent to others in the company, some of them can see this button, but most cannot. Any idea what could be wrong ?
Kind Regards
Diane Poremsky says
Is the form published to the (shared?) mailbox? The users need to have access to the form - either because its published to the organizational forms library or the folder. If they haven't used the form before and they received it by email, they won't have the form installed locally and the default form is used.
Ivan says
Does anyone have problems with the VBS editor in Outlook 2010. I'm finding that characters disappear from my script occasionally and in the same place. If I delete a couple of empty lines other characters then disappear. Simply running my custom Task produces these effects. I then have to reinstate the missing characters then republish the Task. Apart from this my custom form works perfectly.
???????
Diane Poremsky says
I haven't seen reports of this. How many long is the script (# of lines)?
Jason says
I have the same issue. If I change something, a couple random characters will disappear from my code in the VB script editor in Outlook 2010. Then I have to check everything to make sure there are no errors. I know for a fact that these characters were not missing before. My Script is 1046 lines long. I am now keeping a working copy in notepad to see if that helps. This is very annoying and time consuming.
Erum says
Hi Diane,
I made my very first form using your article. It just has a few labels and text boxes. But when i run it ,fill the fields and send it (i have send the form definition check box ON and i dont have a separate Read layout ) , the reciever gets a totally blank message.l Nothing shows - neither the labels nor what i entered in the fields. Any idea what I am ding wrong?
I want to make this form for myself only - to help me compose a certain email and i would be sending out to external people as well
Thanks
Erum.
Diane Poremsky says
You need to check to see if you are designing for both read and compose and if you are using it other people, they need a copy. In Exchange environment, you can use organizational forms library and for others, you need to send the forms definition.
Gabrielle says
Thank you, Diane for all the replies you provide and help. I've referred to your expertise often!
However I now need some help and know that you've replied on this previously, but not completely.
As a busy real estate agent, I need to track dates of transaction closings and that sort of thing. I've created a custom form with custom fields such as "closed on," but need that information to populate either to the calendar or to a task so that I can follow up with previous clients on important dates. I'm definitely not a VBA programmer and haven't a clue how to accomplish this. Can this be done at all?
Thank you!!
Diane Poremsky says
I would do something like this - https://www.slipstick.com/outlook/tasks/create-series-tasks/ if the dates are uniform. If not, a custom form with code behind that creates a new item.
Ivan says
I've cracked it:- The item_open event is a function and is able to return either True or False to Outlook. Thus if the user selects CANCEL at the dialogue stage code can return FALSE and Outlook will not open the task. In the Task Open event I have called a HTA to perfrom the dialgoue with the user. To pass the user data back to the VBS in the task, the HTA writes to a local file then the HTA closes. The VBS in the Task continues by reading the data in the local file and populates the task with the relevant text.
Paul Lehman says
Great information/resource here!
Diane - I would like to know if a customized contact form can be tied to a category. Simply looking to use a contact form that has additional fields specifically for client contacts.
Can the custom form be triggered by a category?
Thanks!
Diane Poremsky says
You mean, if you assign a category to a contact, can Outlook automatically use a specific custom form? No... but you might be able to use VBA to set it. Use the change message class when saved macro with an if statement. If the form name matches the category name, it would be automatic and just one or two lines needed.
Try something like NewMC = IPM.Contact & Item.Categories in that macro. You would be limited to one category per contact. And I'd add error trap for categories that don't have matching forms.
Brandon says
I have now checked the box on the properties page that says "send form definitions." However, when I tried to email the form, the text boxes and controls still did not show up in either my sent items or in the recipient's inbox. Any other ideas?
Thanks
Diane Poremsky says
Are you using one send/read page or separate pages? It's under the Page command in Forms Designer. It looks like default is to use separate pages (i could have sworn the default was not to use separate pages, that why i didn't mention it earlier.)
Brandon says
Diane - I am attempting to make a custom email form that can be sent from and to different Outlook users. I made the form, which basically includes a several fields (date, job#, work center, etc) that are to be filled in by the sender. Once I send the message, the recipient is not able to see the fields. What am I doing wrong?
Diane Poremsky says
You need to include form definitions when you send it to people who don't have the form published on their computer. It's an option on the properties page of the form in forms designer.
Ivan says
As my first venture into VBscript programming I decided to create a custom Task in Outlook 2010. My PC resides on a very large network. It seemed quite easy, I followed your guide and quickly had a rough custom task up and running but with flaws. Basically I wanted to open a new task, have a dialogue with the user then populate the task with some fixed information, the info changes depending upon the dialogue. Things became tricky when I tried to catch all the variations a user might enter in an input box e.g. Opens Task but then decides to cancel rather than progress the action. I have used the Item_Open event to drive the process and I have muddled through and learned quite well but ideally would like to prevent the Custom task being displayed if the user 'cancels' at the InputBox (dialogue) stage and thus the task is not created. After several hard hours on the web I still don't have a solution. To make things easier (read as harder)I initially developed my input routine in a standalone.VBS file and used WScript.Quit at the relevent point in the routine. All worked perfectly till I merged my populate task routine with the revised input routine i.e. I added code to my simple custom Outlook task. The WScript.Quit did not work, everywhere on the web people suggest using this and possibly it maybe because of the security policies related to my PC. Anyway I worked round that by adding a flag in my code to indicate the user had clicked cancel. The last issue is to close the pending Custom task i.e. destroy it before it shows. I've tried all variations of Item.Close, CurrentTask.Close, TaskItem.Close and many many more to no avail. Is there a solution ?
VBScript looked promising initially but soon shows its limitations with regard to user dialogue and the script editor and I guess my inexperience does not help. Thanks
Diane Poremsky says
Well, VBScript has some limitations, it's not as powerful and doesn't support everything. Depending on how you call the task object, you'd use that object - objTask.close or me.close.
akil says
Hi,
I have some questions regarding the using of outlook custom form.
1) when I receive a meeting request or an appointment request, is it possible to automatically switch from the basic outlook calendar form to my calendar custom form ?
2) My custom form has 2 pages. I was wondering how to hide the second page. But it seems that I only need to use the "Separate read layout". Is it correct ?
Thanks for your responses.
Akil.
Diane Poremsky says
1. You can use VBA to force it to use the custom form if the form is set as default but not used on requests. See Change message class as item is saved for more information and a code sample.
Sara says
Hi,
I have a few questions about my custom template that I am creating in Outlook 2010. First, how can I add fields into the message box such as check mark boxes (attachment). Along with that when I use the standard message template, the message field box has stuff written in it that I would like to get rid of but I cannot click around in there at all. My second question is that I tried to use a template that someone in my office had used but even once I edit it to fit my information and send a test email, the email will send to me but will be blank and have the original ladies information written on the bottom of the blank email. Any ideas what I can do?
Thanks!
Diane Poremsky says
When you create templates, start with a blank message, contact etc. You can't add fields to the Notes/Message field.
I'm not sure of the problem with the template you tried to re-use, but the form either needs published to the organizational forms library or you need to send the form definition with it. If you were sending it to yourself and it's bank, are you using separate read and compose pages?
reem says
Thanks Diane very much ,I appreciate your help .
reem says
Thanks ,
But I faced aproblem when I wrote VBA code in outlook ,that I can not access the textbox which i used in custom form to change its value , any idea?
Diane Poremsky says
You need to reference the custom field.
To write:
Item.UserProperties("custom-field-name") = value
To read:
value = Item.UserProperties("custom-field-name")
Carmen says
Hello Diane,
I want to increment the value of textbox everytime the p.2 loads ,
so if i load the page the textbox value will be 1 ,the second time 2 and so on ,and if it possible that the value will be saved after i close the outlook ??
Diane Poremsky says
Do you want it every time the page is opened or the form loads? Item.save should save the changes.
The function I posted a few days ago will increase the value of a field which is displayed in a text box. If you want it to raise on open, use an Item Open function instead.
reem says
I mean when I re-open it from tools-forms-myform
reem says
Thanks alot Diane for your helping
But when I close the form and open it again ,the textbox value return to the initial value which is 1 ,and I do not want this , I want to show the last serial number .
Thanks in advance.
Diane Poremsky says
You need to create a field that is linked to the text box. Right click on the textbox, choose Properties then create a New field -
reem says
yes I did that ,but this will increment the value of textbox everytime i open the same item not the form.
I did a custom form "helpdesk" based on task request form ,when i receive a task from the employee i have to use this form to give this task call no., when I open the form the value of textbox is wrong although i bound it to a field , i want to show the last serial call no. in the textbox then to add 1
Diane Poremsky says
Ah... to increment it for each new form, you need to use VBA in Outlook, not in the form. One method is to call the function Create a serial number from a macro. You'll need to store the count in either a file or registry - it might be possible to store it in a hidden message in the mailbox, but I don't have code samples handy that do that.
reem says
Hi Diane,
THanks very much for your replay, but I do not know how
to do it .
reem says
Hi,
I have designed a custom form , in this form i used a textbox which is used for call number , i need it to increase serially automatically
after i open the form and not to return the initial value.
please help me .
Diane Poremsky says
You'll need to use a script in the form, that reads the value of the field and adds one to it.
Diane Poremsky says
This will increment it by 1 every time you close the form - i had a text box displaying the number and a custom field linked to the text box, with a default value of 1.
Function Item_Close()
Set MyPage = Item.GetInspector.ModifiedFormPages("P.2")
Set MyControl = MyPage.Controls("TextBox1")
MyControl.Value = MyControl.Value +1
MsgBox MyControl.Value
Item.save
End Function
Leslie says
I created a custom form per the instructions and published it to my personal forms library. When I test it and send it off to another account which I have full access permission to or even if sending to myself, the bound fields I added do not show up on the form. I have tried editing a message template and adding a second page to the meeting template. The meeting template (when opened from my computer) after it is sent gives the warning message "To help prevent malicious code from running, one or more objects in this form were not loaded. For more information, contact your administrator" when I try to open the customized second page. I have checked all the settings in the Trust Center. What am I missing here? This seems like such a simple process yet I cannot make it work!
Diane Poremsky says
forms with code or certain objects only run from the template folder, some need to be published. The warning should tell you this. If it didn't, it's possible the admin has something disabled, but i'd try saving it to the template folder or publishing it.
Steven Jones says
Thanks Diane.
Lastly, the custom task seems to be stored in the wrong folder - inbox rather than tasks - how do I put this right?
Diane Poremsky says
did you publish the task form to that folder? Or is it saving there when you create a new task?
Steven Jones says
I had originally published it to "outlook folders". I will try your suggestion - it seems to be working (but so did my original!) Is there a way to put a shortcut to these forms to make them easier to navigate to? With my previous published location, if I was in "tasks" the form appeared on the drop down menu under custom forms.
Diane Poremsky says
You need to use a macro to open custom forms without browsing for them.
See https://www.slipstick.com/outlook/hyperlink-templates/ for the code.
Steven Jones says
Hi,
I made a Outlook 2010 custom task form using vba which generates an email when the task is marked as "completed".
When I try to select the task from the to do list, the task appears as an ordinary task and not my custom one, hence the email is not generated. I have to be in the tasks list to get it to work properly. Any ideas?
Diane Poremsky says
Where is the custom form published? Try publishing it to the personal forms library.
Richard says
Hi,
We have several custom forms designed in Outlook 2000 and 2003. After we switched to Outlook 2010 we started having problems with the custom forms.
Forms are published on an Exchange 2003 server.
Problem 1:
In Outlook 2010 you receive a custom form (designed in Outlook 2000/2003). This looks fine but when you save it as a file (.msg) and later re-open it, you just get a blank email message.
However, when opening the same file in Outlook 2003 you see the custom form with all entered fields again.
We use this as the files are save as an attachment in another program.
Any ideas?
Problem 2:
We have one custom form that also use the form layout on reply or forward.
So I open the form, fill in the required fields and send it to a collegue. He/she goes to work and fills in some more fields and sent the custom form back.
When I receive the form back, the additional fields my collegue entered are empy. Also the default message field is empty.
When my colleague opens the form from sent items, the additional fields are also empty.
Sometimes Outlook just crashed when sending this form. The form contained some piece of VB code but that is already disabled.
We don’t use a separate read layout for this form.
The option ‘send form definition’ is enabled.
Any thought about this? These problems did not occur with Outlook 2003.
Diane Poremsky says
If the form is published to the organizational forms library or in each users mailbox, do not use send forms definition - this results in a one-off form and can cause corruption of the forms cache.
Laura says
Yes, I have VBScript (via the Script Editor) - it autopopulates some textboxes, list boxes etc and manipulates others. The custom fields are all showing correctly in the recipients email, but the message is completely blank.
Does the P2 tab have anything to do with it?
Diane Poremsky says
No it should no be the p2 tab. offhand, I'm not sure what is wrong, it sounds like you did everything right. I'm sure we're overlooking something though.
Laura says
Yes, I have code (VBScript using the Script Editor). I have code written for Comboboxes, listBoxes etc. I publish the form, then select the form, fill in the details. All the parts I have added code to are present in the recipients emaail, but the message is completely blank.
Laura says
Hi,
Thanks fo rthe quick reply.
I have tried various things. I have run from the code/design option and I have published to the Personal Forms Library.
I have also created FDM files from the published forms.
I thought sending the form definiotn with the form was not recommended and that the code I have writen would not run?
Diane Poremsky says
You have code behind the form? That only works if the person sending it has the form published.
No, sending forms definition is not recommended, but sometimes is a necessary evil. If you use exchange server, its easier to avoid using it since every has (or should have) access to the form.
Laura says
Hi Diane,
I have created an Custom Form in Outlook 2007. When the form is completed and sent from one user to the next, the Message Field does not retain any of the contents that was added initially.
Only the message page is set to be displayed and the 'Separate Read Layout' is not checked. All the custom fields I have added are displayed ok with the initial content, its just the message that is completely blank.
Please can you advise why this is happening?
Diane Poremsky says
Where is the form published? If you aren't using the organizational forms library in Exchange, you need to send the form definition with the form.
Joseph says
Hello,
Thank you for your helpful guidance! I am trying to recreate the % Complete field with the horizontal and vertical arrows to cycle through the %0 %25 ect. as well as make a status drop down with diffrent selections in it. How do you go about doing this? It would also be great to be able to duplicate the Start date drop down into a calandar.
Thanks for your help!
Diane Poremsky says
Is there a reason your aren't just using the % complete and status fields? You can create linked controls - i don't have any instructions offhand. I'm not sure if there is anything at outlookcode.com.
The date picker is harder - outlook doesn't include one. There may be a custom date control in the Control toolbox - right click on the toolbox window and choose custom controls and browse the list.
Abhay says
Hi
I have saved an email template .ost file in template folder. When I create an email using the template and send it, it gets received correctly. However, I can not trace it back in my Sent Items folder like any other emails.
I want to know where to search for these emails if not in Sent Items.
Cecelia Varela says
Hi Diane,
I created a custom Outlook form and when it is filled in and sent, the receiver cannot see the information that was entered into the fields. Is there something I need to do to display the information entered into the fields from the sender when the receiver reads the email?
Diane Poremsky says
You need to make sure the fields are in the Read page (if using a separate read page). If you are not using Exchange server's organizational forms library, you need to send the forms definition with the form.
Shveta says
Hi Diane,
I designed a form with same Edit Compose Page and Edit Read Page in Outlook 2007. I ran the form, entered some data in the fields and sent to myself for testing. Opening the form from my Inbox does not contain any of the contents that I entered while sending.
Could you please let me know the cause?
Thanks
Shveta
Diane Poremsky says
Is the form published? If not, you need to send form definitions with it. (Properties tab in Forms Designer.)
ron says
Thanks Diane. Still can't get it to work. Can you post the script that I should copy and paste if it's not too much to ask?
Diane Poremsky says
I won't have time to look at this before the weekend. I had misread the comments earlier and for some reason, that you wanted it in the subject. Now I see you want it in the reply header. The easiest way to do that is by writing the header -
objMsg.Body = "-----Original Message-----" & vbcrlf & "From:" & Item.SenderEmail & vbcrlf & _
& "Sent: " & Item.Received & vbCrLf & "Subject: " & Item.Subject & Item.Studyid & _
vbCrLf & item.body
it would be possible to use regex or mid to locate the linefeed end of the header block and insert the field too.
Diane Poremsky says
In that case, you'd use myReply.Subject = myreply.subject & myreply.studyid
ron says
The Study ID is its own field and follows after the subject.
ron says
Yes. Its Outllok 2003 exchange
Diane Poremsky says
You can add code behind the published form that sets the subject.
Without knowning more about where the studyid is, you need to pass it to a string variable then insert that into the subject
strStudyID = ????
Set myReply = Item.Forward
myReply.Subject = strStudyID
ron says
Currently, when the user replies to the form, you only see the following info in the reply-header:
From: Doe, John
Sent: Tuesday, March 26, 2013 1:47 PM
To: Smith, Jane
Subject: asdf
message/body of email.
How to I get a custom form field (e.g Study ID) to show up in the reply header when the recipient replies to the email so it looks like this:
From: Doe, John
Sent: Tuesday, March 26, 2013 1:47 PM
To: Smith, Jane
Subject: asdf
Study ID: Study 123
Diane Poremsky says
You'd need code behind the form. Is this used in an Exchange server environment?
Mark says
Hello Diane. We have a form published on our Exchange 2010 public folder that allows us to book conference rooms on a calendar. The form works well for everyone except one particular user from her specific PC (Outlook 2010). If I log in as her from our Citrix server she does not have an issue with the form. So, the issue seems specific to her PC. The form she gets while logged in from her PC somehow seems corrupted as it does not behave properly. My guess is that she somehow managed to get a version of the form that everyone else gets from the public folder, but she has a corrupted version of the form save in one of her personal form locations. Do you have any information you can send me that will allow me to identify the corrupted form she might be getting and how to remove it. How can I check the various locations where this form might be saved and remove the corrupted form. Thanks, Mark
Diane Poremsky says
Start with deleting the forms cache. How to delete the forms cache.
Melanie says
It's a custom task request form. I inherited it, so unfortunately I haven't been through the process of setting such a form up from scratch.
Diane Poremsky says
As long as its an internal form, you can add code to send an email on the close event.
Melanie says
Hi Diane,
Can I get Outlook to send me an email notification when someone in my office fills out a form for me? Thanks for your help!
Diane Poremsky says
It would require some code to do that. What type of form?
Kristen says
That did the trick! Thank you for your help!
Kristen says
Hi Diane,
I have made a custom Task form for my users to add and edit Tasks. However, they cannot format the text in the body. The text formatting controls available on the default Task form are disabled in the custom form. How can I make it possible for them to format their body of their Tasks?
Thanks so much in advance! Any help is greatly appreciated.
Diane Poremsky says
What body field did you use? If you add the notes field, you can format the field. It works best if the main page is hidden - otherwise you'll get a message about 2 controls.
Ian S. says
Hi Diane,
We have had a custom TaskItem in a global folder, which has been used on outlook 2003 on XP for some time. We are upgrading to Win7, and I am trying to ensure the forms work with the newer outlook.
We have a Note item that is created, and then a view script which convers it to a task when assigned. Problem is, the custome event handler for item_Open that should run, doesn't seem to be.
But, if I go into the develop mode of that task item before it is saved, and click on run the form, it works as intended. Have you heard of something like this? The script runs an item.Display, and it comes up, but the item_open function doesn't seem to run (to be more clear)
Any assistance would be great, I'm figuring I'll have to go to msdn about this though :S
Thanks!
Diane Poremsky says
What version of Outlook are you using on the new computer? It sounds like macro security is set to low so the macro runs.
Where is the form published?
Is scripting enabled on the folder? This is set in the Trust Center > Email security in newer versions.
Paulette English says
I have four yes/no check boxes in my form. When I check one, they all check. How do I prevent this?
Diane Poremsky says
It sounds like the binding is not correct. https://support.microsoft.com/kb/292789 might help. (The information applies to all versions- not too much has changed with custom forms.) Also see https://msdn.microsoft.com/en-us/library/office/aa203903%28v=office.11%29.aspx.
Matt says
Hi Diane - thanks that (blankness) was also my problem and your solution was spot on.
I'd like the read page to look the same as the form but when I uncheck "Seperate Read Layout" it doesn't seem to happen. If I cant make the form appear on the read page, how do I edit it?
Thanks in advance!.
Diane Poremsky says
What type of email account? Did you test it by sending it to yourself?
Louise says
If I add date fields into a contact form, how do these link with my calendar? I would like to add review dates to my contacts and have these dates place automatically in my Calendar.
Diane Poremsky says
You wouldn't be able to create the appointments unless you use code behind the form. The code will create the appointments for the dates. I have code samples that create the appointments but none that pick up the date from the custom field.
jim says
How can you add a URL field in a Outlook Custom Contact form?
I have been googling everything. Is this even possible? Just a simple field for a url other than the default Webpage field. I am at a complete loss and a little embarrassed that i can't figure it out. Thanks for any help!
Diane Poremsky says
you can use a text field but the url is not clickable. You'd need to use a rtf control - I thought there was one but didn't see it. I'll look again.
johnorcutt says
Sue:
I am a lawyer. I need to send email confirmations to clients of upcoming appointments.
Can I use custom "message" forms for this purpose? I am using Outlook 2007. I ask because I read something where you indicated that custom forms could only be sent to "internal" users. I need to send these emails to "external" users. If I can't use custom forms for the purpose, what do you suggest? The only thing I can think of is to cut and paste the message into each new email on a standard email form, and then edit the form to put in the correct date and time for the appointment, which seems archaic to me. Thanks so much. John Orcutt
Diane Poremsky says
You can use custom forms (or templates) to create the messages since you only need it for composing. A plain email would be sent to the person.
You can use VBA to pull information from an appointment and put it into a message. I have one example that uses the reminder to kick off a message - Send mail when reminder fires. You can do something like that to create the reminder email rather than relying on reminders to do it for you - select the appointment, run the macro, add notes to the message if needed and send.
I also have VBA that sends reminders to meeting attendees, if you create meetings rather than appointments.
Mike says
Outlook 2007 (SP3), and are experiencing a problem with the Message field. When the form is completed and sent from one user to the next, the Message Field does not retain any of the contents (signature, custom message, etc.) that the author added. Other times, it will retain the information, but will "drop" the contents after the form has been Replied To or Forwarded several times. It is very intermittent. Please let me know if you have any thoughts on what could be causing this. The form design was not changed at all during the conversion from 2003 to 2007, and the problem never existed while using 2003. Thank you.
rumbidzai says
Am having the same problem with Darlette when i send the email the fields are invisible.Any solution to this
Diane Poremsky says
Are you using a separate read layout? (Email forms only) Look on the page command for this option.
Does the other person have the same form published in their Outlook? If not, you need to send the form definition (Properties tab.)
Darlette Drummond says
I have created a custom form in Outlook 2010 and when the form is sent the fields are invisible.
Diane Poremsky says
Did you create both read and compose versions of the page? The default is to have a separate read layout.
